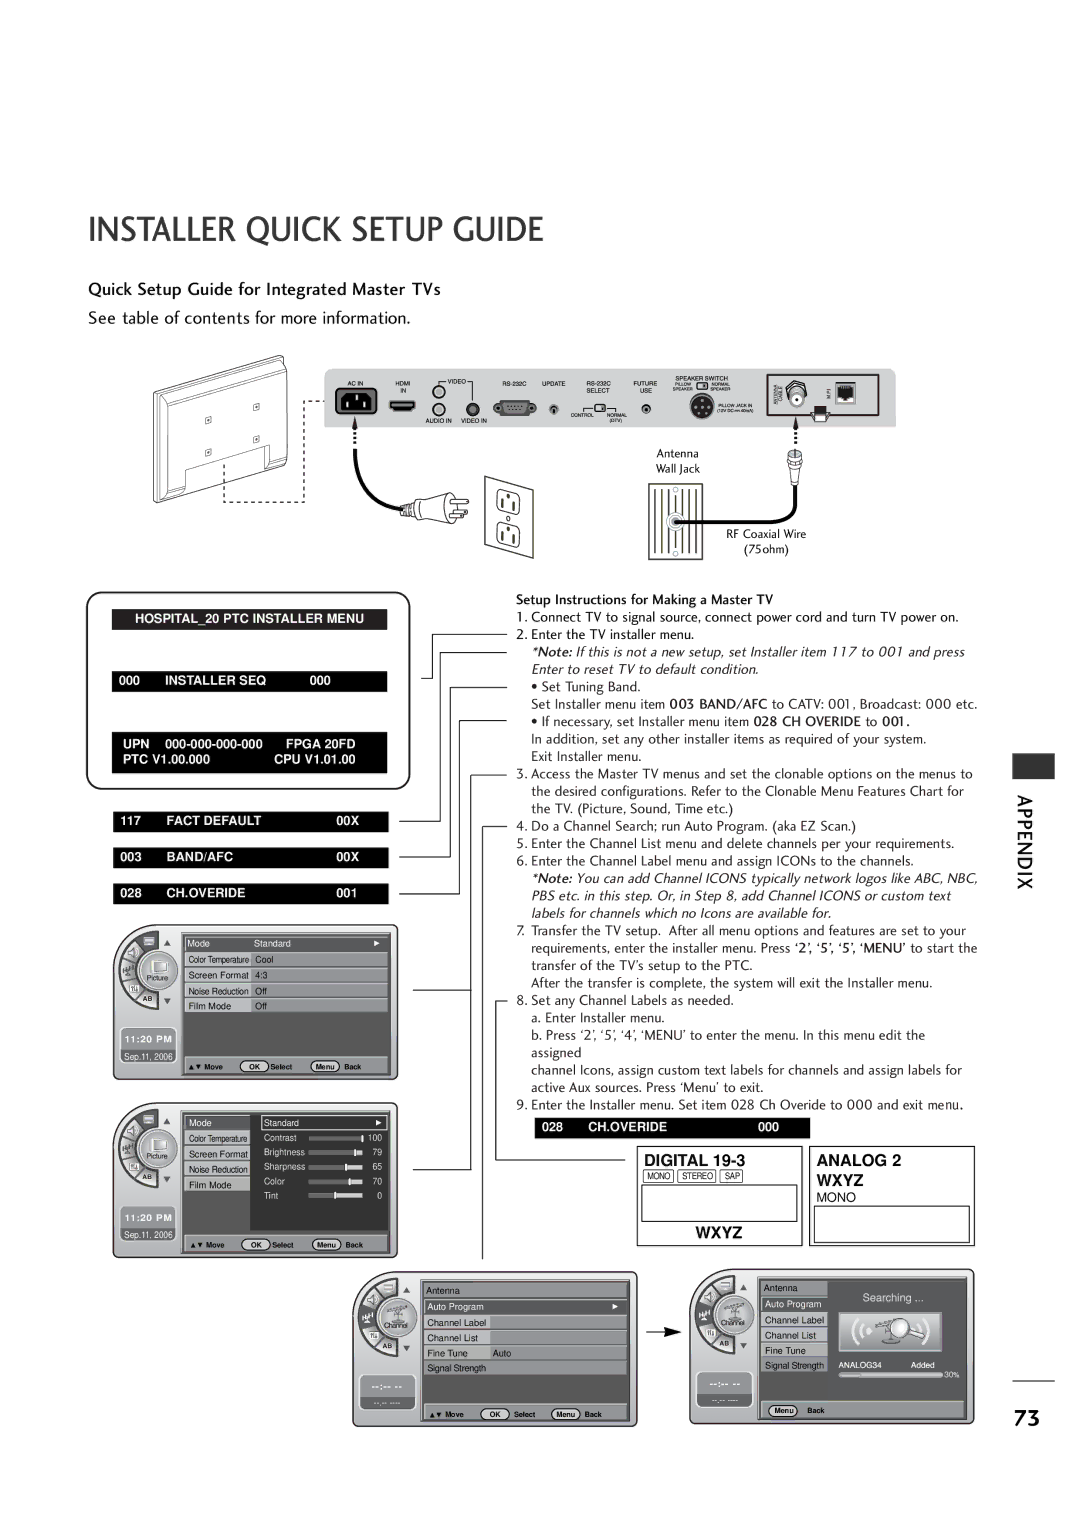
INSTALLER QUICK SETUP GUIDE

Quick Setup Guide for Integrated Master TVs

See table of contents for more information.

HOSPITAL_20 PTC INSTALLER MENU

000

INSTALLER SEQ

000


UPN 000-000-000-000

FPGA 20FD


PTC V1.00.000


CPU V1.01.00


117

FACT DEFAULT

00X


003

BAND/AFC


00X


028

CH.OVERIDE


001


Mode

Standard

G


Color Temperature Cool

Screen Format 4:3

Noise Reduction Off

Film Mode

Off


11:20 PM


Sep.11, 2006


D E Move

OK

Select

Menu

Back

Mode


Standard


G

Color Temperature


Contrast


100

Screen Format


Brightness


79

Noise Reduction


Sharpness


65


Film Mode


Color


70


Tint


0

11:20 PM


Sep.11, 2006


D E Move

OK

Select

Menu

Back

Antenna

Wall Jack

RF Coaxial Wire

(75ohm)

Setup Instructions for Making a Master TV

1.Connect TV to signal source, connect power cord and turn TV power on.

2.Enter the TV installer menu.

*Note: If this is not a new setup, set Installer item 117 to 001 and press Enter to reset TV to default condition.

• Set Tuning Band.

Set Installer menu item 003 BAND/AFC to CATV: 001, Broadcast: 000 etc.

• If necessary, set Installer menu item 028 CH OVERIDE to 001. In addition, set any other installer items as required of your system. Exit Installer menu.

3.Access the Master TV menus and set the clonable options on the menus to the desired configurations. Refer to the Clonable Menu Features Chart for the TV. (Picture, Sound, Time etc.)

4. Do a Channel Search; run Auto Program. (aka EZ Scan.)

5.Enter the Channel List menu and delete channels per your requirements.

6.Enter the Channel Label menu and assign ICONs to the channels.

*Note: You can add Channel ICONS typically network logos like ABC, NBC, PBS etc. in this step. Or, in Step 8, add Channel ICONS or custom text labels for channels which no Icons are available for.

7.Transfer the TV setup. After all menu options and features are set to your requirements, enter the installer menu. Press ‘2’, ‘5’, ‘5’, ‘MENU’ to start the transfer of the TV’s setup to the PTC.

After the transfer is complete, the system will exit the Installer menu.

8.Set any Channel Labels as needed.

a.Enter Installer menu.

b.Press ‘2’, ‘5’, ‘4’, ‘MENU’ to enter the menu. In this menu edit the assigned

channel Icons, assign custom text labels for channels and assign labels for active Aux sources. Press ‘Menu’ to exit.

9.Enter the Installer menu. Set item 028 Ch Overide to 000 and exit menu.

028 CH.OVERIDE000

DIGITAL 19-3

ANALOG 2

MONO STEREO SAP

WXYZ


MONO

WXYZ


APPENDIX

--:-- --

--.-- ----

Antenna

Auto Program


G


Channel Label


Channel List


Fine Tune

Auto


Signal Strength


D E Move

OK Select

Menu Back

--:-- --

--.-- ----

Antenna

Auto Program

Channel Label

Channel List

Fine Tune

Signal Strength

Menu Back

73

Page 73
Image 73
LG Electronics 20LH1DC1 manual Installer Quick Setup Guide, 1120 PM

20LH1DC1 specifications

The LG Electronics 20LH1DC1 is a well-regarded model in the realm of compact display technology, showcasing an array of robust features and advanced technologies that cater to both personal and professional needs. This model stands out for its balance between size, performance, and functionality, making it an excellent choice for various applications, whether for educational environments, gaming, or media consumption.

A key feature of the LG 20LH1DC1 is its high-definition display, offering vivid colors and sharp images that enhance viewing experiences. With a resolution that typically supports HD 1366x768 pixels, users can expect clear visuals that bring content to life. The panel technology employed in this model contributes to enhanced color accuracy and contrast ratio, making it suitable for diverse content types, from movies to presentations.

The design of the 20LH1DC1 is another noteworthy characteristic. Featuring slim bezels and a lightweight form factor, it allows for easy placement in a variety of settings. This portable profile is ideal for use in smaller spaces where traditional displays may be cumbersome. Additionally, the adjustable stand enables users to set the monitor at an optimal viewing angle.

Connectivity options are ample in the LG 20LH1DC1, accommodating a range of devices. It typically includes multiple HDMI ports, VGA, and audio inputs, allowing users to connect laptops, PCs, and other multimedia devices easily. This versatility ensures that the monitor can serve as a central hub for multiple sources of content.

Another significant aspect of the LG 20LH1DC1 is its energy efficiency. Designed with sustainability in mind, this model often complies with energy-saving standards, reducing consumption and minimizing environmental impact. Features such as auto power-off help conserve energy during periods of inactivity, making it an environmentally friendly option.

In conclusion, the LG Electronics 20LH1DC1 combines advanced display technology, versatile connectivity, and an efficient design to create a well-rounded monitor ideal for various applications. Its compact size does not detract from its performance, offering users a reliable choice for their display needs, whether at home, in the office, or in educational settings.