LCD TV / LED LCD TV / Plasma TV
DSW400BG
Separate purchase
Contents
Contents
This item is not included for all models Polishing Cloth
Accessories
Batteries Remote Control
M4 x M4 x 24 M4 x M4x16 Bolts for stand assembly
Emitter Only 42/47LX6
Front Panel Controls
Preparation
Speaker
Surrounding conditions
Power/Standby Indicator
Only 42/47/55LE8
Only 32/37/42LE4
This feature is not available in all countries
Connect an Hdmi signal to Hdmi IN. Or DVI
Video signal to HDMI/DVI port with DVI to
This port is used for Service or Hotel mode
Back of the TV
Stand Installation
On a cushioned surface to protect
Cover with the TV
Swivel Stand
Attaching the TV to a Desk
Mounted on the wall
When moving the TV undo the cords first
Kensington Security System
If your TV has bolts in the eyebolts, loosen then bolts
55LE7 400 42/47LE8 200 55LE8 42/47LX6
Earthing
32LE4 200 37/42LE4 32LE5 37/42/47LE5 55LE5 400
200 100
External input mode rotate in regular sequence
Switches the TV on from standby or off to standby
You can turn the light of the remote control button
When connecting AV devices. p.66
Displays the programme table. p.55
Subtitle Recalls your preferred subtitle in digital mode
Selects a programme
Selects numbered items in a menu
Installing Batteries
Remote Control KEY Functions Only 42/47LX6
List
Installing Batteries
Protection cover
Power Cord
Batteries
32/42LD7
Only 32/37/42/47/55LD6
Only 32/42/47LD7
Option menu
Only 32/37/42LD8
Only 32/37/42LD4
Preparation Speaker
Back Panel Information
Fit the Cable Management Clip as shown
Open the Cable Management Clip as
Do not use the Cable Management Clip to lift the TV
Attaching the TV to a
Not Using the DESK-TYPE Stand
System
37/42/47LD6
32LD4
37/42LD4
32LD6
Remote Control KEY Functions
Opens an empty space on the screen keyboard
Installing Batteries
Nero MediaHome
LED LCD TV Models 47/55LX9 Accessories
Bolts for stand assembly Cable Holder
AAA
Front Panel Controls
Back Panel Information
Stand Rear Cover
Fix the 4 bolts securely using the holes
Stand Body on
Cover with the TV
Product to the wall as shown in the picture
55LX9
47LX9
Only 47/55LX98
To 9 number
Installing Batteries
Cable Management Clip Batteries Remote Control
LED LCD TV Models 42/47LE73 Accessories
Nero MediaHome Cable Holder
Front Panel Controls
4 5
To lift the TV
Install the Cable Management Clip as
Equipment Setup section
Ment, see the External Equipment Setup
Kensington Security System
42/47LE73 200
Remote Control KEY Functions
List
Installing Batteries
Fingerprints on the surface
Cover 3D Glasses Only 50/60PX9
Cable
Lightly wipe any stains or
Touch Button
Only 50/60PK5
Only 50/60PK7***, 50/60PK9***, 50/60PX9
Back Panel Information
Only 50PK5
HOW to Remove the Cable Management Clip
Back Cover for Wire Arrangement
External Equipment Setup section
Not Using the DESK- Type Stand
50PK9
50PK5 400 60PK5
50PK7
60PK7
Only 50/60PK78**, 50/60PK98
Only 50/60PK5**, 50/60PK7***, 50/60PK9
List
Installing Batteries
Remote Control KEY Functions Only 50/60PX9
List
Batteries matching correct polarity +with +,-with
To remove the batteries, perform the installation actions
Ies with new ones
View
Installing Batteries
Page
Antenna Connection
External Equipment Setup
Wall Antenna Socket Outdoor
On DVD player
Connecting with a Component Cable
Component Input ports
Component in Audio jacks on the TV
Top box, DVD, etc. to HDMI/DVI in 1DVI , HDMI/DVI
Connecting with AN Hdmi Cable
Select HDMI1, HDMI2, HDMI3 or HDMI4 Except for
Connecting with AN Hdmi to DVI Cable
AV1
Connecting with a Euro Scart Cable
Connecting with AN RF Cable
USB Setup
Video Game Set
Connecting with AN RCA Cable
Connecting with a D-SUB 15 PIN Cable
Check this point as shown and insert the CI Module
Headphone Setup
To adjust the headphone volume, press
Insertion of a CI Module
Digital Audio OUT Setup
LG Wireless Media Box
External Equipment Wireless Connection
RGB-PC, HDMI/DVI-PC mode HDMI/DVI-DTV mode
Supported Display Resolution
Plasma TV Models
LCD TV Models / LED LCD TV Models
RGB-PC, HDMI/DVI-PC mode
External Equipment Setup
Screen Reset
Screen Setup for PC Mode
Screen
Run Auto Config
Auto Configure RGB PC mode only
Auto configure
Select Auto Config
Select Resolution
Selecting Resolution
Select the desired resolution
Select Position, Size or Phase
Adjustment for screen Position, Size, Phase
Make appropriate adjustments
Router Broadband Modem Broadband Service
Network Setup
Wired Network Connection
Select Network Setting in the Network menu
Select Network Setting
Network Setting
When Selecting IP Manual Setting
External Equipment Setup
External Equipment Setup
Adaptor to the USB in 1 or USB in 2 jack on the TV
Wireless Network Connection
Connect the LG Wireless LAN for Broadband/DLNA
After connecting, you can use the NetCast menu
External Equipment
Wireless Network Setup
External
Repeat -6 on P.24 Connect the access point with PIN
Setup
PIN Personal Identification Number
Repeat -4 on P.24
Select Simple setting WPS-button mode
Select Setting Ad-hoc network
Equipment Setup
Repeat -3 on P.24
Select Network Status
Network Status
Programme Selection
Initializing Setup
Volume Adjustment
Turning on the TV
Programme Control
Quick Menu
Watching TV
Audio or Audio Language Selects the sound output
Watching
On Screen Menus Selection and Adjustment
TV / Programme Control
Lock
Run Auto tuning
Auto Programme Tuning
Select Setup
Select Auto Tuning
Select Cable
Setup -Auto Tuning -Cable -Setting
Select Comhem or Other Operators Select Quick or Full
Watching TV / Programme
When you select the Quick
Control
Select Full Select OK Select Start
When you select the Full
Watching TV / Programme Control
Cable Mode only
Cable DTV Setting
Select Manual Tuning
Manual Programme Tuning
6875
Select Manual Tuning Select Cable DTV
Channel number
Select Setup Select V/UHF or Cable
Commence searching
Select TV or Cable TV Select Fine
Fine Tuning
Assigning a station name
Select TV or Cable TV Select Name
Skipped
Programme Edit
Enter the Programme Edit
Select a programme to be stored or
TV Mode
DTV/RADIO Mode
Selecting favourite programme
Auto Sort
Select your desired programme Display a pop-up window where
Selecting favourite programme group
Select a Favourite group
Booster
Select Setup Select Booster Select On or Off
Save
Information, language, or software download etc Save
CI Common Interface Information
Programme
Select CI Information
Select Software Update
Software Update
Select Customer Support
Simple Update for current update stream
When setting Software Update
TV is restarted when download is completed
Select Yes or No
PICTURE/SOUND Test
Display the information of Channel
Signal Test
RED Select Customer Support Select Signal Test
Software Version
Check the network status
PRODUCT/SERVICE Information
RED Select Customer Support Select Product/Service Info
Network Test
Select Simple Manual
Simple Manual
Select the part of the manual you want to see
Display the Programme List
Selecting the Programme List
Displaying programme List
Selecting a programme in the programme list
Currently selected Group Favourite group is changed
Paging through a programme list
Return to normal TV viewing
Turn the pages
Input List
Blue Select Input Label
Input Label
Select the source Select the label
Select Data Service Select Mheg or Teletext
Data Service
Select Option
TV / Programme
MHP Service
Select MHP Auto start
Display the MHP Application List
When MHP Auto Start is set to On
When MHP Auto Start is set to Off
RED Display the MHP
Display the Simplink Select On or Off Save
Simplink
HDMI/DVI in 3 or Hdmi in 4 Except for
Connecting to Home Theater with the Simplink logo
Simplink Functions
Simplink Menu
Game Optimizes video and audio for playing games
AV Mode
Select Factory Reset
Initializingreset to Original Factory Settings
Check Legal notice
Legal Notice
Netcast
Select Legal Notice
Important Notice Relating to Network Services
Enjoy the AccuWeather, Picasa or YouTube
Netcast Menu
Accu Weather YouTube Picasa
Select Netcast menu option
YouTube menu
Youtube
Videos list
YouTube Service menu
AccuWeather menu
Accuweather
Weather list by city
Photos list
Remote control
Picasa
Picasa menu
Picasa Service menu
Precautions when using the Bluetooth
BLUETOOTH?
To USE a Bluetooth
USE a Bluetooth
Setting the Bluetooth
Select Bluetooth Select Bluetooth on
Connecting a new Bluetooth headset
Bluetooth Headset
Select Bluetooth Select Search headset
Select Bluetooth
Connecting to Bluetooth headset already registered
To USE
Disconnecting the Bluetooth headset during use
Select Bluetooth Select Disconnect
Disconnect the Bluetooth headset
When requesting to connect to TV from the Bluetooth headset
Select Bluetooth RED Select Remove device
Remove the Bluetooth Device
Select Delete Remove the Bluetooth device
Select Setup TV PIN or Setup TV name
MY Bluetooth Information
Select My Info
Receiving Photos from External Bluetooth Device
Listening to bluetooth music
Listening to the Musics from External Bluetooth Device
3D Imaging
3D Technology
Analog TV, 3D Imaging does not work
7 m
When Using 3D Glasses
When the viewing distance is 2 m
3D Imaging Viewing Range
Select 3D video or 2D video
Watching 3D Imaging
Select the screen with 3D video with better visibility
Select Left/Right or Right/Left
Select USB Device
When Connecting a USB Device
Select Movie List, Photo List or
Music List
To USE a USB or PC Device
Precautions when using the USB device
Dlna
To USE a USB or PC Device
Button
Installation is not possible without this agreement
Click the Exit button to complete the installation
Click Next to go to the next step
Sharing files and folders
Playing back shared contents
Max bitrate of playable movie file is 20 Mbps
Movie List
Supported DivX file
USB or PC Device
You can also adjust USB in the Input menu
Screen Components
To USE a
Movie Selection
Using the remote control
When playing movie files
Blue Convert to Mark Mode
100
When selected movie files are played
Mark all movie files on the screen
Blue Exit the Mark Mode
101
Play the selected movie file
102
Using the Movie List function, play
Or Show the Option menu
103
104
When you select the Set Video Play
LCD TV/LED LCD TV only
When you select the Set Video
Select Picture Mode or TruMotion
105
Select Sound Mode, Auto Volume, Clear Voice II or Balance
When you select the Set Audio
106
107
Photo List
108
When playing photo files
Convert to Mark Mode
Photo Selection
RED Marked photo file is displayed
When selected photo files are displayed
109
Select the target folder or drive
Display the selected photo file
110
Yellow Deselect all marked photo files
111
How to view photo
Option, Hide or Exit
112
Option Set values for Slide Speed and BGM
Slideshow
113
Using the Photo List function
114
When you select the Set Photo View
Select Slide Speed or BGM
115
116
117
Music List
Select Music List
Use the P button to navigate up/down in the music
When playing music files
Music Selection
118
119
When selected music files are played
Yellow Deselect all marked music files
120
Display the selected music file
Mark all music files on the screen
121
Using the Music List function, play
122
123
When you select the Set Audio Play
Select Repeat or Random
124
125
126
Divx Registration Code
Display DivX Reg. Code
127
Deactivation
Display Deactivation
Game
Allows you to enjoy the games installed on the TV
Game
128
Guide
EPG Electronic Programme in Digital Mode
129
Shows current programme information
Select a programme
Switch on/off EPG
Button Function in NOW/NEXT Guide Mode
EPG Electronic Programme Guide in Digital Mode
131
Button Function in 8 Day Guide Mode
132
Button Function in Date Change Mode
133
Button Function in Record/Remind Setting Mode
Blue or
Button Function in Schedule List Mode
Switch off Schedule List
134
135
Picture Size Aspect Ratio Control
Cinema Zoom
136
149
Zoom
137
Picture Wizard
Minimum , Medium
Energy Saving
138 LCD TV/LED LCD TV only Plasma TV only
Select Energy Saving
Vivid
Preset Picture Settings
Picture Mode-Preset
139
140
Picture Mode-User option
Manual Picture Adjustment
141
142
143
Picture Improvement Technology
Select Advanced Control
Expert Picture Control
Select your desired Source Make appropriate adjustments
144
145
Expert Control EBU/SMPTE/BT709/ Wide/Standard Edge Enhancer
146
Colour Gamut
LCD TV/LED LCD TV
147
Picture Reset
Select Picture Reset
Initialize the adjusted value
148
Trumotion
Select TruMotion Select Low, High, User or Off
149
LED Local Dimming
Select LED Local Dimming
150
Power Indicator
Power Light
Select Power Indicator Select Standby Light or Power Light
Orbiter
Image Sticking Minimization ISM Method
151
White Wash
Select Mode Setting Select Store Demo or Home Use
Mode Setting
152
Select On
Demo Mode
Select Mode Setting Select Store Demo
153
Sound & Language Control
Auto Volume Leveler
Select Auto Volume
154
Select Clear Voice
Adjustment for Clear Voice Level With selecting On
Clear Voice
155
Select Audio You can also adjust Sound Mode in the Q
Preset Sound SETTINGS-SOUND Mode
156
157
Sound Setting Adjustment -USER Mode
Select Sound Mode
Infinite Sound
Balance
Select Audio Select Balance Make desired adjustment
158
159
TV Speakers ON/ OFF Setup
Select TV Speaker
Select Auto, HE-AAC, Dolby Digital +, Dolby
DTV Audio Setting in Digital Mode only
Select DTV Audio Setting
160
Select Auto or PCM
Selecting Digital Audio OUT
161
Select Digital Audio Out
Select Audio Select Reset
Audio Reset
162
Select Disability Assistance
Audio Description in Digital Mode only
Adjustment for Audio Description Volume With selecting On
163
Mono sound selection
164
Select Audio or Audio Language
Select the sound output
Nicam Dual I+II or FM Mono
165
166
ON-SCREEN Menu Language / Country Selection
Select LanguageLanguage Select Menu Language
Select Hard of Hearing
Language Selection
167
Select LanguageLanguage
Subtitle Language Selection
168
Audio Language Selection
Select an audio language
Select Time
Clock Setup
Time Setting
169
Select Off Time or On Time
Auto ON/OFF Time Setting
Setting
170
171
Sleep Timer Setting
Select Lock System
SET Password & Lock System
172
Parental Control / Ratings
Select Block Programme Enter the Block Programme
Block Programme
173
Select Lock
174
Parental Control in Digital Mode only
Select Parental Guidance
Select input source Select On or Off
External Input Blocking
175
Select Lock System Select Input Block
176
KEY Lock
177
Switch ON/OFF
This feature is not available in all countries
Simple Text
Block / group / page selection
TOP Text
Fastext
178
179
Special Teletext Functions
This function works in UK, Ireland only
Teletext Within Digital Service
Teletext in Digital Service
180
Appendix
Troubleshooting
181
Hdmi
182
Appendix
Extended Absence
Maintenance
Cleaning the Screen
Cleaning the Cabinet
37LE5
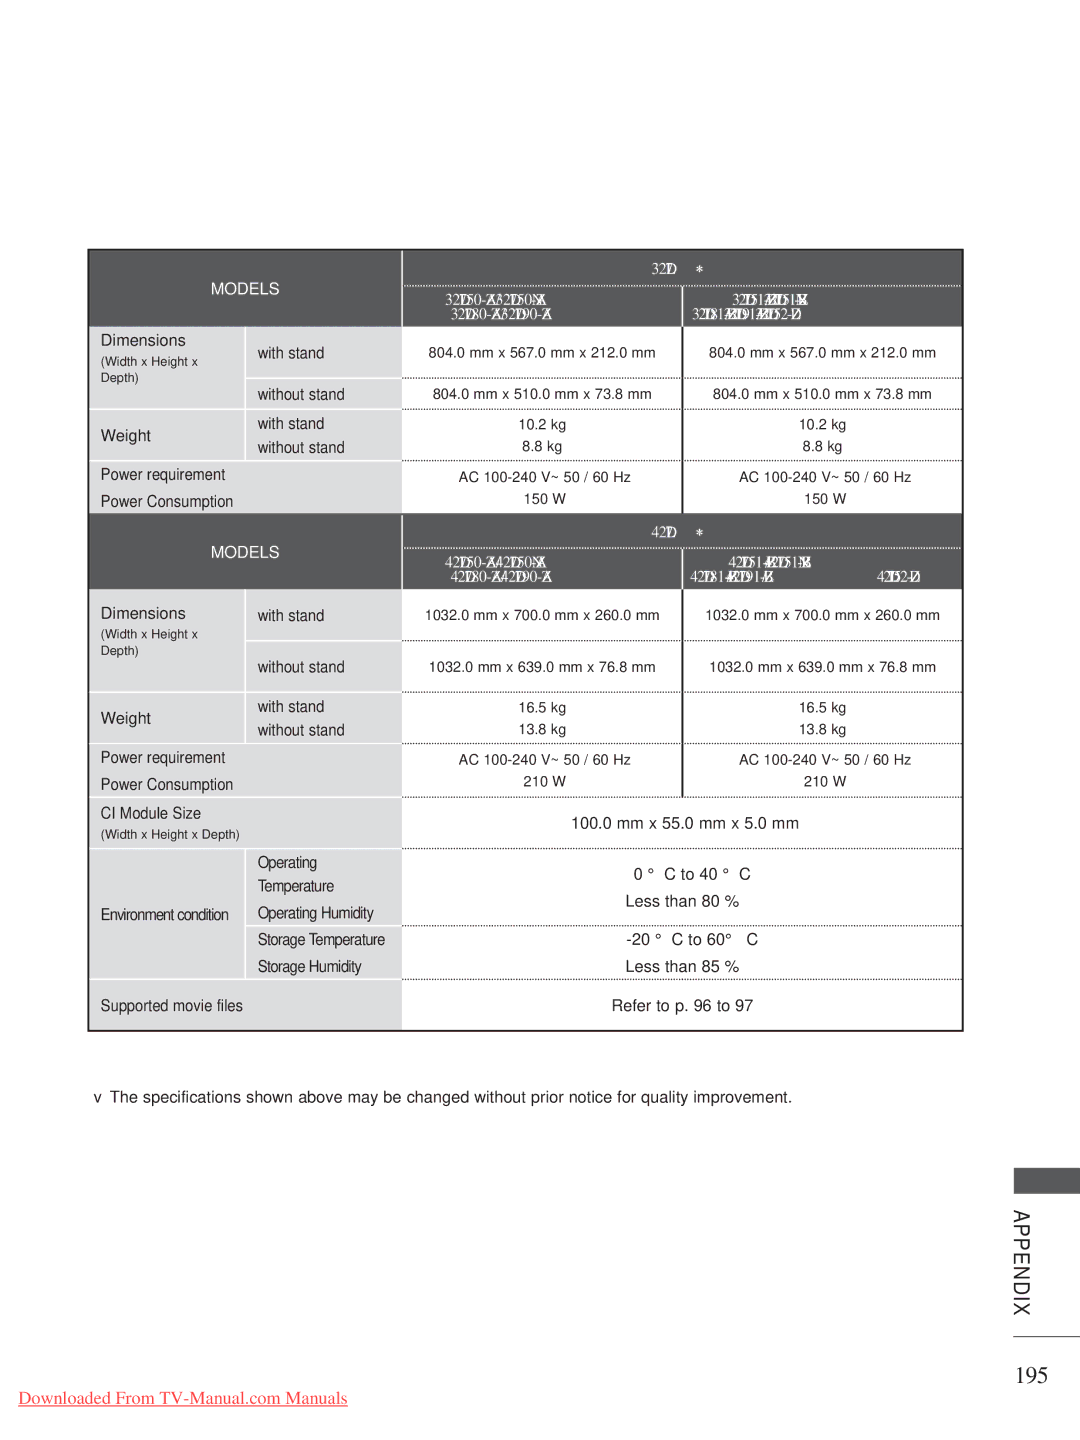
Product Specifications
184
32LE5
42LE5
185
47LE5
55LE5
186
42LX6 47LX6
32LE7
187
37LE7
42LE7 42LE7500-ZA 42LE7510-ZB 42LE7300-ZA
188
47LE7
55LE7
189
47LX9 55LX9
42LE8
190
47LE8
42LD4
191
55LE8
32LD4 37LD4
32LD6
192
37LD6
42LD6
193
47LD6
42LE4
194
55LD6
32LE4 37LE4
32LD7
195
42LD7
47LD7
196
32LD8
197
37LD8
42LD8
198
50PK5 60PK5 50PK590-ZE 60PK590-ZE
199
50PX9 60PX9
200
201
IR Codes
Code Hexa Function
RS-232C Configurations
External Control Device Setup
RS-232C Setup
Type of Connector D-Sub 9-Pin Male
203
Set ID
Select Option Select Set ID
Communication Parameters
Command Reference List
204
205
Power Command k a
206
Tint Command k j
207
ISM Method Command j p Plasma TV only
208
KeyCommand m c
209
Open Source Software Notice
210
211
Open Source License
Version 2, June
212
213
214
215
GNU Lesser General Public License
216
217
218
219
220
Mozilla Public License
221
222
223
10. U.S. Government END Users
224
Model Serial No