Installation and Configuration

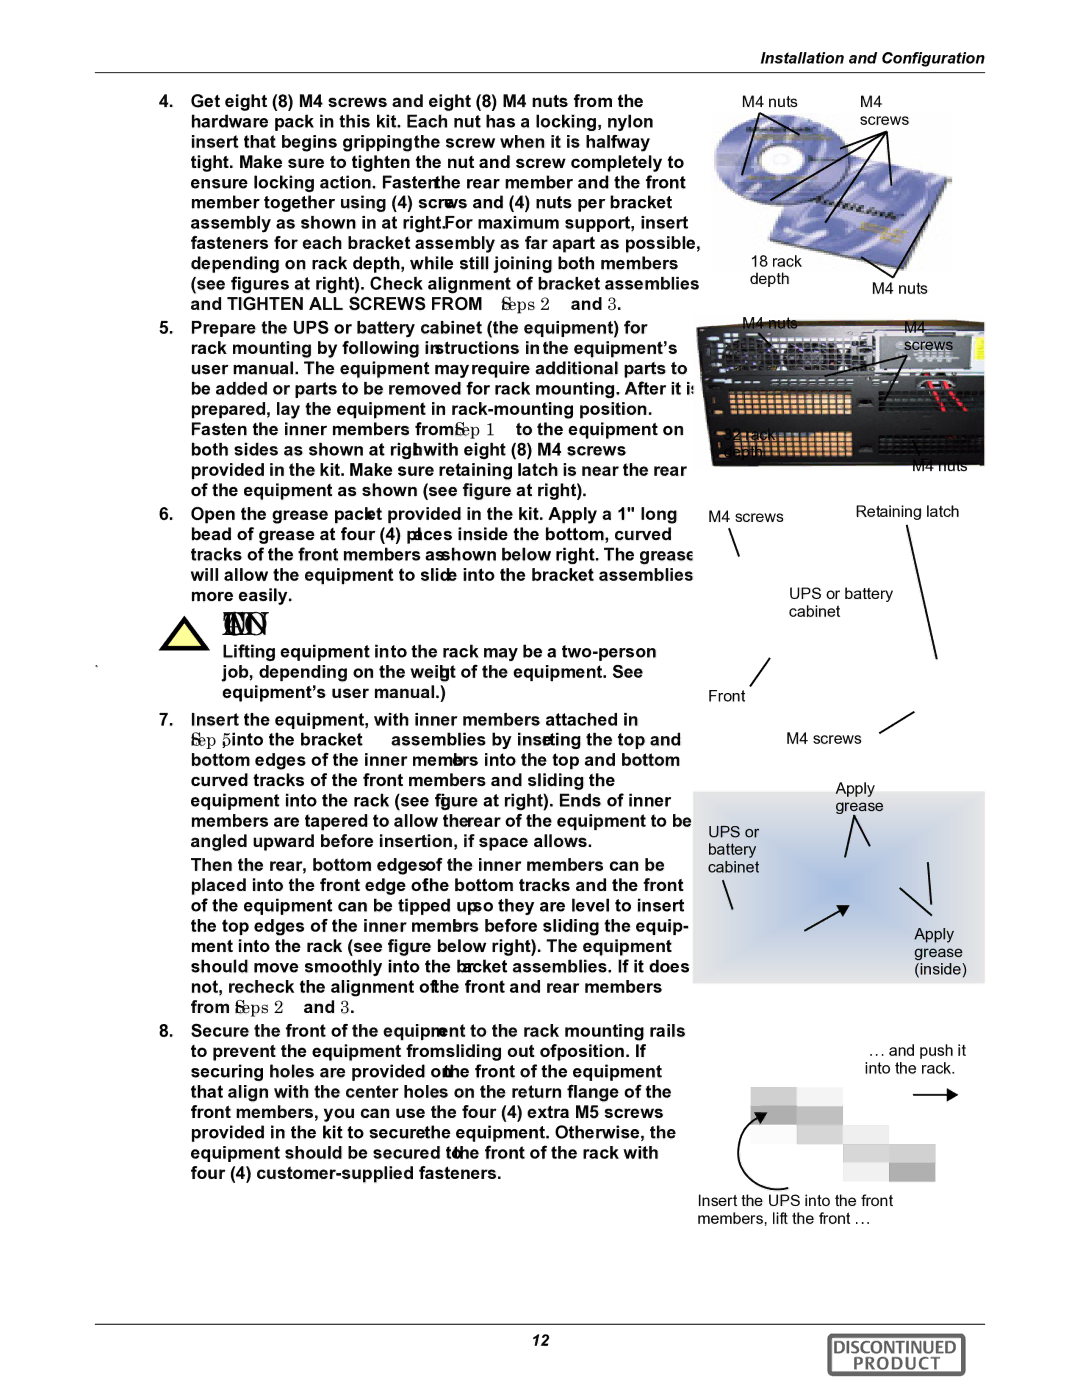
4.Get eight (8) M4 screws and eight (8) M4 nuts from the hardware pack in this kit. Each nut has a locking, nylon insert that begins gripping the screw when it is halfway tight. Make sure to tighten the nut and screw completely to ensure locking action. Fasten the rear member and the front member together using (4) screws and (4) nuts per bracket assembly as shown in at right. For maximum support, insert fasteners for each bracket assembly as far apart as possible, depending on rack depth, while still joining both members (see figures at right). Check alignment of bracket assemblies and TIGHTEN ALL SCREWS FROM Steps 2 and 3.

5.Prepare the UPS or battery cabinet (the “equipment”) for rack mounting by following instructions in the equipment’s user manual. The equipment may require additional parts to be added or parts to be removed for rack mounting. After it is prepared, lay the equipment in rack-mounting position. Fasten the inner members from Step 1 to the equipment on both sides as shown at right with eight (8) M4 screws provided in the kit. Make sure retaining latch is near the rear of the equipment as shown (see figure at right).

6.Open the grease packet provided in the kit. Apply a 1" long bead of grease at four (4) places inside the bottom, curved tracks of the front members as shown below right. The grease will allow the equipment to slide into the bracket assemblies more easily.

! CAUTION

Lifting equipment into the rack may be a two-person

6.job, depending on the weight of the equipment. See equipment’s user manual.)

7.Insert the equipment, with inner members attached in Step 5, into the bracket assemblies by inserting the top and bottom edges of the inner members into the top and bottom curved tracks of the front members and sliding the equipment into the rack (see figure at right). Ends of inner members are tapered to allow the rear of the equipment to be angled upward before insertion, if space allows.

Then the rear, bottom edges of the inner members can be placed into the front edge of the bottom tracks and the front of the equipment can be tipped up so they are level to insert the top edges of the inner members before sliding the equip- ment into the rack (see figure below right). The equipment should move smoothly into the bracket assemblies. If it does not, recheck the alignment of the front and rear members from Steps 2 and 3.

8.Secure the front of the equipment to the rack mounting rails to prevent the equipment from sliding out of position. If securing holes are provided on the front of the equipment that align with the center holes on the return flange of the front members, you can use the four (4) extra M5 screws provided in the kit to secure the equipment. Otherwise, the equipment should be secured to the front of the rack with four (4) customer-supplied fasteners.

M4 nuts

M4


screws

18" rack


depth

M4 nuts


M4 nuts

M4


screws

32" rack depth

M4 nuts

M4 screws

Retaining latch

UPS or battery cabinet

Front

M4 screws

Apply grease

UPS or battery cabinet

Apply grease (inside)

... and push it into the rack.

Insert the UPS into the front

members, lift the front ...

12

DISCONTINUED


PRODUCT

Page 18
Image 18
Liebert GXT2-10000RT208 user manual Rack Depth M4 nuts

GXT2-10000RT208 specifications

The Liebert GXT2-10000RT208 is a highly sophisticated uninterruptible power supply (UPS) designed to deliver reliable power protection for critical IT infrastructure and business operations. With a power capacity of 10,000 VA, this UPS ensures the continuous operation of essential devices, safeguarding them from potential damage caused by power interruptions, surges, or sags.

One of the standout features of the Liebert GXT2-10000RT208 is its online double conversion technology. This technology provides a consistent, high-quality power output by converting incoming AC power to DC and then back to AC. This process eliminates voltage fluctuations and offers a stable energy supply, ensuring that connected equipment operates smoothly, regardless of the condition of the utility power.

The UPS is designed to support a wide range of applications, making it an ideal choice for data centers, telecommunications setups, and other critical environments. Its advanced microprocessor control ensures precise monitoring and regulation of power conditions. The Liebert GXT2-10000RT208 also features an impressive input voltage range, which is beneficial in areas where power quality is inconsistent.

Equipped with an LCD display, users can easily access vital information regarding the UPS’s operational status, battery health, and power protection levels. This user-friendly interface simplifies monitoring and management, allowing for quick assessments and troubleshooting.

Another key characteristic of the Liebert GXT2-10000RT208 is its modular design. This allows for easy installation and maintenance, as well as the opportunity to expand the power capacity by adding external battery cabinets. This scalability ensures that businesses can adapt their power protection solutions to meet evolving needs without significant changes to their existing setups.

The UPS also includes advanced battery management features that optimize battery lifespan and performance. The Liebert GXT2-10000RT208 employs intelligent charging algorithms and battery testing functions to ensure reliable performance when needed most. Furthermore, support for various communication protocols enhances compatibility with other management systems, enabling seamless integration into existing infrastructure.

In summary, the Liebert GXT2-10000RT208 is a powerful and versatile UPS solution that combines advanced technology with robust features. Its online double conversion technology, extensive monitoring capabilities, and scalable design make it an excellent choice for organizations seeking reliable protection for their critical systems. With the GXT2-10000RT208, businesses can operate confidently, knowing their power supply is secure from unexpected disruptions.