Installation & Operation Manual

4 Sidewall direct venting (continued)

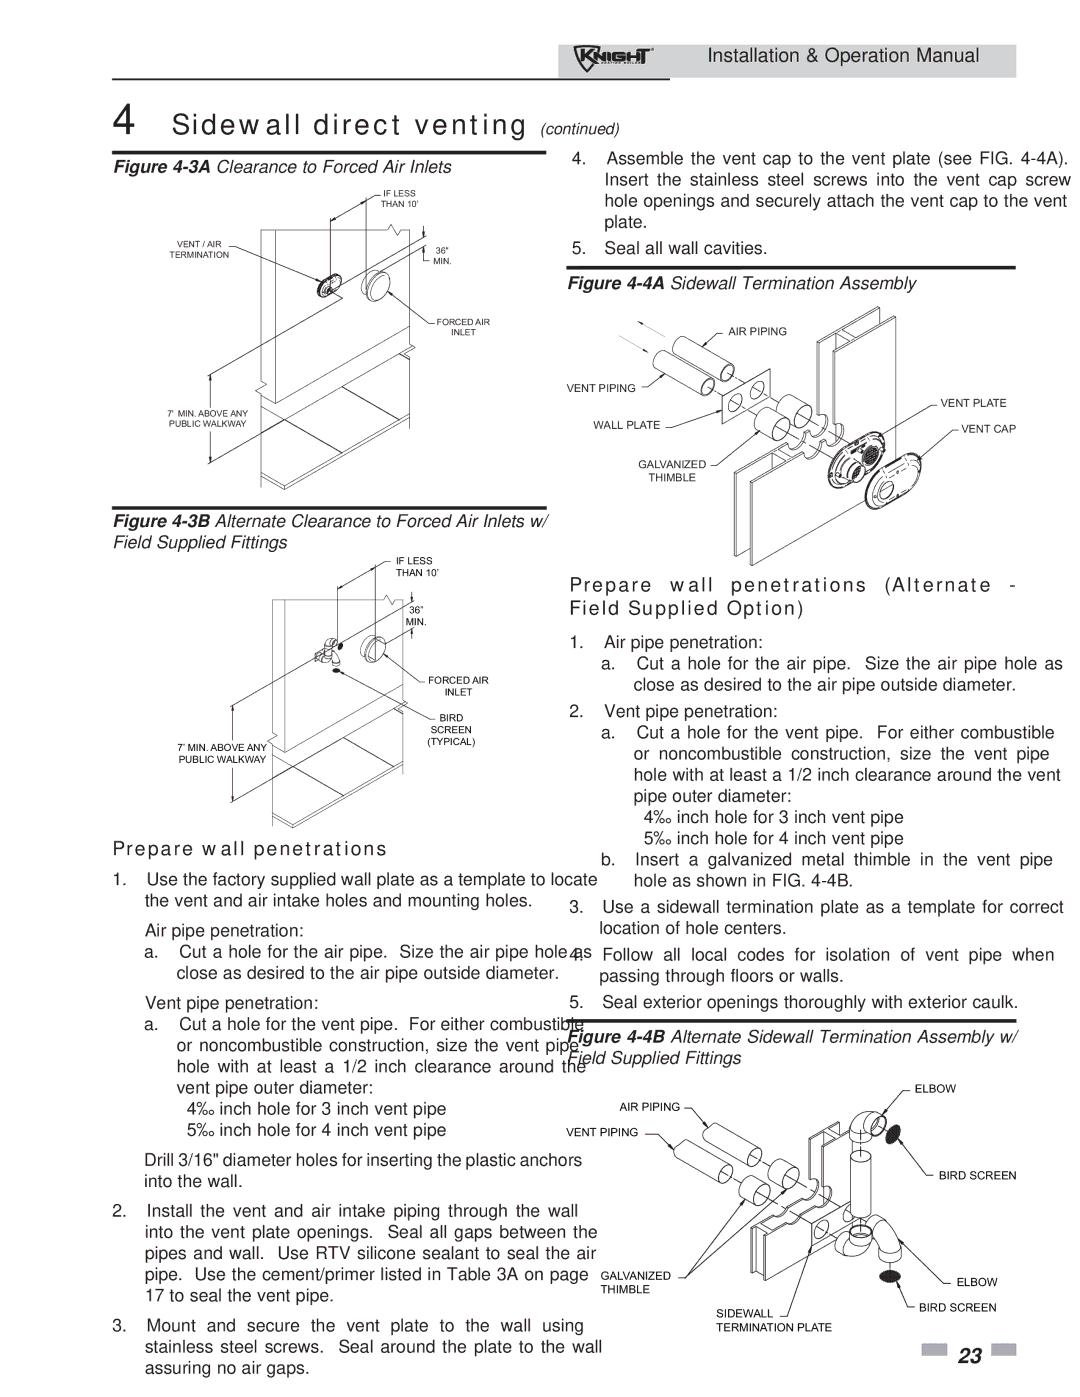
Figure 4-3AClearance to Forced Air Inlets

IF LESS

THAN 10’

VENT / AIR

36"

TERMINATION

MIN.


4.Assemble the vent cap to the vent plate (see FIG. 4-4A). Insert the stainless steel screws into the vent cap screw hole openings and securely attach the vent cap to the vent plate.

5.Seal all wall cavities.

Figure 4-4ASidewall Termination Assembly

FORCED AIR

INLET

7' MIN. ABOVE ANY PUBLIC WALKWAY

Figure 4-3BAlternate Clearance to Forced Air Inlets w/ Field Supplied Fittings

AIR PIPING

VENT PIPING

WALL PLATE

GALVANIZED

THIMBLE

VENT PLATE

VENT CAP

7’ MIN. ABOVE ANY PUBLIC WALKWAY

IF LESS

THAN 10’

36”

MIN.

FORCED AIR

INLET

BIRD

SCREEN

(TYPICAL)

Prepare wall penetrations (Alternate - Field Supplied Option)

1.

Air pipe penetration:


a. Cut a hole for the air pipe. Size the air pipe hole as


close as desired to the air pipe outside diameter.

2.

Vent pipe penetration:


a. Cut a hole for the vent pipe. For either combustible


or noncombustible construction, size the vent pipe


hole with at least a 1/2 inch clearance around the vent


pipe outer diameter:


• 4½ inch hole for 3 inch vent pipe

Prepare wall penetrations

1.Use the factory supplied wall plate as a template to locate the vent and air intake holes and mounting holes.

Air pipe penetration:

a.Cut a hole for the air pipe. Size the air pipe hole as close as desired to the air pipe outside diameter.

Vent pipe penetration:

a.Cut a hole for the vent pipe. For either combustible or noncombustible construction, size the vent pipe hole with at least a 1/2 inch clearance around the vent pipe outer diameter:

4½ inch hole for 3 inch vent pipe

5½ inch hole for 4 inch vent pipe

Drill 3/16" diameter holes for inserting the plastic anchors into the wall.

2.Install the vent and air intake piping through the wall into the vent plate openings. Seal all gaps between the pipes and wall. Use RTV silicone sealant to seal the air pipe. Use the cement/primer listed in Table 3A on page 17 to seal the vent pipe.

3.Mount and secure the vent plate to the wall using stainless steel screws. Seal around the plate to the wall assuring no air gaps.


• 5½ inch hole for 4 inch vent pipe


b. Insert a galvanized metal thimble in the vent pipe


hole as shown in FIG. 4-4B.

3.

Use a sidewall termination plate as a template for correct


location of hole centers.

4.

Follow all local codes for isolation of vent pipe when


passing through floors or walls.

5.

Seal exterior openings thoroughly with exterior caulk.

Figure 4-4BAlternate Sidewall Termination Assembly w/ Field Supplied Fittings

ELBOW

AIR PIPING

VENT PIPING

BIRD SCREEN

GALVANIZED


ELBOW

THIMBLE


SIDEWALL

BIRD SCREEN


TERMINATION PLATE


23

Page 23
Image 23
Lochinvar 81 - 286 operation manual Prepare wall penetrations Alternate Field Supplied Option

81 - 286 specifications

Lochinvar 81 - 286 is a state-of-the-art boiler recognized for its efficiency and reliability in both residential and commercial applications. This high-performance heating solution is designed to meet the diverse needs of users while adhering to modern environmental standards.

One of the standout features of the Lochinvar 81 - 286 is its advanced condensing technology. This allows the unit to harness more heat from the combustion gases, significantly boosting its thermal efficiency. With an impressive efficiency rating of over 95%, users can expect lower energy bills and reduced carbon emissions, making this boiler an environmentally friendly choice.

The Lochinvar 81 - 286 incorporates a robust stainless steel heat exchanger that guarantees durability and longevity. This corrosion-resistant material not only prolongs the unit's life but also ensures consistent performance over time. Additionally, the heat exchanger’s design facilitates optimal heat transfer, further enhancing the boiler's efficiency.

In terms of control, the Lochinvar 81 - 286 features a user-friendly control interface that simplifies operation. The boiler is equipped with advanced modulation capabilities, allowing it to adjust its output based on real-time heating demands. This responsiveness reduces energy waste and optimizes comfort levels within the space it serves.

The boiler also supports a variety of installation configurations, providing flexibility for different building layouts. Its compact design allows for easy installation in restricted spaces, while versatile venting options facilitate integration into various systems.

Safety is a paramount consideration in the design of the Lochinvar 81 - 286. The unit comes with integrated safety features such as a built-in diagnostic system that alerts users to any potential issues before they escalate. This proactive technology helps in maintaining seamless operation and reducing downtime.

Finally, the Lochinvar 81 - 286 is compliant with the latest regulations and industry standards, ensuring that it meets the expectations of both consumers and environmental agencies. With its impressive combination of efficiency, durability, and advanced technology, the Lochinvar 81 - 286 stands out as a top choice for anyone seeking a high-performance heating solution. This boiler not only addresses the immediate needs of heating but also supports long-term sustainability initiatives, proving to be a wise investment for the future.