Owner’s Safety Manual
Table of contents
Thank you for purchasinga Makita product
Packing
On/Off VO switch
Choke switch
Delivery inventory
Symbok
General precautions
Working with the Power Cut requires high concentration
Fuels/ Refuelling
Fuel vapors
Feet 3 meters
LOOfeet 30 meters
For cutting metal
When guiding the Power Cut by hand, use the side mounting
Kickbackand lock-in
To prevent kickback, observe the following
To prevent lock-in, observe the following
Cutting metals
Transport and storage
Use only original Makita spares and accessories
When calling for help, give the following information
DPC 9500, DPC
Identification plate
Handle Choke
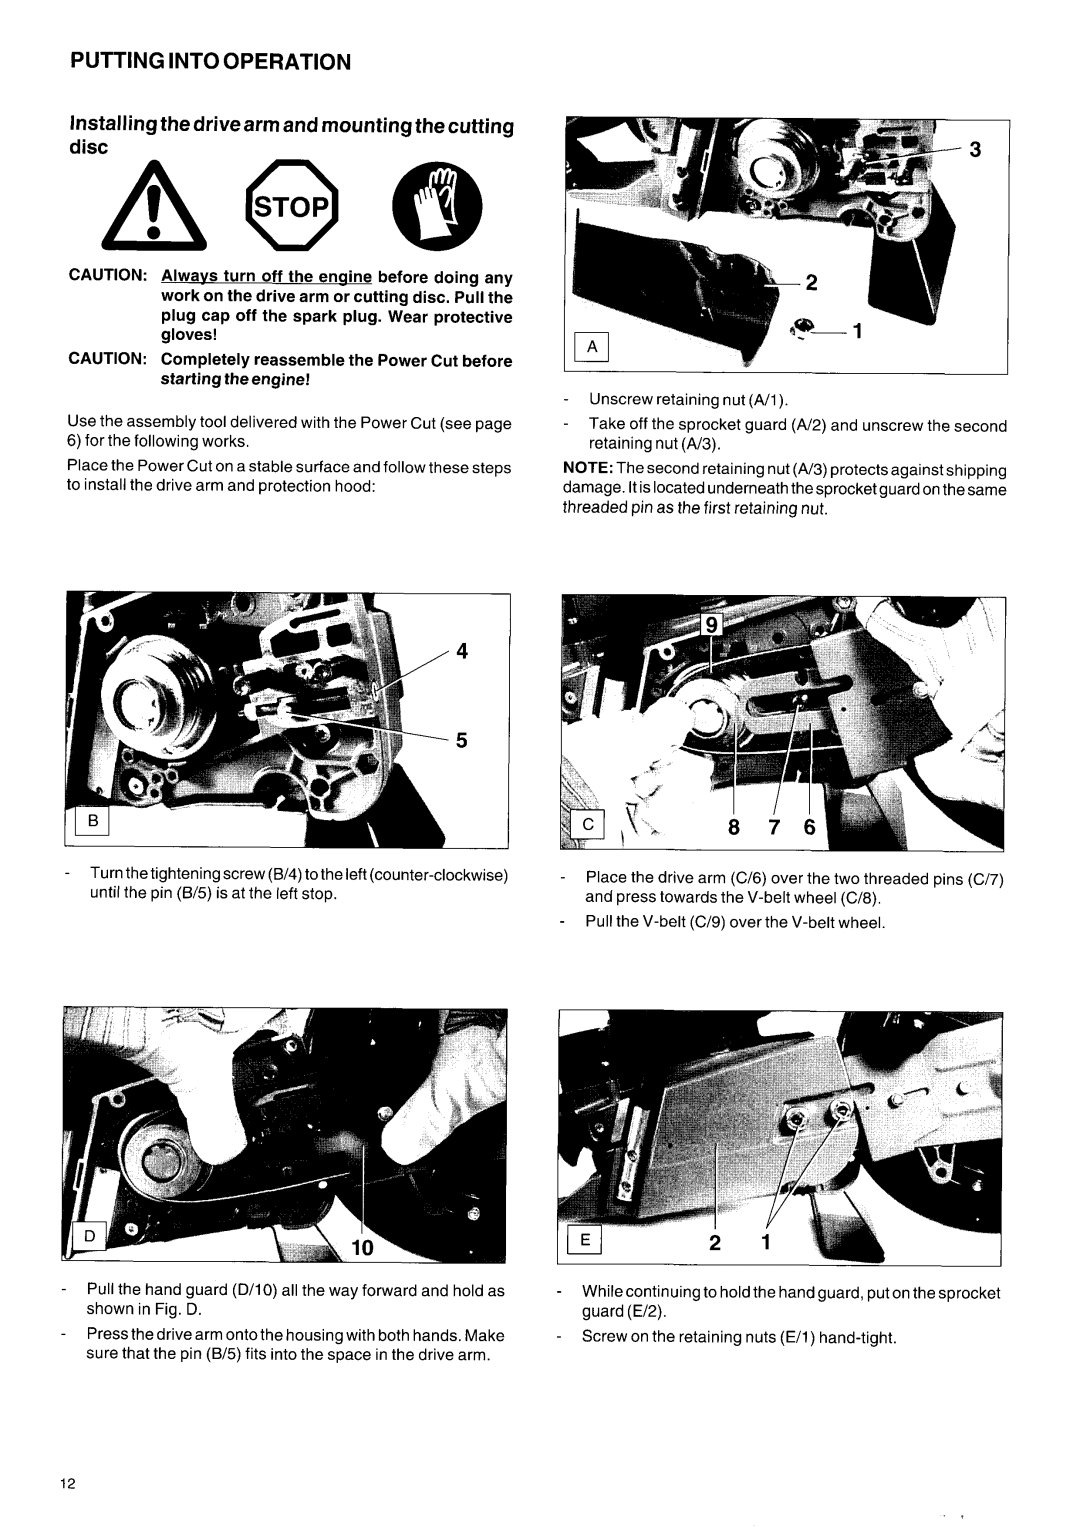
Installingthe drivearm and mountingthe cutting disc
Puttinginto Operation
See Safety INSTRUCTIONS,
Fuels/ Refuelling@
Gasoline I 50l 25l
Correct mixture ratio
Store fuel only in approved and marked containers
Put the short-circuiting switch E/I in position 0STOP
StartingtheengineCold starting
Stoppingtheengine
Refuelling
Adjustingthe carburetor
Switch off the engine. Stop
Running at idling speed, loosen the screw a little
Clockwise direction until it comes to a noticeable stop
Cleaningthe protection hood
ChangingtheV-belt
Cleaning/changing the air filter
Replacingthe spark plug
Drythoroughly
Electrode gap
Wire bent at one end to form a hook
Replacingthe suction head
Replacing the starter cable
Replacing the return spring
Cuttingattachment in central /side position
Dismountthe cutting attachment seel‘changingtheV-belt
13 17 16 15
Remove nuts and screwsfrom segment H/18
Diamondcuttingdiscs
Guidetrolley
Water tank
Maindpressurewater system
Instructionsfor periodic maintenance
Service, spare parts and guarantee
Trouble shootig
Defective
Valve dirty DPC 7001, DPC
Extract from the spare parts list
DPC 7000, DPC DPC 9500, DPC
17 5 18 19 20 21
Service d’atelier, piec Recherche de pannes
Sommaire
Emballage
Reglagedu carbura
Symboles
5 4
Instructions generales
En la matiere ou de la personne chargee de ce travail
Equipement de protection personnel
Produitsde fonctionnement / Remplissagedes reservoirs
100feet 30 metres
=porter I’equipement ’ de protection
Sinon risque de torsion du disque
II faut veiller constamment a avoir une bonne assise sure
Soit libre et que personne ne soit en danger
Et emp6cher la corrosion
Rebond kickback et freinage
Nejamais tronqonner avec le segment montre sur lafigure
ComDortement et techniaue de travail
\ \
Remarque
Maintenance
Premier secours
Respecter les prescriptions de prevoyance contre les
Si vous appelez du secours, veuillez indiquer
Caracteristiquestechniques
Designationdes pieces
DPC 7000, DPC DPC 9500, DPC
Plaque signatique
Mise EN Route
Montage du bras de transmission et de la decou Peuse
Tendre la courroie a @ @
Viseur est a la mBme hauteur que le repere exterieur de
Carburants/ravitaillement63
Carburant I 50l
Realisation du rapport correct du melange
Remplissage des reservoirs
Demarrer le moteur
Qui pourraient y 6tre tombees peuvent deteriorer le
Moteur !Prenez donc soin de porter des v6tements non
Poussiereux et propres, d’utiliser des outils propres et
De travailler a un endroit propre. Ne poser aucun chiffon
Remplacer lacourroie
Ll\
Nettoyer le capot de protection
Remplacementde bougie
Nettoyer/ remplacer le filtre a air
Prefiltre en mousse et filtre interieur
Ecartementdes electrodes
Remplacement de la crepine d’aspiration
Remplacement du cordon de lancement
Remplacementdu ressort de rappel
Debarrassez-vousde Iancienressorten recourantau recyclage
Demonter le dispositif
Disques a decouper en diamant
Le chariot de guidage
Le reservoir deau
La conduite deau au reseau / reservoir
Indications de maintenance et d’entretien periodiques
Maintenanceet reparations
Piecesde rechange
Garantie
Recherche de pannes
Panne
Observation Origine
Extrait de la liste des pieces de rechange
DPC7000, DPC 7001 DPC9500, DPC
23 24
Modele7000,7001
PENNSYLVANlA
Page
Makita U.S.A., Inc Makita Canada Inc