Stabilizing
Leg

Installation

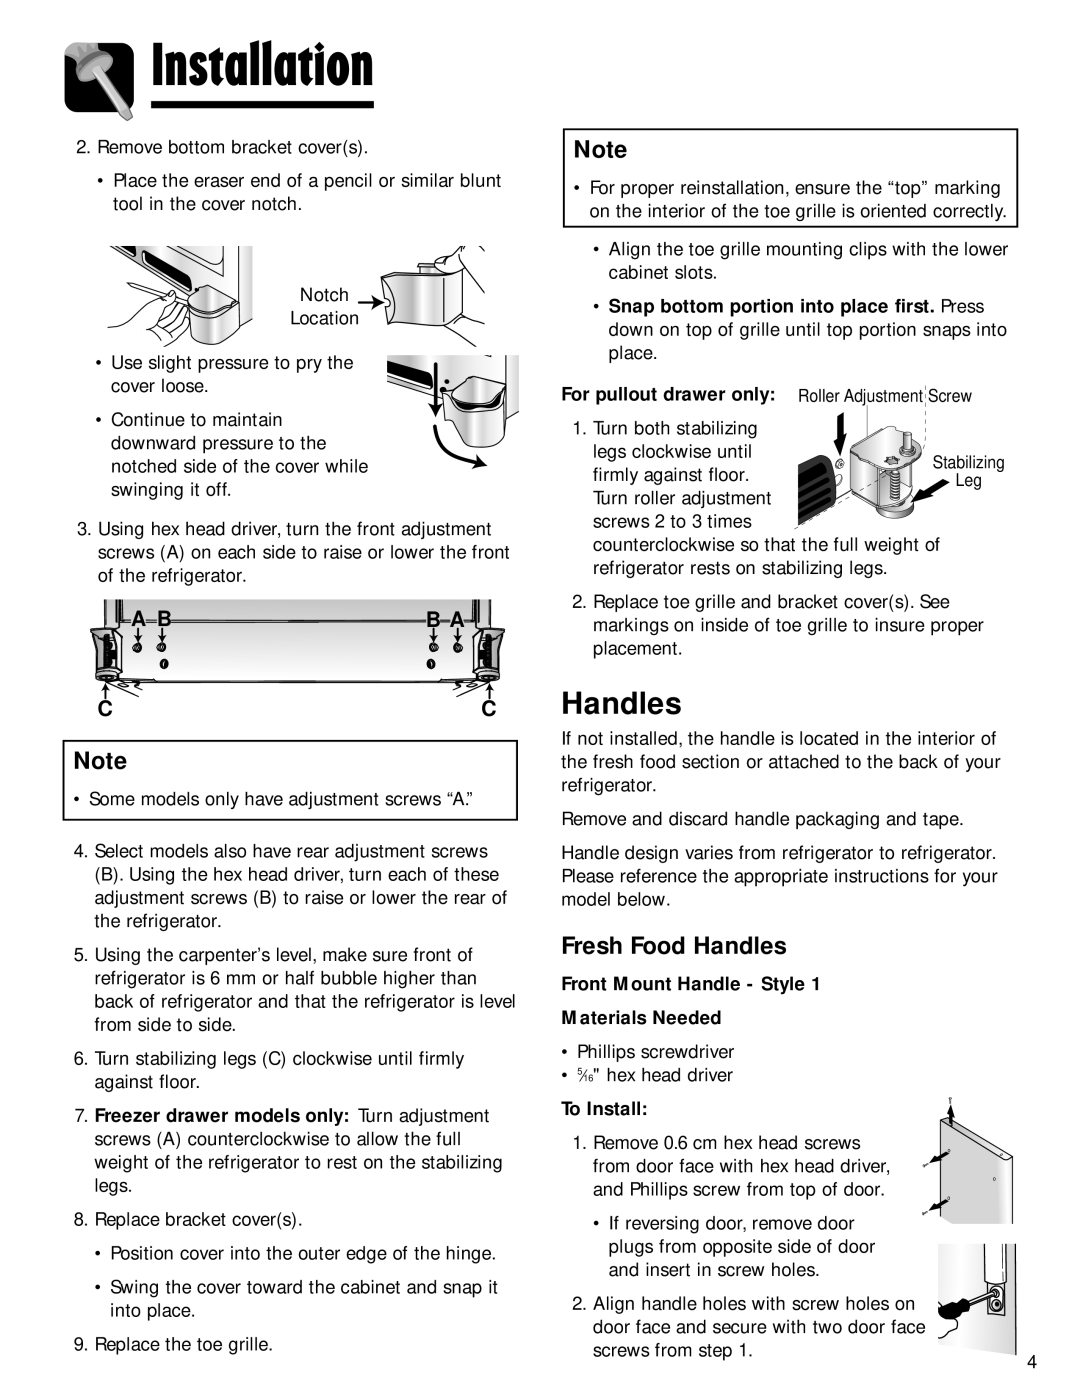
2.Remove bottom bracket cover(s).

Place the eraser end of a pencil or similar blunt tool in the cover notch.

Notch

Location

• Use slight pressure to pry the cover loose.

• Continue to maintain downward pressure to the notched side of the cover while swinging it off.

3.Using hex head driver, turn the front adjustment screws (A) on each side to raise or lower the front of the refrigerator.

A BB A

CC

Note

Some models only have adjustment screws “A.”

4.Select models also have rear adjustment screws

(B). Using the hex head driver, turn each of these adjustment screws (B) to raise or lower the rear of the refrigerator.

5.Using the carpenter’s level, make sure front of refrigerator is 6 mm or half bubble higher than back of refrigerator and that the refrigerator is level from side to side.

6.Turn stabilizing legs (C) clockwise until firmly against floor.

7.Freezer drawer models only: Turn adjustment screws (A) counterclockwise to allow the full weight of the refrigerator to rest on the stabilizing legs.

8.Replace bracket cover(s).

Position cover into the outer edge of the hinge.

Swing the cover toward the cabinet and snap it into place.

9.Replace the toe grille.

Note

For proper reinstallation, ensure the “top” marking on the interior of the toe grille is oriented correctly.

Align the toe grille mounting clips with the lower cabinet slots.

Snap bottom portion into place first. Press down on top of grille until top portion snaps into place.

For pullout drawer only: Roller Adjustment Screw

1. Turn both stabilizing legs clockwise until firmly against floor. Turn roller adjustment screws 2 to 3 times

counterclockwise so that the full weight of refrigerator rests on stabilizing legs.

2.Replace toe grille and bracket cover(s). See markings on inside of toe grille to insure proper placement.

Handles

If not installed, the handle is located in the interior of the fresh food section or attached to the back of your refrigerator.

Remove and discard handle packaging and tape.

Handle design varies from refrigerator to refrigerator. Please reference the appropriate instructions for your model below.

Fresh Food Handles

Front Mount Handle - Style 1

Materials Needed

Phillips screwdriver

516" hex head driver

To Install:

1. Remove 0.6 cm hex head screws from door face with hex head driver, and Phillips screw from top of door.

• If reversing door, remove door plugs from opposite side of door and insert in screw holes.

2. Align handle holes with screw holes on door face and secure with two door face

screws from step 1.

4

Page 5
Image 5
Maytag G32026PExx, SOV026TB important safety instructions Fresh Food Handles

G32026PExx, SOV026TB specifications

The Maytag SOV026TB and G32026PE models are innovative appliances designed to enhance home comfort and efficiency. As part of Maytag's commitment to quality and reliability, these models come equipped with a range of features and technologies that cater to modern household needs.

The Maytag SOV026TB is a state-of-the-art refrigerator that boasts a sleek design, combining aesthetics with functionality. One of its standout features is the ExtendFresh temperature management system, which ensures optimal food preservation by controlling humidity levels. This technology maintains an even temperature throughout the fridge and freezer compartments, preventing spoilage and extending the freshness of your groceries.

In addition, this model includes the PowerCold feature, which rapidly cools the interior after the door has been open for an extended period, ensuring that items return to optimal temperatures quickly. With its adjustable shelving and flexible storage options, the SOV026TB allows users to maximize storage efficiency, making it suitable for households of various sizes.

The G32026PE, on the other hand, is a robust dishwasher that offers a range of advanced washing technologies. Featuring the powerful Resist Dry technology, it ensures that dishes come out sparkling clean and free from water spots. The targeted wash arms provide better water coverage, ensuring that all areas of the dishwasher are effectively cleaned, even for larger loads.

One of the most appealing aspects of the G32026PE is its QuietSeries sound package, which minimizes operational noise, allowing for a peaceful kitchen environment. Additionally, it includes a variety of wash cycles and options tailored to different types of dishes and soil levels, giving users the flexibility they need to address various cleaning challenges.

Both the SOV026TB and G32026PE models reflect Maytag's dedication to efficiency, boasting Energy Star certifications to help save on energy bills while reducing environmental impact. This commitment to sustainability is further complemented by durable materials and construction, ensuring that these appliances stand the test of time.

In summary, the Maytag SOV026TB refrigerator and G32026PE dishwasher combine cutting-edge technology with user-friendly features to provide reliable performance and enhanced convenience. These appliances are designed not only to meet the demands of modern households but also to ensure longevity and sustainability in everyday use.