1

2

Fig. 4-3A

3

Fig. 4-3B

Fig. 4-3C

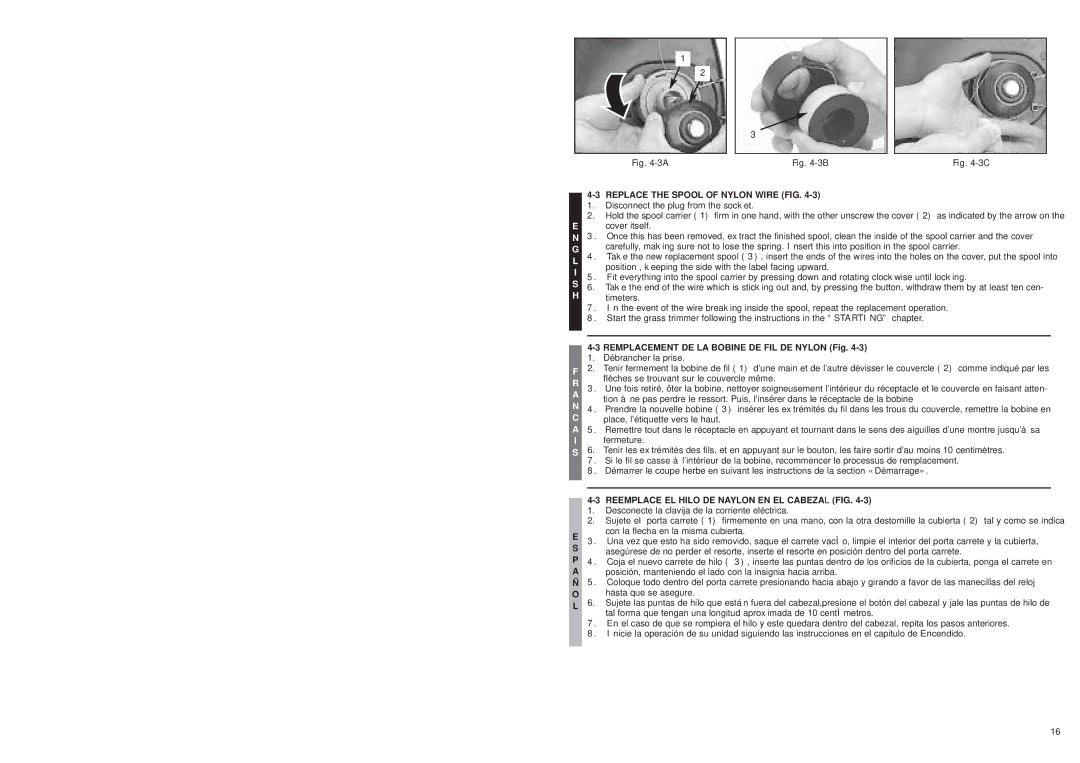
4-3 REPLACE THE SPOOL OF NYLON WIRE (FIG. 4-3)

1.Disconnect the plug from the socket.

2.Hold the spool carrier (1) firm in one hand, with the other unscrew the cover (2) as indicated by the arrow on the

E cover itself.

N3. Once this has been removed, extract the finished spool, clean the inside of the spool carrier and the cover

Gcarefully, making sure not to lose the spring. Insert this into position in the spool carrier.

L

4.

Take the new replacement spool (3), insert the ends of the wires into the holes on the cover, put the spool into

I


position , keeping the side with the label facing upward.

5.

Fit everything into the spool carrier by pressing down and rotating clockwise until locking.

S6. Take the end of the wire which is sticking out and, by pressing the button, withdraw them by at least ten cen-

Htimeters.

7.In the event of the wire breaking inside the spool, repeat the replacement operation.

8.Start the grass trimmer following the instructions in the “STARTING” chapter.


4-3 REMPLACEMENT DE LA BOBINE DE FIL DE NYLON (Fig. 4-3)


1.

Débrancher la prise.

F

2.

Tenir fermement la bobine de fil (1) d’une main et de l’autre dévisser le couvercle (2) comme indiqué par les

R


flèches se trouvant sur le couvercle même.

3.

Une fois retiré, ôter la bobine, nettoyer soigneusement l’intérieur du réceptacle et le couvercle en faisant atten-

A


tion à ne pas perdre le ressort. Puis, l’insérer dans le réceptacle de la bobine

N4. Prendre la nouvelle bobine (3) insérer les extrémités du fil dans les trous du couvercle, remettre la bobine en

Cplace, l’étiquette vers le haut.

A5. Remettre tout dans le réceptacle en appuyant et tournant dans le sens des aiguilles d’une montre jusqu’à sa

Ifermeture.

S6. Tenir les extrémités des fils, et en appuyant sur le bouton, les faire sortir d’au moins 10 centimètres.

7.Si le fil se casse à l’intérieur de la bobine, recommencer le processus de remplacement.

8.Démarrer le coupe herbe en suivant les instructions de la section «Démarrage».

4-3 REEMPLACE EL HILO DE NAYLON EN EL CABEZAL (FIG. 4-3)

1.

Desconecte la clavija de la corriente eléctrica.

2.

Sujete el porta carrete (1) firmemente en una mano, con la otra destornille la cubierta (2) tal y como se indica

E 3.

con la flecha en la misma cubierta.

Una vez que esto ha sido removido, saque el carrete vacÌo, limpie el interior del porta carrete y la cubierta,

Sasegúrese de no perder el resorte, inserte el resorte en posición dentro del porta carrete.

P4. Coja el nuevo carrete de hilo ( 3), inserte las puntas dentro de los orificios de la cubierta, ponga el carrete en

A posición, manteniendo el lado con la insignia hacia arriba.

Ñ 5. Coloque todo dentro del porta carrete presionando hacia abajo y girando a favor de las manecillas del reloj

Ohasta que se asegure.

L6. Sujete las puntas de hilo que están fuera del cabezal,presione el botón del cabezal y jale las puntas de hilo de tal forma que tengan una longitud aproximada de 10 centÌmetros.

7.En el caso de que se rompiera el hilo y este quedara dentro del cabezal, repita los pasos anteriores.

8.Inicie la operación de su unidad siguiendo las instrucciones en el capitulo de Encendido.

16

Page 17
Image 17
McCulloch MT2026, MT2027 user manual Replace the Spool of Nylon Wire FIG, Remplacement DE LA Bobine DE FIL DE Nylon Fig

MT2026, MT2027 specifications

The McCulloch MT2026 and MT2027 are two robust trimmers designed to cater to the needs of both home gardeners and landscape professionals seeking efficiency and user-friendly features. Each model boasts a combination of power and versatility, making them ideal for maintaining lawns, gardens, and other outdoor spaces.

The MT2026 is powered by a dependable 26cc engine that ensures efficient cutting performance. It features a lightweight design that enhances maneuverability, allowing users to easily navigate around shrubs, trees, and flower beds. The trimmer comes with a dual-line cutting system, which ensures a wide cutting path and reduces the time spent on yard work. Additionally, the MT2026 is equipped with an automatic line feed system that guarantees an uninterrupted workflow, as the line advances automatically, preventing any interruptions while you work.

On the other hand, the MT2027 provides an upgrade in terms of power with its 27cc engine. This additional power translates into improved cutting performance, making it more suitable for tackling tougher weeds and thicker brush. Like its counterpart, the MT2027 features a lightweight and ergonomic design that minimizes user fatigue. This trimmer is also designed with a dual-line cutting system, offering similar benefits of an efficient wide cutting path.

One of the standout features of both models is the innovative comfort grip handle, which provides a secure and comfortable hold, allowing for better control during operation. Both trimmers also come with adjustable shafts, enabling users to customize the length according to their height and preference, ultimately enhancing user comfort during extended use.

Moreover, these trimmers prioritize ease of maintenance, with tool-less access to the air filter and easy-to-change spark plugs, ensuring that users can perform necessary upkeep with minimal hassle. The overall aesthetics of both models reflect McCulloch's commitment to durability, with robust construction designed to withstand the rigors of outdoor work.

In summary, the McCulloch MT2026 and MT2027 stand out in the crowded market of trimmers due to their powerful engines, user-friendly designs, and advanced features. Whether you choose the MT2026 for light to medium trimming tasks or the more powerful MT2027 for demanding jobs, both models exemplify McCulloch's dedication to creating reliable and efficient tools for every gardening enthusiast. With these trimmers, achieving a well-manicured lawn has never been easier.