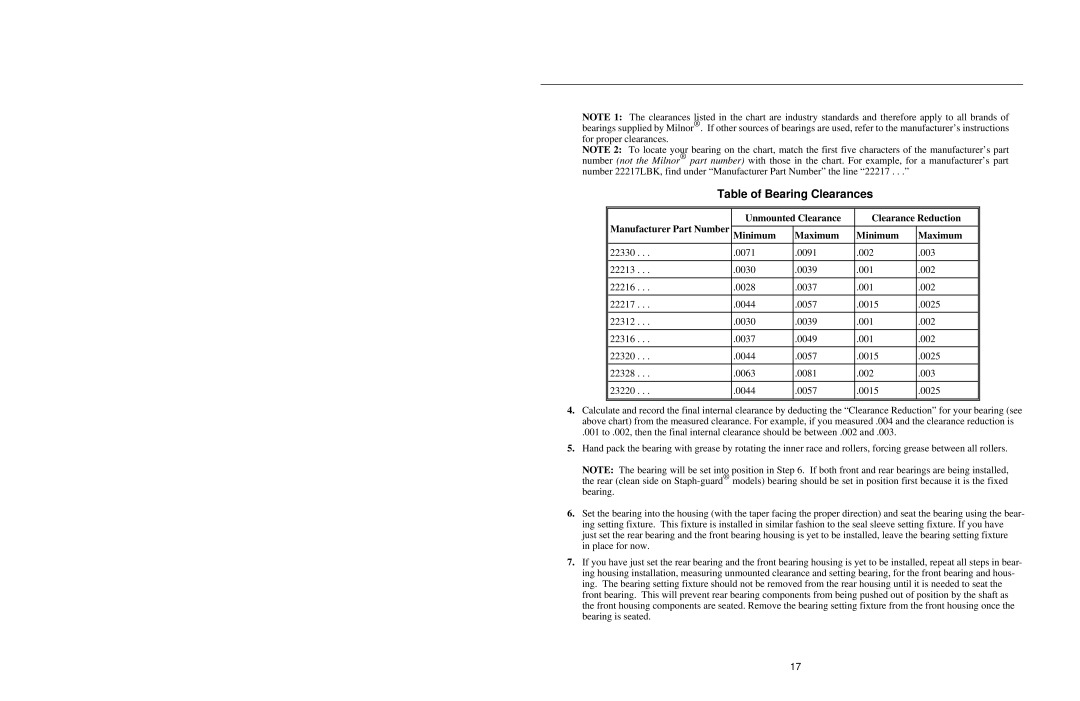
NOTE 1: The clearances listed in the chart are industry standards and therefore apply to all brands of bearings supplied by Milnor® . If other sources of bearings are used, refer to the manufacturer's instructions for proper clearances.
NOTE 2: To locate your bearing on the chart, match the first five characters of the manufacturer's part number (not the Milnor® part number) with those in the chart. For example, for a manufacturer's part number 22217LBK, find under “Manufacturer Part Number” the line “22217 . . .”
Table of Bearing Clearances
|
|
|
|
|
Manufacturer Part Number | Unmounted Clearance | Clearance Reduction | ||
|
|
|
| |
Minimum | Maximum | Minimum | Maximum | |
|
|
|
|
|
22330 . . . | .0071 | .0091 | .002 | .003 |
|
|
|
|
|
22213 . . . | .0030 | .0039 | .001 | .002 |
|
|
|
|
|
22216 . . . | .0028 | .0037 | .001 | .002 |
|
|
|
|
|
22217 . . . | .0044 | .0057 | .0015 | .0025 |
|
|
|
|
|
22312 . . . | .0030 | .0039 | .001 | .002 |
|
|
|
|
|
22316 . . . | .0037 | .0049 | .001 | .002 |
|
|
|
|
|
22320 . . . | .0044 | .0057 | .0015 | .0025 |
|
|
|
|
|
22328 . . . | .0063 | .0081 | .002 | .003 |
|
|
|
|
|
23220 . . . | .0044 | .0057 | .0015 | .0025 |
|
|
|
|
|
|
|
|
|
|
4.Calculate and record the final internal clearance by deducting the “Clearance Reduction” for your bearing (see above chart) from the measured clearance. For example, if you measured .004 and the clearance reduction is
.001 to .002, then the final internal clearance should be between .002 and .003.
5.Hand pack the bearing with grease by rotating the inner race and rollers, forcing grease between all rollers.
NOTE: The bearing will be set into position in Step 6. If both front and rear bearings are being installed, the rear (clean side on
6.Set the bearing into the housing (with the taper facing the proper direction) and seat the bearing using the bear- ing setting fixture. This fixture is installed in similar fashion to the seal sleeve setting fixture. If you have just set the rear bearing and the front bearing housing is yet to be installed, leave the bearing setting fixture
in place for now.
7.If you have just set the rear bearing and the front bearing housing is yet to be installed, repeat all steps in bear- ing housing installation, measuring unmounted clearance and setting bearing, for the front bearing and hous- ing. The bearing setting fixture should not be removed from the rear housing until it is needed to seat the front bearing. This will prevent rear bearing components from being pushed out of position by the shaft as the front housing components are seated. Remove the bearing setting fixture from the front housing once the bearing is seated.
17
