Menu operation (continued)
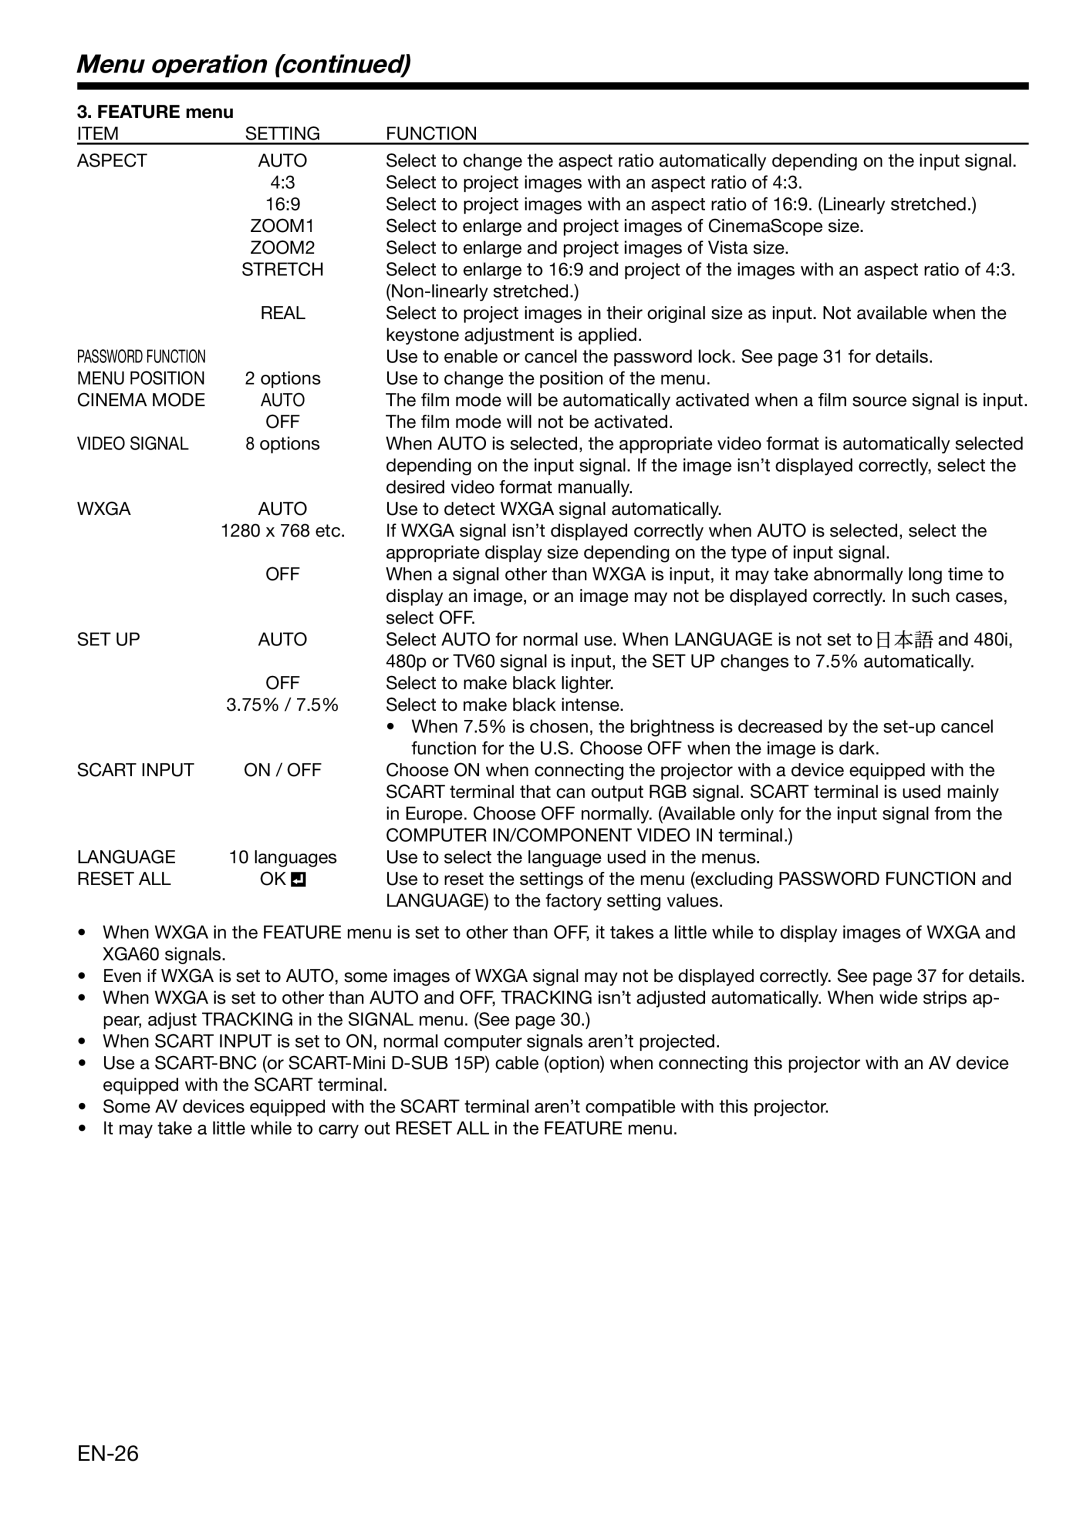
3. FEATURE menu |
|
| |
ITEM | SETTING | FUNCTION |
|
ASPECT | AUTO | Select to change the aspect ratio automatically depending on the input signal. | |
| 4:3 | Select to project images with an aspect ratio of 4:3. |
|
| 16:9 | Select to project images with an aspect ratio of 16:9. (Linearly stretched.) | |
| ZOOM1 | Select to enlarge and project images of CinemaScope size. |
|
| ZOOM2 | Select to enlarge and project images of Vista size. |
|
| STRETCH | Select to enlarge to 16:9 and project of the images with an aspect ratio of 4:3. | |
|
|
| |
| REAL | Select to project images in their original size as input. Not available when the | |
|
| keystone adjustment is applied. |
|
PASSWORD FUNCTION |
| Use to enable or cancel the password lock. See page 31 for details. |
|
MENU POSITION | 2 options | Use to change the position of the menu. |
|
CINEMA MODE | AUTO | The film mode will be automatically activated when a film source signal is input. | |
| OFF | The film mode will not be activated. |
|
VIDEO SIGNAL | 8 options | When AUTO is selected, the appropriate video format is automatically selected | |
|
| depending on the input signal. If the image isn’t displayed correctly, select the | |
|
| desired video format manually. |
|
WXGA | AUTO | Use to detect WXGA signal automatically. |
|
| 1280 x 768 etc. | If WXGA signal isn’t displayed correctly when AUTO is selected, select the | |
|
| appropriate display size depending on the type of input signal. |
|
| OFF | When a signal other than WXGA is input, it may take abnormally long time to | |
|
| display an image, or an image may not be displayed correctly. In such cases, | |
|
| select OFF. |
|
SET UP | AUTO | Select AUTO for normal use. When LANGUAGE is not set to | and 480i, |
|
| 480p or TV60 signal is input, the SET UP changes to 7.5% automatically. | |
| OFF | Select to make black lighter. |
|
| 3.75% / 7.5% | Select to make black intense. |
|
|
| • When 7.5% is chosen, the brightness is decreased by the | |
|
| function for the U.S. Choose OFF when the image is dark. |
|
SCART INPUT | ON / OFF | Choose ON when connecting the projector with a device equipped with the | |
|
| SCART terminal that can output RGB signal. SCART terminal is used mainly | |
|
| in Europe. Choose OFF normally. (Available only for the input signal from the | |
|
| COMPUTER IN/COMPONENT VIDEO IN terminal.) |
|
LANGUAGE | 10 languages | Use to select the language used in the menus. |
|
RESET ALL | OK | Use to reset the settings of the menu (excluding PASSWORD FUNCTION and | |
|
| LANGUAGE) to the factory setting values. |
|
•When WXGA in the FEATURE menu is set to other than OFF, it takes a little while to display images of WXGA and XGA60 signals.
•Even if WXGA is set to AUTO, some images of WXGA signal may not be displayed correctly. See page 37 for details.
•When WXGA is set to other than AUTO and OFF, TRACKING isn’t adjusted automatically. When wide strips ap- pear, adjust TRACKING in the SIGNAL menu. (See page 30.)
•When SCART INPUT is set to ON, normal computer signals aren’t projected.
•Use a
•Some AV devices equipped with the SCART terminal aren’t compatible with this projector.
•It may take a little while to carry out RESET ALL in the FEATURE menu.
