MODEL SELECT

6. Electrical work


1-3/16


1-3/16


1-3/16

9/32

1-37/64


3-


4-23/32


Fig. 6-2


B-1.

B-2.


Fig. 6-3

AB TB6

6.2. Remote controller

6.2.1.For wired remote controller

1) Installing procedures

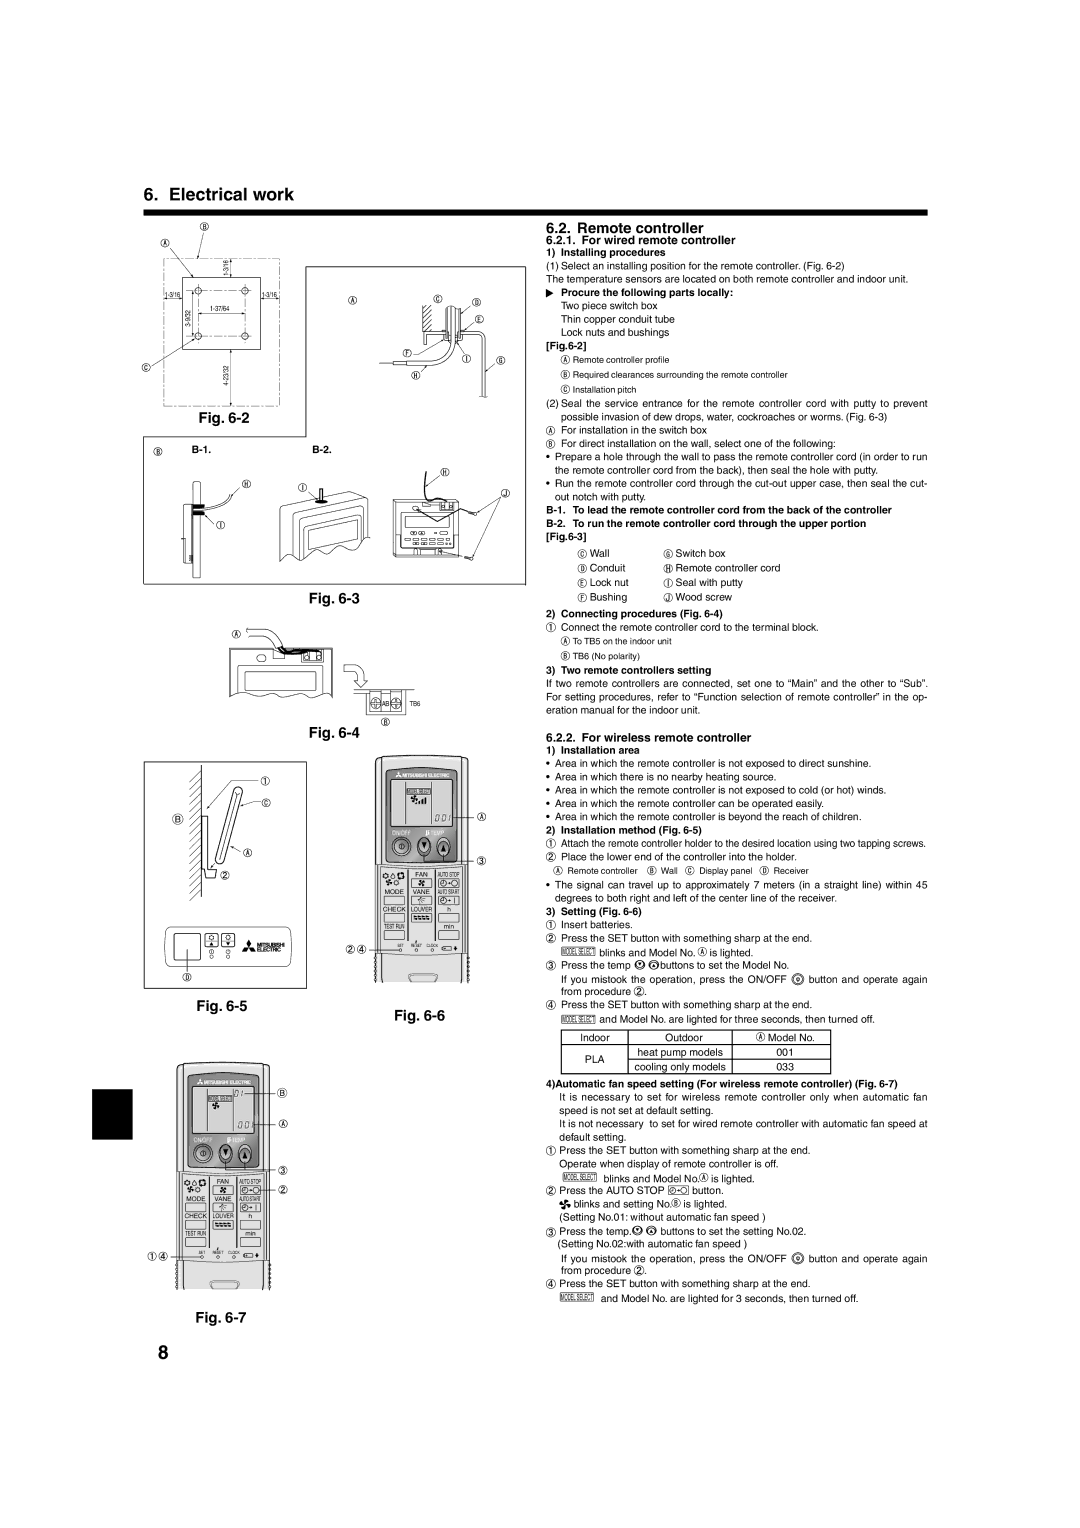
(1) Select an installing position for the remote controller. (Fig. 6-2)

The temperature sensors are located on both remote controller and indoor unit.

Procure the following parts locally:

Two piece switch box

Thin copper conduit tube

Lock nuts and bushings

[Fig.6-2]

Remote controller profi le

Required clearances surrounding the remote controller

Installation pitch

(2)Seal the service entrance for the remote controller cord with putty to prevent possible invasion of dew drops, water, cockroaches or worms. (Fig. 6-3)

For installation in the switch box

For direct installation on the wall, select one of the following:

Prepare a hole through the wall to pass the remote controller cord (in order to run the remote controller cord from the back), then seal the hole with putty.

Run the remote controller cord through the cut-out upper case, then seal the cut- out notch with putty.

B-1. To lead the remote controller cord from the back of the controller

B-2. To run the remote controller cord through the upper portion [Fig.6-3]

Wall

Switch box

Conduit

Remote controller cord

Lock nut

Seal with putty

Bushing

Wood screw

2) Connecting procedures (Fig. 6-4)

Connect the remote controller cord to the terminal block.

To TB5 on the indoor unit

TB6 (No polarity)

3) Two remote controllers setting

If two remote controllers are connected, set one to “Main” and the other to “Sub”. For setting procedures, refer to “Function selection of remote controller” in the op- eration manual for the indoor unit.

Fig. 6-4

MODEL SELECT

ON/OFF TEMP


FAN

AUTO STOP

MODE

VANE

AUTO START

CHECK

LOUVER

h

TEST RUN


min

SET

RESET CLOCK

6.2.2.For wireless remote controller

1) Installation area

• Area in which the remote controller is not exposed to direct sunshine.

• Area in which there is no nearby heating source.

• Area in which the remote controller is not exposed to cold (or hot) winds.

• Area in which the remote controller can be operated easily.

• Area in which the remote controller is beyond the reach of children.

2) Installation method (Fig. 6-5)

Attach the remote controller holder to the desired location using two tapping screws.

Place the lower end of the controller into the holder.

Remote controller

Wall

Display panel

Receiver

The signal can travel up to approximately 7 meters (in a straight line) within 45 degrees to both right and left of the center line of the receiver.

3)Setting (Fig. 6-6) Insert batteries.

Press the SET button with something sharp at the end. MODEL SELECT blinks and Model No. is lighted.

Press the temp buttons to set the Model No.

If you mistook the operation, press the ON/OFF button and operate again from procedure .

Fig. 6-5

MODEL SELECT

ON/OFF TEMP

Fig. 6-6

Press the SET button with something sharp at the end.

MODEL SELECT and Model No. are lighted for three seconds, then turned off.

Indoor

Outdoor

Model No.

PLA

heat pump models

001

cooling only models

033


4)Automatic fan speed setting (For wireless remote controller) (Fig. 6-7)

It is necessary to set for wireless remote controller only when automatic fan speed is not set at default setting.

It is not necessary to set for wired remote controller with automatic fan speed at

default setting.

Press the SET button with something sharp at the end.

Operate when display of remote controller is off.

MODEL SELECT blinks and Model No. is lighted.


FAN

AUTO STOP

MODE

VANE

AUTO START

CHECK

LOUVER

h

TEST RUN


min

SET

RESET CLOCK

Fig. 6-7

Press the AUTO STOP

button.


blinks and setting No. is lighted.


(Setting No.01: without automatic fan speed )


Press the temp.

buttons to set the setting No.02.


(Setting No.02:with automatic fan speed )


If you mistook the operation, press the ON/OFF

button and operate again

from procedure .


Press the SET button with something sharp at the end.

and Model No. are lighted for 3 seconds, then turned off.

8

Page 8
Image 8
Mitsumi electronic PLA-ABA Remote controller, For wired remote controller, For wireless remote controller

PLA-ABA specifications

Mitsumi Electric, a leading manufacturer in the electronic components sector, has made significant strides in audio equipment with the development of the PLA-ABA, a premium audio amplifier. This device is engineered to deliver exceptional sound quality while integrating advanced technologies that enhance its performance and usability.

One of the standout features of the PLA-ABA is its class-D amplifier architecture. This design ensures high efficiency, allowing the device to operate coolly even under heavy load conditions. The amplifier boasts a power output that can drive a wide range of speaker systems, making it suitable for both casual listeners and audio professionals. With a total harmonic distortion (THD) level that is notably low, users can experience pristine audio reproduction without the unwanted artifacts that often plague lower-quality amplifiers.

In addition to its robust performance characteristics, the PLA-ABA is equipped with advanced digital signal processing (DSP). This technology allows for various audio enhancement features, including equalization settings that can be adjusted to suit different musical genres or personal preferences. The user-friendly interface makes it easy to navigate through these settings, ensuring that users can customize their audio experience effortlessly.

Connectivity is another facet where the PLA-ABA excels. It supports multiple input options, including AUX, optical, and Bluetooth, making it versatile for various setups, whether for home theater systems or portable use. The integration of Bluetooth technology not only enables wireless streaming from smartphones and tablets but also ensures a stable connection with minimal latency, making it perfect for both music streaming and gaming.

Durability is paramount in the design of the PLA-ABA. The chassis is constructed from high-grade materials that not only provide a sleek aesthetic but also protect internal components from electromagnetic interference and physical damage. This attention to ruggedness makes the amplifier suitable for both stationary and mobile applications.

Moreover, Mitsumi has placed a strong emphasis on energy efficiency with the PLA-ABA. The device incorporates features that help reduce power consumption when not in use, contributing to a smaller carbon footprint, while still delivering the high-quality audio performance that users expect.

In summary, the Mitsumi electronic PLA-ABA represents a blend of cutting-edge technology and practical design, making it a formidable choice for audiophiles and casual users alike. Its combination of class-D amplification, advanced DSP, versatile connectivity options, and durable construction positions it as a leading product in its category, setting a benchmark for future audio amplifiers.