English

2. Installation Schematics –

Measuring for Ideal Tub/Shower Performance

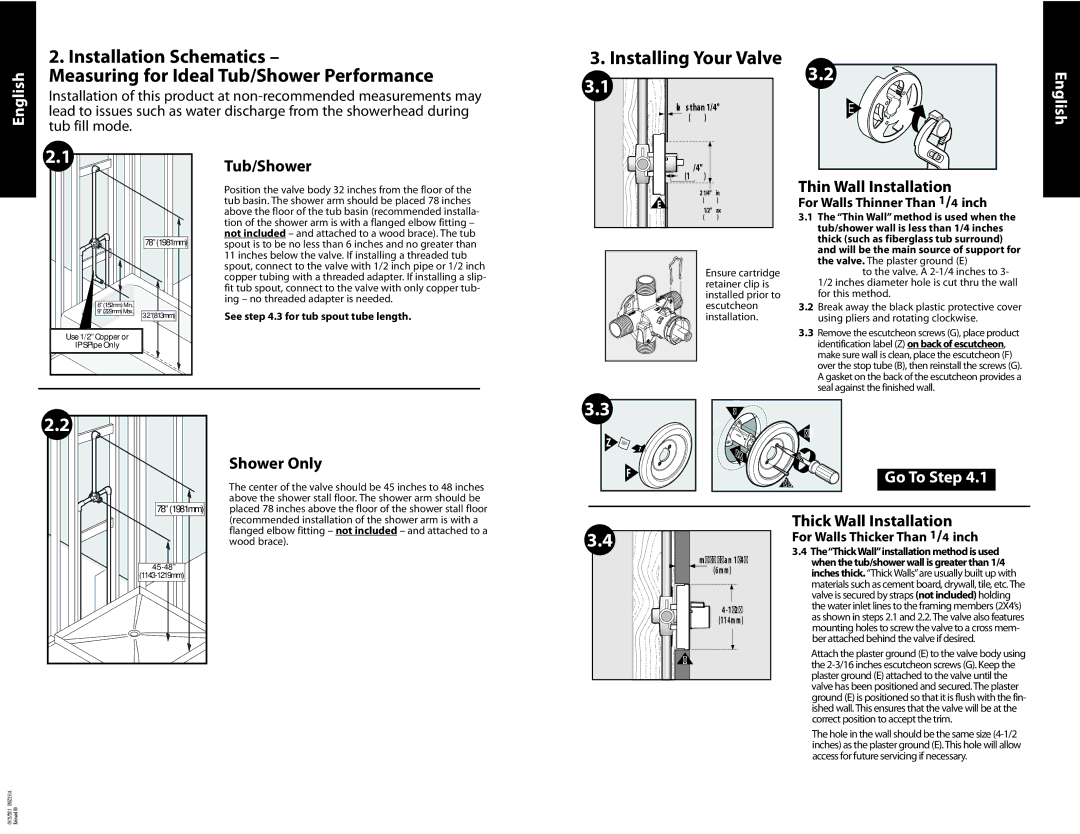
Installation of this product at non-recommended measurements may lead to issues such as water discharge from the showerhead during tub fill mode.

2.1

Tub/Shower


Position the valve body 32 inches from the floor of the


tub basin. The shower arm should be placed 78 inches


above the floor of the tub basin (recommended installa-


tion of the shower arm is with a flanged elbow fitting –

78” (1981mm)

not included – and attached to a wood brace). The tub

spout is to be no less than 6 inches and no greater than


11 inches below the valve. If installing a threaded tub


spout, connect to the valve with 1/2 inch pipe or 1/2 inch


copper tubing with a threaded adapter. If installing a slip-


fit tub spout, connect to the valve with only copper tub-

6” (152mm) Min.

ing – no threaded adapter is needed.


9” (229mm) Max.

See step 4.3 for tub spout tube length.

32” (813mm)

Use 1/2” Copper or


IPS Pipe Only


3. Installing Your Valve

3.2

3.1


less than 1/4"

E


(6mm)


3/4"


(19mm)

Thin Wall Installation


2-1/4"min.

E

(57mm)

For Walls Thinner Than 1/4 inch

3-1/2"max.


(89mm)

3.1 The “Thin Wall” method is used when the


tub/shower wall is less than 1/4 inches


thick (such as fiberglass tub surround)


and will be the main source of support for


the valve. The plaster ground (E) remains


Ensure cartridge

attached to the valve. A 2-1/4 inches to 3-


retainer clip is

1/2 inches diameter hole is cut thru the wall


installed prior to

for this method.


escutcheon

3.2 Break away the black plastic protective cover


installation.

using pliers and rotating clockwise.


3.3 Remove the escutcheon screws (G), place product


identification label (Z) on back of escutcheon,


make sure wall is clean, place the escutcheon (F)


over the stop tube (B), then reinstall the screws (G).


A gasket on the back of the escutcheon provides a


seal against the finished wall.

English

2.2


Shower Only


The center of the valve should be 45 inches to 48 inches


above the shower stall floor. The shower arm should be

78” (1981mm)

placed 78 inches above the floor of the shower stall floor

3.3

Z 1

F

B


F

2

3


G

Go To Step 4.1

(recommended installation of the shower arm is with a

flanged elbow fitting – not included – and attached to a

wood brace).

45-48”

(1143-1219mm)

3.4

more than 1/4"

(6mm)

4-1/2"

(114mm)

E

Thick Wall Installation For Walls Thicker Than 1/4 inch

3.4The“ThickWall”installation method is used when the tub/shower wall is greater than 1/4 inches thick. “Thick Walls”are usually built up with materials such as cement board, drywall, tile, etc. The valve is secured by straps (not included) holding the water inlet lines to the framing members (2X4’s) as shown in steps 2.1 and 2.2. The valve also features mounting holes to screw the valve to a cross mem- ber attached behind the valve if desired.

Attach the plaster ground (E) to the valve body using the 2-3/16 inches escutcheon screws (G). Keep the plaster ground (E) attached to the valve until the valve has been positioned and secured. The plaster ground (E) is positioned so that it is flush with the fin- ished wall. This ensures that the valve will be at the correct position to accept the trim.

The hole in the wall should be the same size (4-1/2 inches) as the plaster ground (E). This hole will allow access for future servicing if necessary.

E6

E7

Page 4
Image 4
Moen INS2151A-9, 11 installation instructions Tub/Shower, Thin Wall Installation, Shower Only, Go To Step

11, INS2151A-9 specifications

The Moen INS2151A-9,11 is a standout product in the kitchen and bath fixtures category, reflecting the brand’s commitment to quality, innovation, and user-friendly design. This particular model embodies a perfect fusion of functionality and aesthetic appeal, making it an attractive addition to contemporary home interiors.

One of the main features of the INS2151A-9,11 is its advanced technology that enhances the overall user experience. Equipped with Moen’s proprietary Power Clean technology, this fixture provides a powerful spray that is 50% more efficient than traditional models. This means users can achieve thorough cleaning with less water and time, ideal for busy households or commercial settings.

The INS2151A-9,11 also boasts a streamlined design that not only elevates visual appeal but also maximizes space efficiency. The ergonomic handle design offers a comfortable grip, facilitating easy temperature and flow adjustments. This convenience is further complemented by its intuitive functionality, allowing users to switch between different spray patterns effortlessly, whether it's for rinsing dishes or filling pots.

Another key characteristic is the use of high-quality materials in its construction. The INS2151A-9,11 features a durable finish that resists corrosion and tarnishing, ensuring that the fixture maintains its sleek appearance regardless of daily wear and tear. Additionally, it is designed to be easy to install, which can significantly reduce the complexity and cost associated with upgrading fixtures in the home.

Moreover, the Moen INS2151A-9,11 emphasizes water efficiency, supporting eco-conscious practices without sacrificing performance. This product is compliant with WaterSense standards, which means it helps conserve water while still delivering optimal pressure—an essential feature for environmentally minded consumers.

In terms of compatibility, the INS2151A-9,11 is designed to accommodate standard plumbing systems, making it a versatile choice for various sink configurations. This adaptability, combined with its sleek design and advanced features, makes it an ideal selection for anyone looking to enhance their kitchen or bathroom space.

In conclusion, the Moen INS2151A-9,11 stands out as a well-rounded fixture that exemplifies practicality and style. With its innovative technologies, user-friendly design, and environmentally responsible features, it is an excellent addition for those looking to improve their contemporary living spaces while enjoying the reliability synonymous with the Moen brand.