Trowel Blade Removal

CAUTION

Disconnect the spark plug wire from the spark plug and secure away from the engine before performing maintenance or adjustments on the machine.

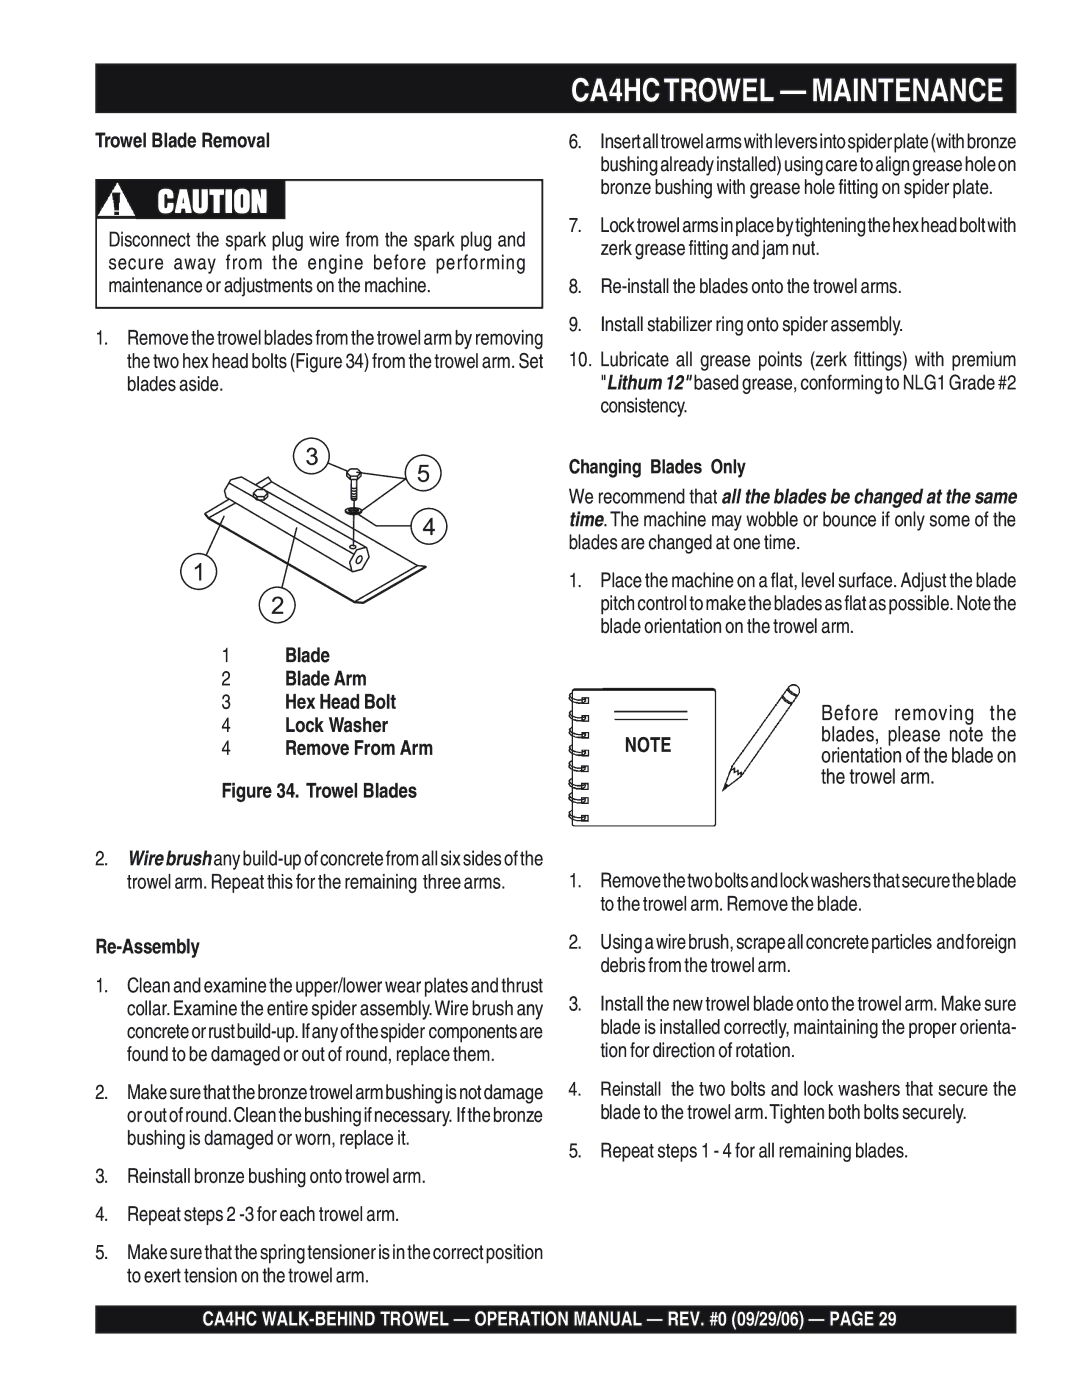
1.Remove the trowel blades from the trowel arm by removing the two hex head bolts (Figure 34) from the trowel arm. Set blades aside.

CA4HCTROWEL — MAINTENANCE

6.Insertalltrowelarmswithleversintospiderplate(withbronze bushing already installed) using care to align grease hole on bronze bushing with grease hole fitting on spider plate.

7.Locktrowelarmsinplacebytighteningthehexheadboltwith zerk grease fitting and jam nut.

8.Re-install the blades onto the trowel arms.

9.Install stabilizer ring onto spider assembly.

10.Lubricate all grease points (zerk fittings) with premium "Lithum 12" based grease, conforming to NLG1 Grade #2 consistency.

3

1

2

5

4

Changing Blades Only

We recommend that all the blades be changed at the same time. The machine may wobble or bounce if only some of the blades are changed at one time.

1.Place the machine on a flat, level surface. Adjust the blade pitch control to make the blades as flat as possible. Note the blade orientation on the trowel arm.

1Blade

2Blade Arm

3Hex Head Bolt

4Lock Washer

4Remove From Arm Figure 34. Trowel Blades

2.Wirebrush any build-up of concrete from all six sides of the trowel arm. Repeat this for the remaining three arms.

Re-Assembly

1.Clean and examine the upper/lower wear plates and thrust collar. Examine the entire spider assembly.Wire brush any concreteorrustbuild-up.Ifanyofthespider componentsare found to be damaged or out of round, replace them.

2.Makesurethatthebronzetrowelarmbushingisnotdamage or out of round.Clean the bushing if necessary. If the bronze bushing is damaged or worn, replace it.

3.Reinstall bronze bushing onto trowel arm.

4.Repeat steps 2 -3 for each trowel arm.

5.Make sure that the spring tensioner is in the correct position to exert tension on the trowel arm.

Before removing the

NOTEblades, please note the orientation of the blade on

the trowel arm.

1.Removethetwoboltsandlockwashersthatsecuretheblade to the trowel arm. Remove the blade.

2.Using a wire brush, scrape all concrete particles and foreign debris from the trowel arm.

3.Install the new trowel blade onto the trowel arm. Make sure blade is installed correctly, maintaining the proper orienta- tion for direction of rotation.

4.Reinstall the two bolts and lock washers that secure the blade to the trowel arm.Tighten both bolts securely.

5.Repeat steps 1 - 4 for all remaining blades.

CA4HC WALK-BEHIND TROWEL — OPERATION MANUAL — REV. #0 (09/29/06) — PAGE 29

Page 29
Image 29
Multiquip CA4HC Trowel Blade Removal, Changing Blades Only, Blade Blade Arm Hex Head Bolt Lock Washer, Re-Assembly

CA4HC specifications

The Multiquip CA4HC is an advanced concrete mixer that combines efficiency and versatility, making it a preferred choice for both professionals and DIY enthusiasts. This robust machine is engineered to handle a variety of mixing tasks seamlessly, allowing users to tackle projects of varying sizes effectively.

One of the standout features of the CA4HC is its 4-cubic-foot capacity. This size strikes an ideal balance, enabling users to mix enough concrete for substantial jobs while retaining portability. The unit is equipped with a powerful Honda engine that ensures reliable performance, allowing users to achieve high-quality mixes consistently.

Technology-wise, the CA4HC incorporates a direct drive system that eliminates the need for belts and pulleys, thus reducing maintenance and enhancing durability. This design not only improves the mixer’s lifespan but also results in a quieter operation, creating a more pleasant working environment. The electric start feature adds convenience, enabling users to start the mixer effortlessly with minimal effort.

Another notable characteristic of the CA4HC is its heavy-duty construction. The mixer features a solid steel frame that provides stability and resistance to the rigors of everyday use. The drum itself is made from robust materials that resist wear and tear, ensuring longevity and reliability over time. Additionally, the drum’s design allows for easy pouring, reducing spills and improving efficiency during concrete pouring tasks.

Portability is a key attribute of the Multiquip CA4HC. The mixer comes with pneumatic tires that allow for easy transportation over different terrains. Its compact design makes it easy to store when not in use, saving valuable space in garages or job sites.

Safety has also been prioritized in the design of the CA4HC. The mixer is equipped with safety guards to protect users from moving parts, reducing the risk of accidents during operation. Its intuitive controls ensure that even those new to concrete mixing can operate it with confidence.

In summary, the Multiquip CA4HC is a powerful, versatile, and user-friendly concrete mixer designed to meet the needs of various projects. With its durable construction, efficient engineering, and integrated safety features, it stands out as a reliable tool for achieving consistent mixing results. Whether for construction professionals or home improvement enthusiasts, the CA4HC offers a combination of performance and practicality that is hard to beat.