Access Control
D
Toggle Aux Relay
C
Instant
B
Aux K.P. Panic
0

Programming the GEM-P3200 & GEM-P9600

08 INTERIOR

BYPASS

FIRE/TBL SYS TBL

CHIME


INTERIOR BYPASS

FIRE/TBL SYS TBL

CHIME


(Direct Entry)

Key Fob Transmitters

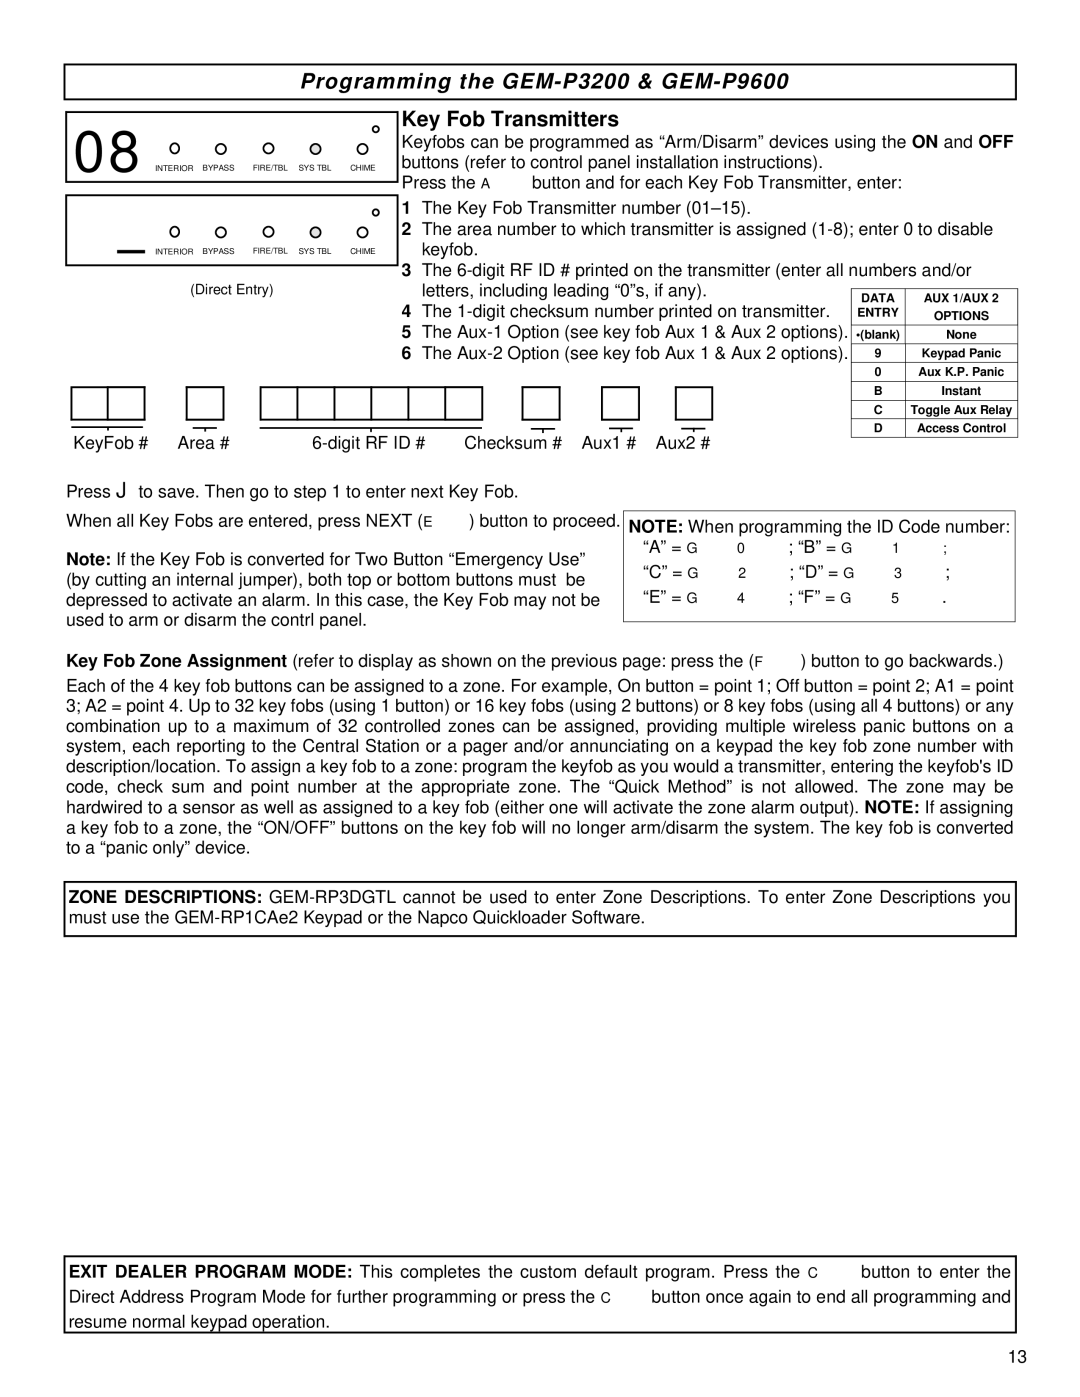
Keyfobs can be programmed as “Arm/Disarm” devices using theON and OFF buttons (refer to control panel installation instructions).

Press the Abutton and for each Key Fob Transmitter, enter:

1The Key Fob Transmitter number (01–15).

2The area number to which transmitter is assigned (1-8); enter 0 to disable keyfob.

3The 6-digit RF ID # printed on the transmitter (enter all numbers and/or


letters, including leading “0”s, if any).


DATA

AUX 1/AUX 2

4

The 1-digit checksum number printed on transmitter.

ENTRY

OPTIONS

5

The Aux-1

Option (see key fob Aux 1

& Aux 2 options).

•(blank)

None

6

The Aux-2

Option (see key fob Aux 1

& Aux 2 options).

9

Keypad Panic


KeyFob #

Area #

6-digit RF ID #

Checksum #

Aux1 #

Aux2 #

Press Jto save. Then go to step 1 to enter next Key Fob.

When all Key Fobs are entered, press NEXT (E) button to proceed.

Note: If the Key Fob is converted for Two Button “Emergency Use” (by cutting an internal jumper), both top or bottom buttons must be depressed to activate an alarm. In this case, the Key Fob may not be used to arm or disarm the contrl panel.

NOTE: When programming the ID Code number: “A” =G0; “B” =G1;

“C” =G2; “D” =G3; “E” =G4; “F” =G5.

Key Fob Zone Assignment (refer to display as shown on the previous page: press the (F) button to go backwards.)

Each of the 4 key fob buttons can be assigned to a zone. For example, On button = point 1; Off button = point 2; A1 = point 3; A2 = point 4. Up to 32 key fobs (using 1 button) or 16 key fobs (using 2 buttons) or 8 key fobs (using all 4 buttons) or any combination up to a maximum of 32 controlled zones can be assigned, providing multiple wireless panic buttons on a system, each reporting to the Central Station or a pager and/or annunciating on a keypad the key fob zone number with description/location. To assign a key fob to a zone: program the keyfob as you would a transmitter, entering the keyfob's ID code, check sum and point number at the appropriate zone. The “Quick Method” is not allowed. The zone may be hardwired to a sensor as well as assigned to a key fob (either one will activate the zone alarm output). NOTE: If assigning a key fob to a zone, the “ON/OFF” buttons on the key fob will no longer arm/disarm the system. The key fob is converted to a “panic only” device.

ZONE DESCRIPTIONS: GEM-RP3DGTL cannot be used to enter Zone Descriptions. To enter Zone Descriptions you must use the GEM-RP1CAe2 Keypad or the Napco Quickloader Software.

EXIT DEALER PROGRAM MODE: This completes the custom default program. Press the C button to enter the Direct Address Program Mode for further programming or press the Cbutton once again to end all programming and resume normal keypad operation.

13

Page 13
Image 13
Napco Security Technologies GEM-P9600, GEM-P816, GEM-P1632 quick start Aux-1 Option see key fob Aux Aux 2 options

GEM-P9600, GEM-P816, GEM-P1632 specifications

Napco Security Technologies is known for its innovative and robust security solutions, and its GEM series control panels, particularly the GEM-P9600, GEM-P1632, and GEM-P816, exemplify this commitment to excellence in security technology. These panels are designed to meet the diverse needs of residential and commercial properties, offering a combination of reliability, functionality, and user-friendly features.

Starting with the GEM-P9600, this control panel serves as a central hub for monitoring and controlling various security devices. One of its standout features is its ability to support up to 96 zones, making it suitable for larger installations. Its versatile communication capabilities include options for TCP/IP, cellular, and telephone dialer systems, ensuring that users can stay connected regardless of their circumstances. The panel also integrates seamlessly with Napco's range of peripheral devices, including motion detectors, door/window contacts, and glass break sensors, enhancing the overall security ecosystem.

The GEM-P1632 is tailored for medium-sized applications, supporting up to 32 zones. Its user-friendly interface includes an LCD keypad that provides live feedback and allows for easy programming. Just like the GEM-P9600, it supports multiple communication methods, which facilitate real-time alerts and remote management through mobile devices or web applications. The GEM-P1632 also features an advanced event logging system, offering comprehensive records of system activity, which is invaluable for both security professionals and end-users.

In contrast, the GEM-P816 is designed for smaller setups, accommodating up to 16 zones. Despite its compact nature, it boasts many of the same powerful features as its larger counterparts, including compatibility with various communication technologies and integration with smart home systems. Users appreciate its simplified programming, which allows for quick installation and setup. Additionally, with the GEM-P816, end-users have the option to add wireless capabilities, providing flexibility in choosing security devices based on their unique needs.

All three panels utilize advanced technologies, including robust encryption protocols for secure communication and intuitive user interfaces that simplify operation. The GEM series is built with scalability in mind, allowing users to expand their systems effortlessly as their security needs evolve. With a strong emphasis on performance and reliability, Napco's GEM-P9600, GEM-P1632, and GEM-P816 control panels are ideal solutions for anyone looking to enhance the security of their homes or businesses.