Tag2 |
| Adjusts the position of the red component of the image. Press ÒLeftÓ or ÒRightÓ to adjust. |
|
| |||||||||||
| (Analog input only) |
|
|
|
|
|
|
|
|
|
|
|
|
| English |
|
|
|
|
|
|
|
|
|
|
|
|
|
|
| |
| Adjusts the position of the green component of the image. Press ÒLeftÓ or ÒRightÓ to adjust. |
| |||||||||||||
|
|
| |||||||||||||
| (Analog input only) |
|
|
|
|
|
|
|
|
|
|
|
|
|
|
|
|
|
|
|
|
|
|
|
|
|
|
| |||
|
| Adjusts the position of the blue component of the image. Press ÒLeftÓ or ÒRightÓ to adjust. |
|
| |||||||||||
| (Analog input only) |
|
|
|
|
|
|
|
|
|
|
|
|
|
|
|
|
|
|
|
|
|
|
|
|
|
|
|
|
| |
|
|
|
|
|
|
|
|
|
|
|
|
|
| ||
|
| Adjusts the ÒFINEÓ setting of the RED component of the image. |
|
|
|
| |||||||||
| (Analog input only) | Press ÒLeftÓ or ÒRightÓ to adjust. |
|
|
|
|
|
| |||||||
|
|
|
|
|
|
|
|
|
|
|
|
| |||
| Adjusts the ÒFINEÓ setting of the GREEN component of the image. |
|
| ||||||||||||
| (Analog input only) | Press ÒLeftÓ or ÒRightÓ to adjust. |
|
|
|
|
|
| |||||||
|
|
|
|
|
|
|
|
|
|
|
|
|
| ||
| Adjusts the ÒFINEÓ setting of the BLUE component of the image. |
|
|
|
| ||||||||||
| (Analog input only) | Press ÒLeftÓ or ÒRightÓ to adjust. |
|
|
|
|
|
| |||||||
|
|
|
|
|
|
|
|
|
|
|
|
| |||
|
| Adjusts the sharpness of the red component of the image. Press ÒLeftÓ or ÒRightÓ to adjust. |
|
| |||||||||||
| (Analog input only) |
|
|
|
|
|
|
|
|
|
|
|
|
|
|
|
|
|
|
|
|
|
|
|
|
|
|
|
| ||
| Adjusts the sharpness of the green component of the image. |
|
|
|
| ||||||||||
| (Analog input only) | Press ÒLeftÓ or ÒRightÓ to adjust. |
|
|
|
|
|
| |||||||
|
|
|
|
|
|
|
|
|
|
|
|
|
| ||
| Adjusts the sharpness of the blue component of the image. |
|
|
|
| ||||||||||
| (Analog input only) | Press ÒLeftÓ or ÒRightÓ to adjust. |
|
|
|
|
|
| |||||||
|
|
|
|
|
|
|
|
|
|
|
|
| |||
| DVI Long Cable | Compensates for image degradation caused by using a long DVI cable. |
|
| |||||||||||
| (Digital input only) | There are 4 possible settings, with Ò0Ó being the lowest level of compensation and |
|
| |||||||||||
|
| Ò3Ó being the highest level. The default setting is Ò1Ó. |
|
|
|
| |||||||||
|
|
|
|
|
|
|
|
|
|
|
|
| |||
Tag3 | Auto Adjust | Automatically adjusts the Image Position and H.Size settings and Fine settings. |
|
| |||||||||||
| (Analog input only) | Press ÒSELECTÓ to activate Auto Adjustment. |
|
|
|
| |||||||||
|
|
|
|
|
|
|
|
|
|
|
|
|
| ||
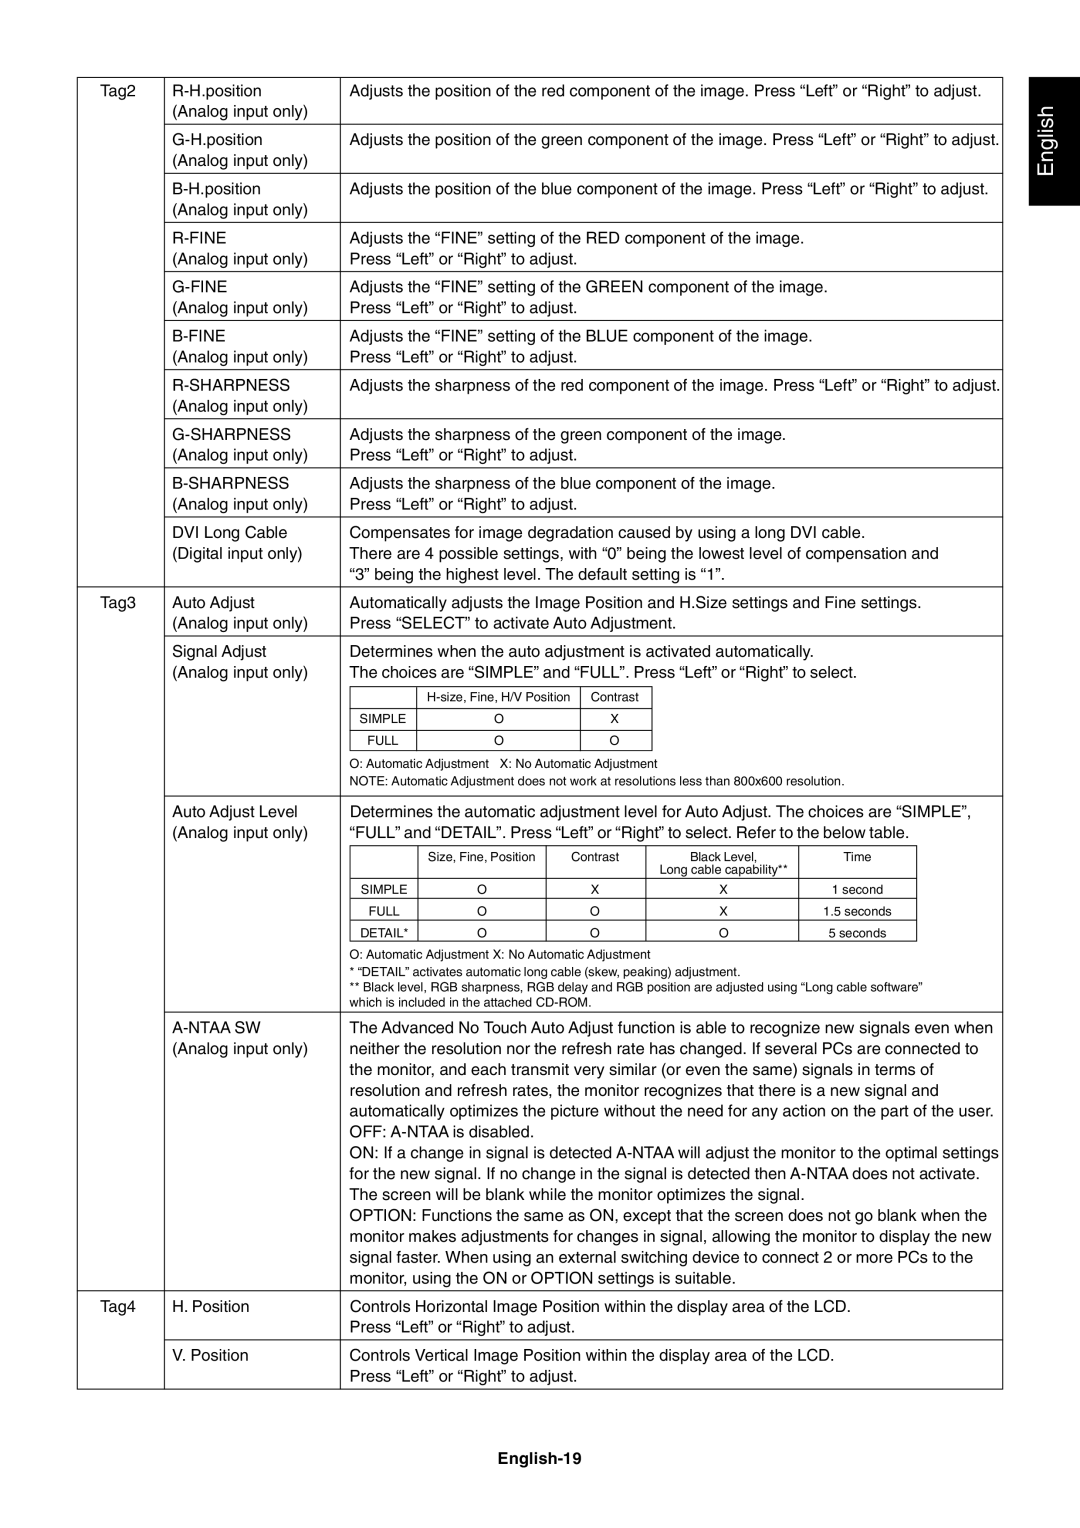
| Signal Adjust | Determines when the auto adjustment is activated automatically. |
|
|
|
| |||||||||
| (Analog input only) | The choices are ÒSIMPLEÓ and ÒFULLÓ. Press ÒLeftÓ or ÒRightÓ to select. |
|
| |||||||||||
|
|
|
|
|
|
|
|
|
|
|
|
|
|
|
|
|
|
|
|
| Contrast |
|
|
|
|
|
|
| |||
|
|
|
|
|
|
|
|
|
|
|
|
|
|
|
|
|
|
| SIMPLE | O |
| X |
|
|
|
|
|
|
| ||
|
|
|
|
|
|
|
|
|
|
|
|
|
|
|
|
|
|
| FULL | O |
| O |
|
|
|
|
|
|
| ||
|
|
|
|
|
|
|
|
|
|
|
|
|
|
| |
|
| O: Automatic Adjustment X: No Automatic Adjustment |
|
|
|
|
|
| |||||||
|
| NOTE: Automatic Adjustment does not work at resolutions less than 800x600 resolution. |
|
| |||||||||||
|
|
|
|
|
|
|
|
|
|
|
|
| |||
| Auto Adjust Level |
| Determines the automatic adjustment level for Auto Adjust. The choices are ÒSIMPLEÓ, |
|
| ||||||||||
| (Analog input only) | ÒFULLÓ and ÒDETAILÓ. Press ÒLeftÓ or ÒRightÓ to select. Refer to the below table. |
|
| |||||||||||
|
|
|
|
|
|
|
|
|
|
|
|
|
| ||
|
|
|
| Size, Fine, Position |
| Contrast |
| Black Level, |
| Time |
|
|
| ||
|
|
|
|
|
|
|
|
|
| Long cable capability** |
|
|
|
|
|
|
|
| SIMPLE | O |
|
| X |
| X |
| 1 second |
|
|
| |
|
|
| FULL | O |
|
| O |
| X |
| 1.5 seconds |
|
|
| |
|
|
| DETAIL* | O |
|
| O |
| O |
| 5 seconds |
|
|
| |
|
| O: Automatic Adjustment X: No Automatic Adjustment |
|
|
|
|
|
| |||||||
|
| * ÒDETAILÓ activates automatic long cable (skew, peaking) adjustment. |
|
|
|
| |||||||||
|
| ** Black level, RGB sharpness, RGB delay and RGB position are adjusted using ÒLong cable softwareÓ |
|
| |||||||||||
|
| which is included in the attached |
|
|
|
|
|
| |||||||
|
|
|
|
|
|
|
|
|
|
|
|
| |||
|
| The Advanced No Touch Auto Adjust function is able to recognize new signals even when |
|
| |||||||||||
| (Analog input only) | neither the resolution nor the refresh rate has changed. If several PCs are connected to |
|
| |||||||||||
|
| the monitor, and each transmit very similar (or even the same) signals in terms of |
|
| |||||||||||
|
| resolution and refresh rates, the monitor recognizes that there is a new signal and |
|
| |||||||||||
|
| automatically optimizes the picture without the need for any action on the part of the user. |
|
| |||||||||||
|
| OFF: |
|
|
|
|
|
|
|
|
|
| |||
|
| ON: If a change in signal is detected |
|
| |||||||||||
|
| for the new signal. If no change in the signal is detected then |
|
| |||||||||||
|
| The screen will be blank while the monitor optimizes the signal. |
|
|
|
| |||||||||
|
| OPTION: Functions the same as ON, except that the screen does not go blank when the |
|
| |||||||||||
|
| monitor makes adjustments for changes in signal, allowing the monitor to display the new |
|
| |||||||||||
|
| signal faster. When using an external switching device to connect 2 or more PCs to the |
|
| |||||||||||
|
| monitor, using the ON or OPTION settings is suitable. |
|
|
|
| |||||||||
|
|
|
|
|
|
|
|
|
|
|
|
| |||
Tag4 | H. Position |
| Controls Horizontal Image Position within the display area of the LCD. |
|
| ||||||||||
|
| Press ÒLeftÓ or ÒRightÓ to adjust. |
|
|
|
|
|
| |||||||
|
|
|
|
|
|
|
|
|
|
|
|
| |||
| V. Position | Controls Vertical Image Position within the display area of the LCD. |
|
| |||||||||||
|
| Press ÒLeftÓ or ÒRightÓ to adjust. |
|
|
|
|
|
| |||||||
|
|
|
|
|
|
|
|
|
|
|
|
|
|
|
|
Page 21
Image 21