202-10065-01
Certificate of the Manufacturer/Importer
Technical Support
FCC Requirements for Operation in the United States
FCC Guidelines for Human Exposure
Declaration Of Conformity
Export Restrictions
Operation Using 2.4 GHz Channels in France
Metropolitan Regions with Eased Restrictions in 2.4GHz Band
Allowed 5GHz Channels in Each European Community Country
Operation Using 5 GHz Channels in the European Community
Vii
Viii
Contents
Chapter Configuration
Appendix C Preparing Your Network to Work with a Router
Glossary Index
Typographical conventions
Manual Specifications
Chapter About This Manual
Audience, Scope, Conventions
Html version of this manual
How to Use this Manual
How to Print this Manual
About This Manual
About the WG111U
Chapter Introduction
802.11a and 802.11b/g Wireless Networking
Key Features
Comparing the 802.11a, 802.11b, and 802.11g Modes
Comparison of Wireless Modes
What’s in the Box?
Road Map for ‘How to Get There From Here’
If I Want To? What’s Needed? What Do I Do? How Do I?
Road Map for How to Get There From Here
Netgear Super AG
Netgear Super AG Wireless
Wired network Wirelessly connect
Verifying System Requirements
Chapter Basic Setup
What You Need Before You Begin
Observing Location and Range Guidelines
Determining Placement of the USB Adapter
Attach fastener to back of plastic cradle
Two Basic Operating Modes
Basic Installation Instructions
WG111U Default Wireless Configuration Settings
For Windows XP Users Installing a WG111U
Install the Netgear Super AG Wireless USB 2.0 Adapter WG111U
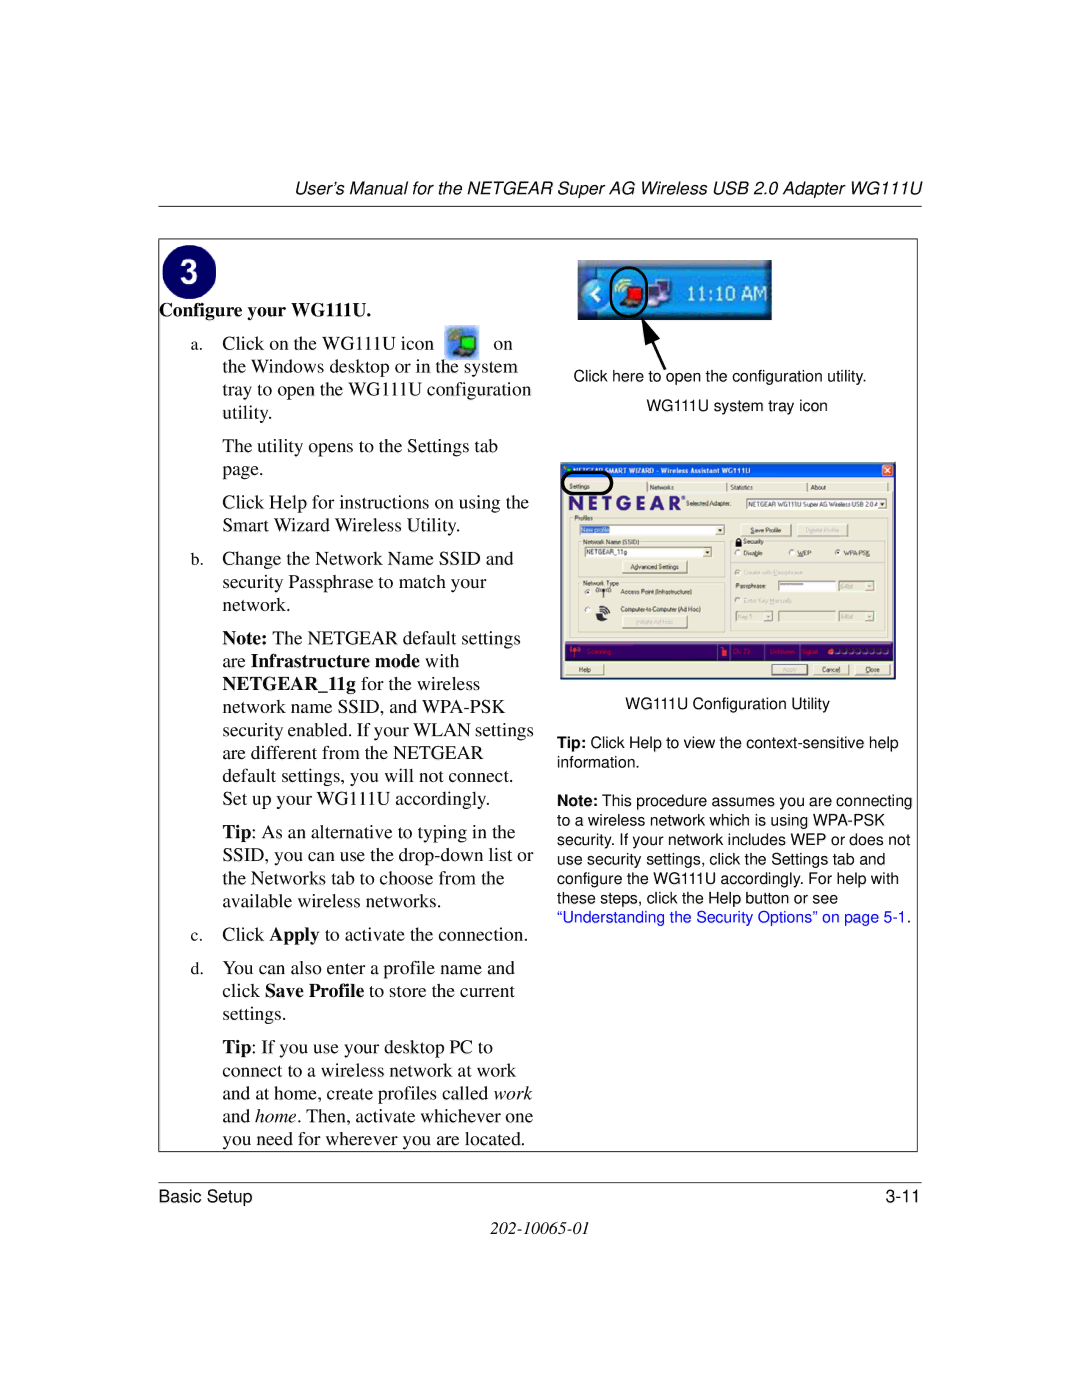
Configure your WG111U
Verify wireless connectivity to your network
For Windows 2000, ME, and 98SE Users Installing a WG111U
Found New Hardware Wizard WG111U System Tray Icon
Configure your WG111U
WG111U Wireless Connection Indicators
LED Descriptions
Interpreting the LED on the WG111U
Status LED
Yellow
Interpreting System Tray Icon Colors
Color Condition Description
Red
Using Configuration Profiles
Chapter Configuration
Understanding the Configuration Options
Run the WG111U Smart Wireless Wizard
Connecting to an Access Point in Infrastructure Mode
How to Configure an Infrastructure Mode Profile
Save your settings in a Profile
Configure the wireless network settings
Configure the PC network settings
Connecting to Another PC in Ad-hoc Mode
How to Configure an Ad-hoc Mode Profile
Ad-Hoc Setting dialog box
Ping -t 192.168.0.1 and then click OK
Statistics
What’s on the Statistics Page?
Advanced Settings
Understanding the Advanced Settings
TPC Configuration Procedure
European Regulatory Requirements for Transmit Power Control
Configuration
Understanding the Security Options
Chapter Wireless Security Configuration
Basic Requirements for WEP
Using WEP Security
WEP Security Encryption Key
WEP Security Settings Worksheet
Wireless Network Name Ssid
Configure the WEP settings
How to Configure WEP Encryption Security
Configure the Network Name Ssid settings
Basic Requirements for WPA-PSK
Using WPA-PSK Advanced Security
How to Configure WPA-PSK Advanced Security
WPA-PSK Security Settings Worksheet
WPA-PSK settings screen
Configure the WPA-PSK settings
Wireless Security Configuration
Basic Tips
Chapter Troubleshooting
General Questions
Frequently Asked Questions
Ad Hoc mode is not working correctly
New Hardware Wizard appears after installation has completed
How to use XP’s own Wireless configuration utility
Troubleshooting
USB
Appendix a Technical Specifications
Technical Specifications
Infrastructure Mode
Appendix B Wireless Networking Basics
Wireless Networking Overview
Wireless Channels
Ad Hoc Mode Peer-to-Peer Workgroup
Network Name Extended Service Set Identification Essid
Table B-1 802.11g Radio Frequency Channels
Radio frequency channels used are listed in Table B-1
WEP Authentication
WEP Wireless Security
Access point have the same WEP are described below
Authentication Shared Key Steps
Key Size and Configuration
How to Use WEP Parameters
WPA Wireless Security
How Does WPA Compare to WEP?
How Does WPA Compare to Ieee 802.11i?
What are the Key Features of WPA Security?
Wireless Networking Basics
Figure B-3 WPA Overview
Login Authentication
Figure B-4 802.1x Authentication Sequence
WPA Data Encryption Key Management
Temporal Key Integrity Protocol Tkip
Product Support for WPA
Supporting a Mixture of WPA and WEP Wireless Clients
Changes to Wireless Access Points
Is WPA Perfect?
Michael
WPA two-phase authentication
Changes to Wireless Network Adapters
New WPA information element
Changes to Wireless Client Programs
Cabling and Computer Hardware
Computer Network Configuration Requirements
Appendix C Preparing Your Network to Work with a Router
What You Need To Use a Router with a Broadband Modem
Where Do I Get the Internet Configuration Parameters?
Internet Configuration Requirements
Record Your Internet Connection Information
Preparing Your Computers for TCP/IP Networking
Installing a New Adapter
Configuring Windows 95, 98, and Me for TCP/IP Networking
Installing or Verifying Windows Networking Components
Installing the Client for Microsoft Networks
Installing TCP/IP
Open the Network Panel
Verify the Configuration Settings
Verifying TCP/IP Properties
Selecting the Windows’ Internet Access Method
Verify the Properties IP Address Setting
Configuring Windows NT4, 2000 or XP for IP Networking
Go to the Network Connection Status window
Configuring Dhcp of TCP/IP in Windows XP, 2000, or NT4
Dhcp Configuration of TCP/IP in Windows XP
Open the Network Connection Window
Set Dhcp for TCP/IP
Go to Properties
Check the Local Area Connection Properties Settings
Dhcp Configuration of TCP/IP in Windows
Check the Internet Protocol Properties
Complete the configuration
Go to TCP/IP Properties
Dhcp Configuration of TCP/IP in Windows NT4
Set the TCP/IP Properties
Verifying TCP/IP Properties for Windows XP, 2000, and NT4
MacOS
Configuring the Macintosh for TCP/IP Networking
MacOS 8.6 or
Verifying TCP/IP Properties for Macintosh Computers
Verifying the Readiness of Your Internet Account
What Is Your Configuration Information?
Are Login Protocols Used?
Select the Gateway tab
Restarting the Network
Glossary
Glossary-2
Glossary Glossary-3
Glossary-4
Glossary Glossary-5
Glossary-6
Numerics
Index
Index-2