User’s Manual
Trademark Information
Page
Do not disassemble
For Your Safety
Iii
For Your Safety/Notices
Symbol for Separate Collection in European Countries
Table of Contents
Features of f, g, h, i, j, k, and lModes
Table of Contents
Shooting in a, b, c, and dModes
Shooting in cMode Aperture-Priority Auto
Vii
Viii
159
145
Technical Notes 167
Introduction This icon marks cautions, information
About This Manual
Information and Precautions
Http//nikonimaging.com
Introduction
About the Manuals
Information and Precautions
Camera Body
Getting to Know the Camera
Getting to Know the Camera Introduction
LInformation display/Quick settings
157
Tripod socket
Power Switch
Mode Dial
Advanced Modes Exposure Modes
Point-and-Shoot Modes Digital Vari-Programs
Viewfinder
Viewfinder Display
Tuning on and off Shooting Information Display
Shooting Information Display
Information Display Format
Wide Landscape Orientation Tall Portrait Orientation
Flash compensation indicator
Shutter-speed display Aperture display
Shutter-Speed and Aperture Displays
Command Dial
Image quality/size a
Release mode a
ISO sensitivity a
White balance a
Multi selector is used for the following operations
Multi Selector
NHelp Button
Shutter-Release Button
Attach the camera strap as shown below two eyelets
Camera Strap AN-DC1
First Steps
Rechargeable Li-ion Battery EN-EL9
Charging and Inserting the Battery
Charge the battery
Quick Charger MH-23
Charging and Inserting the Battery
Insert the battery
Removing the Battery
Battery and Charger
Attaching a Lens
Turn the camera off and remove the body Cap
Lenses for Autofocus
Attaching a Lens
Detaching Lenses
Lens
Aperture Ring
Vibration Reduction Mode VR
Using Vibration Reduction
Picture Angle and Focal Length
Reset the Clock
Setting Display Language, Date and Time
Highlight On if daylight saving time is in effect
Turn the camera on and press O
Changing Display Language
Clock Battery
Inserting Memory Cards
Inserting Memory Cards
Removing Memory Cards
Formatting Memory Cards
Highlight Yes
Write Protect Switch
Memory Cards
Formatting Memory Cards
Adjusting Viewfinder Focus Diopter Adjustment
Basic Photography
Turn the Camera On and Select Shooting Mode
Point-and-Shoot Photography eAuto Mode
Battery Level
Image Sensor Cleaning
Large-Capacity Memory Cards
Image Quality and Image Size
Frame a Photograph
Using a Zoom Lens
Hold the camera as shown
Frame a photograph in the viewfinder
Diopter Adjustment
Exposure Meters On/Off and Auto Meter-Off
Shooting Info Auto Off
Memory card access lamp will light
Focus and Shoot
Press the shutter-release button halfway
Shutter-Release Button
Changing Shooting Settings
Beep
Built-in Flash
Viewing Photographs/Deleting Photographs
Viewing Photographs
Deleting Photographs
Full-Frame Playback
Displaying Photo Information
Deleting Multiple Photographs
Features of f, g, h, i, j, k, and lModes
Shooting Particular Scenes
Taking Pictures
Shooting Particular Scenes Landscape
Mode a 64. The flash mode can be changed a
Child
Sports
Shooting Particular Scenes
Getting Good Results with Autofocus
C, and dModes
Shooting in a, b, c, and dModes
Shutter Speed and Aperture
Lens Aperture Ring
Flexible Program
Shooting in aMode Programmed Auto
Shutter Speed and Camera Shake
Shooting in bMode Shutter-Priority Auto
Information display by pressing K L
Shooting in cMode Aperture-Priority Auto
C, and d
Shooting in dMode Manual
Electronic Analog Exposure Display
Shooting in dMode Manual
Display
Optimal exposure
C, and dModes Shooting in dMode Manual
Long Time-Exposures
Changing Shooting Settings
Adjusting a Setting
Quick Settings Display
Display options for highlighted setting
When playing photographs back, press Pto exit playback mode
Changing Shooting Settings
Quick Settings Display/Image Quality and Size
Image Quality and Size
Select option
Image Quality
Image Size
Retouch option a 132 or the NEF RAW processing
File Names
NEF RAW/NEF RAW+JPEG Basic
Image Quality/Size
11 F/GButton A112
White balance can also be set using the command dial
White Balance
White Balance A103
ISO Sensitivity
Continuous Mode
Release Mode
Release Mode
Releasing the Shutter
Continuous Mode
Self-Timer and Remote Control Modes
Frame the photograph
Number of Shots Remaining before Memory Buffer Fills
Eyepiece Cap
Turning off the Self-Timer
Rubber Eyecup DK-20 and insert
Rubber eyecup
Focus
Focus Mode
AF Area Mode
AF-Area Mode
AF-Area Mode
Viewfinder Display
Focus Point Selection
Focus Lock using H
Focus Lock
Rest of the way down to shoot
Manual Focus
Electronic Rangefinder
Focal Plane Position
Exposure
Metering
Metering
Autoexposure Lock
Adjusting Shutter Speed and Aperture
Keeping Hpressed, recompose Photograph and shoot
Exposure
Using the Built-in Flash e, g, i, k, and lModes
Using the Built-in Flash
Using the Built-in Flash a, b, c, and dModes
Lowering the Built-in Flash
Using the Command Dial
Changing the Flash Mode
Flash modes are described below
I, kl
Changing Shooting Settings Using the Built-in Flash
Flash Mode Setting
Rear-Curtain Sync
Exposure Compensation in dMode
Exposure Compensation
Flash Compensation
At right
Flash Compensation
Active D-Lighting
Active D-Lighting
Active D-Lighting versus D-Lighting
Default Settings
Two-Button Reset
More on Playback
Full-Frame Playback
Viewing Photographs in Full-Frame Playback
Viewing Photographs in Full-Frame Playback
Photo Information
Histogram Highlights Active D-Lightingand Retouch History
Frame number/total number of images More on Playback
Active D-Lighting and Retouch History
Shooting Data,
Highlights
Histogram
Frame number/total number of images Histogram
Display more images
Viewing Multiple Photographs Thumbnail Playback
Per
Display fewer images
Following operations can be performed
Taking a Closer Look Playback Zoom
Choose a photograph
Protecting Photographs from Deletion
Press HI to protect the photograph Currently displayed
File Attribute
Connecting to a Computer, Printer, or TV
Before Connecting the Camera
Connecting to a Computer
Installing the Software
Operating Systems Compatible with D60
Transfer photographs using Nikon Transfer
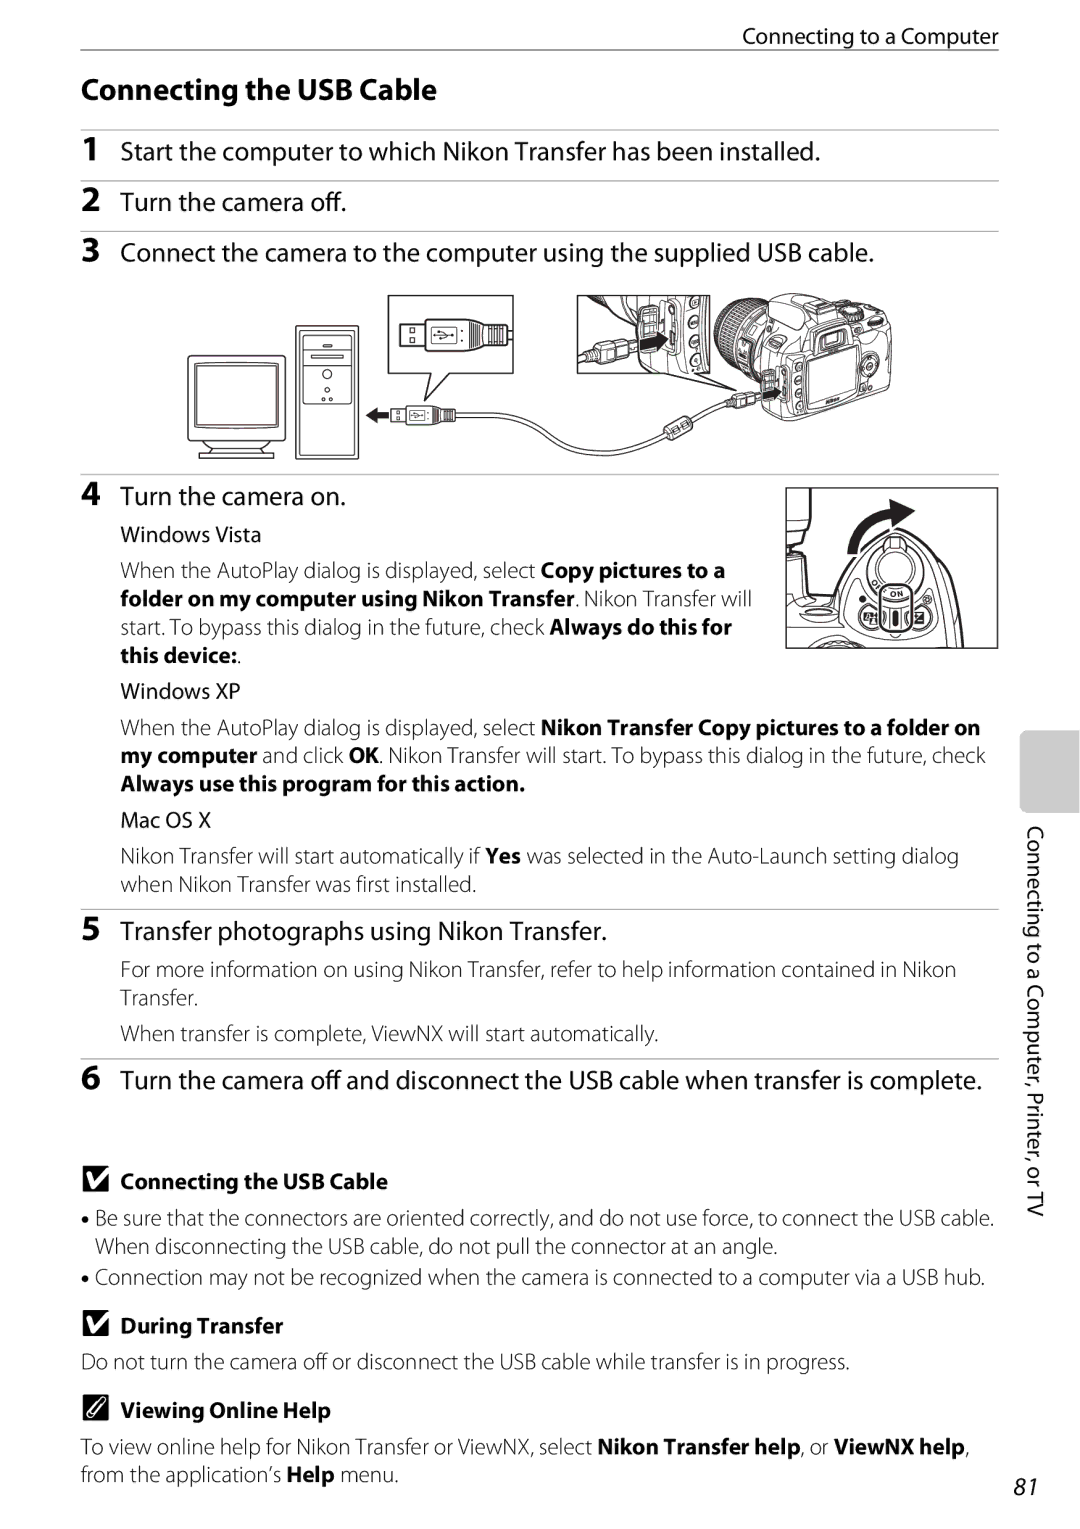
Connecting the USB Cable
Camera Control Pro
For Users of Windows 2000 Professional
Printing NEF RAW Photographs
Connecting to a Printer
Printing Via Direct USB Connection
Printing Via Direct USB Connection
Connecting the Printer
Printing Photographs One at a Time
Connecting to a Computer, Printer, or TV Size
Press the multi selector left or right
PictBridge playback display a 85 to Choose a photograph
With some errors
Printing Error
Printing at Printer Default
Cropping Photographs
Selecting Photographs for Printing
Printing Multiple Photographs
Creating an Index Print
Menu will be displayed when printing is complete
Press Oin the PictBridge playback display a
Press Q
Creating a Dpof Print Order Print Set
Repeat steps 3-4 to select additional photographs
Processing in the retouch menu a
Connect the camera to a printer a 83. Press Oin
Canceling the Print Orders
PictBridge playback display
Date Imprint
Video Mode
Connect the camera to the TV using the video cable
Viewing Photographs on TV
Tune the television to the video channel Turn the camera on
Creating Retouched Copies The Retouch Menu A129
Menu Guide
To view the menus, press O
Using Camera Menus
Select one of the five menus
Highlight icon in yellow for current menu
Position cursor in selected menu
Highlight menu item
Playback Options The Playback Menu
See Using Camera Menus a 94 for more information on using
Delete
Playback menu contains the following options
Selecting Multiple Photographs for Deletion
Playback Folder
Select the folder from which images will be played back
Playback Options The Playback Menu
Rotate Tall
Slide Show
Following operations can be performed during a slide show
Stop-Motion Movie
View movie files created with the Stop-motion movie option
Stop-Motion Movies
100
Shooting Options The Shooting Menu
Optimize Image
Settings other than Custom use the sRGB color space
Shooting Options The Shooting Menu
Optimize Image
102
Customizing Image Enhancement Options Custom
White Balance
Specifying Fluorescent Lighting
103
Fine-Tuning White Balance
Color Temperature
Fine tune white balance
Measuring a Value for Preset White Balance
Preset Manual
White Balance Fine Tuning
105
106
Highlight Measure and press the multi selector right
Measuring Value
Other Ways to Measure a Value
With D60 can be used as source for preset manual
Source for Preset Manual
Copying White Balance from a Photograph
107
108
Noise Reduction
109
Custom Settings
Image review A111
A113
Beep
Reset
No Memory Card?
110
111
Off default setting
112
Choose the function performed by F/G
Choose the function performed by H
Built-in Flash/Optional Flash Unit
113
100, m/ft., 20C/68F
Normal default setting
Menu Guide Custom Settings
Short
Long
Date and time of recording can be imprinted on photographs
115
Date Imprint and Print Set
Date Counter
Folders A125
117
CSM/Setup Menu
Choose the options displayed in the menus
118
Highlight My menu and press the multi selector right
Choosing Menu Items for My Menu
Highlight a menu name and press the multi selector right
119
Info Display Format
Setting the Information Display Format
Highlight a background color or a font color and press Q
120
Information displayed in Classic format is shown below
Classic
121
Wide Landscape Orientation
Wallpaper
Auto Shooting Info
To choose a photograph for the Wallpaper format
122
Shooting Info Auto off
Video Mode
LCD Brightness
Language
124
Image Comment
Select folder
125
Delete Delete all empty folders on the memory card
Folder Names
View the current camera firmware version
Choose how the camera names files
126
File Numbering
127
Acquiring Image Dust Off Reference Data
Image Dust Off
128
129
Creating Retouched Copies The Retouch Menu
130
Creating Retouched Copies
Creating Retouched Copies The Retouch Menu
Retouching Copies
Display retouch options
Creating Retouched Copies in Full-frame Playback
131
Image overlay is not available during full-frame playback
Quick Retouch
Lighting
Image Quality and Size
133
Red-Eye Correction
Trim
Monochrome
Create cropped copies of selected photographs
Choose from the following options
Filter Effects
135
Filter amount
Small Picture
Highlight Choose size Display options
136
Confirmation dialog displayed
Display selection screen
Highlight Yes and press Q
Viewing Small Pictures
138
Image Overlay
Photograph selection dialog will be displayed
Selected image will appear as Image
Press the multi selector left or right to highlight Image
Proceed to step When Save is selected and Qis pressed,
Check the preview image and press Q
139
Desired
NEF RAW Processing
Creating a Stop-motion Movie
141
Screen shown at right will be displayed
Highlight Save and press Q
When End image is selected, repeat to select the ending
142
Image will be displayed in full-frame playback
Before and after Making a Side-by-Side Comparison
143
Retouch menu items will be displayed
Creating Retouched Copies The Retouch Menu Menu Guide
144
145
Use Only Nikon Brand Electronic Accessories
146
Compatible Lenses
147
Incompatible Accessories and Non-CPU Lenses
Lens f-number
Recognizing CPU and Type G and D Lenses
AF-S/AF-I Teleconverter
148
CPU Lens Aperture Ring
Non-CPU Lenses
50mm M/3 ft AF-S 28-70mm f/2.8D ED 24mm
149
Accessory shoe allows SB-series Speedlights, including
Optional Flash Units Speedlights
150
151
Optional Flash Units Speedlights
Guide Number
152
153
Use Only Nikon Flash Accessories
G, h, i, j, k, and lModes
Sync Terminal Adapter AS-15
H, i, j, l, amodes
154
ISO sensitivity 100 200 400 800 1600
Kmode
Other Accessories
Viewfinder eyepiece accessories
155
156
Other Accessories AC Adapter EH-5a/Power Connector EP-5
Connecting the Power Connector and the AC Adapter
Other Accessories
157
158
Approved Memory Cards
Caring for the Camera
Cleaning
Storage
159
Cleaning from the Setup Menu Option
Automatic Low-Pass Filter Cleaning Clean Image Sensor
Caring for the Optical Low-Pass Filter
Place the camera base down
Select Clean at
Cleaning at Startup/Shutdown
Select an option
161
Use a Reliable Power Source
Cleaning the Low-Pass Filter Manually
Press the shutter-release button all the way down
162
Remove any dust and lint from the filter with a blower
163
Foreign Matter on the Low-Pass Filter
Lens contacts Keep the lens contacts clean
Caring for the Camera and Battery Cautions
Camera and Lens
164
165
Caring for the Camera and Battery Cautions
166
Battery
Display
Troubleshooting
167
Is selected for Auto shooting info
Shooting
Select Full for CSM/Setup menu
All shooting modes
168
169
C, and dmodes
170
Playback
Others
171
Select On for Rotate tall
Camera Error Messages and Displays
172
Help
173
Set Playback folder to All
174
Err Contact Nikon-authorized service
Service representative
175
Err
Following defaults are restored with Custom Setting R Reset
Available Settings and Defaults
Defaults for other settings are listed below
Appendix
177
Exposure program for mode P is shown in the following graph
Exposure Program Mode P
Memory Card Capacity and Image Quality/Size
178
Shutter Speeds Available with the Built-in Flash
Flash Control
Aperture, Sensitivity, and Flash Range
179
180
Specifications
Matrix or center-weighted metering 0-20 EV
181
Spot metering 2-20 EV
182
183
Specifications
Battery Life
Rechargeable Li-ion Battery EN-EL9
Quick Charger MH-23
184
185
Lens
186
Supported Standards
Symbols
Index
187
188
Jpeg 50
Monitor 5, 8, 72, 123, 159
189
Shutter speed 7, 9, 40, 44
USB cable 80, 81, 85
Speedlight 113, 150, 152
190
Index Technical Notes
191
YP8A0111 6MB01411-01