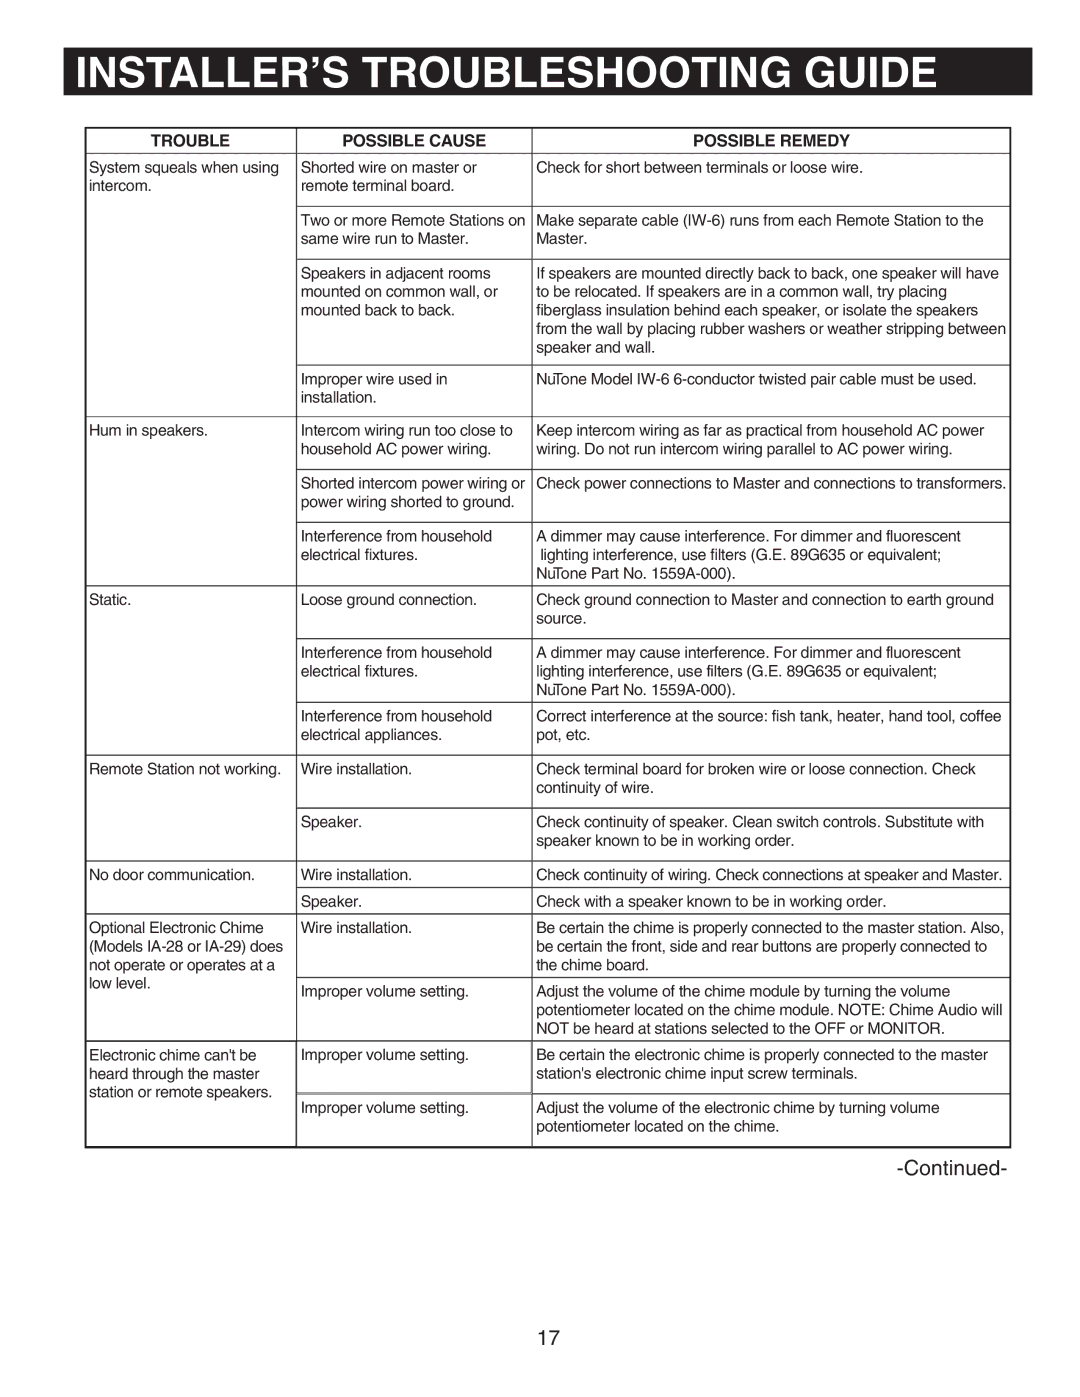
INSTALLER’S TROUBLESHOOTING GUIDE
TROUBLE | POSSIBLE CAUSE | POSSIBLE REMEDY | |
|
|
| |
System squeals when using | Shorted wire on master or | Check for short between terminals or loose wire. | |
intercom. | remote terminal board. |
| |
|
|
| |
| Two or more Remote Stations on | Make separate cable | |
| same wire run to Master. | Master. | |
|
|
| |
| Speakers in adjacent rooms | If speakers are mounted directly back to back, one speaker will have | |
| mounted on common wall, or | to be relocated. If speakers are in a common wall, try placing | |
| mounted back to back. | fiberglass insulation behind each speaker, or isolate the speakers | |
|
| from the wall by placing rubber washers or weather stripping between | |
|
| speaker and wall. | |
|
|
| |
| Improper wire used in | NuTone Model | |
| installation. |
| |
|
|
| |
Hum in speakers. | Intercom wiring run too close to | Keep intercom wiring as far as practical from household AC power | |
| household AC power wiring. | wiring. Do not run intercom wiring parallel to AC power wiring. | |
|
|
| |
| Shorted intercom power wiring or | Check power connections to Master and connections to transformers. | |
| power wiring shorted to ground. |
| |
|
|
| |
| Interference from household | A dimmer may cause interference. For dimmer and fluorescent | |
| electrical fixtures. | lighting interference, use filters (G.E. 89G635 or equivalent; | |
|
| NuTone Part No. | |
|
|
| |
Static. | Loose ground connection. | Check ground connection to Master and connection to earth ground | |
|
| source. | |
|
|
| |
| Interference from household | A dimmer may cause interference. For dimmer and fluorescent | |
| electrical fixtures. | lighting interference, use filters (G.E. 89G635 or equivalent; | |
|
| NuTone Part No. | |
|
|
| |
| Interference from household | Correct interference at the source: fish tank, heater, hand tool, coffee | |
| electrical appliances. | pot, etc. | |
|
|
| |
Remote Station not working. | Wire installation. | Check terminal board for broken wire or loose connection. Check | |
|
| continuity of wire. | |
|
|
| |
| Speaker. | Check continuity of speaker. Clean switch controls. Substitute with | |
|
| speaker known to be in working order. | |
|
|
| |
No door communication. | Wire installation. | Check continuity of wiring. Check connections at speaker and Master. | |
|
|
| |
| Speaker. | Check with a speaker known to be in working order. | |
|
|
| |
Optional Electronic Chime | Wire installation. | Be certain the chime is properly connected to the master station. Also, | |
(Models |
| be certain the front, side and rear buttons are properly connected to | |
not operate or operates at a |
| the chime board. | |
low level. |
|
| |
Improper volume setting. | Adjust the volume of the chime module by turning the volume | ||
| |||
|
| potentiometer located on the chime module. NOTE: Chime Audio will | |
|
| NOT be heard at stations selected to the OFF or MONITOR. | |
|
|
| |
Electronic chime can't be | Improper volume setting. | Be certain the electronic chime is properly connected to the master | |
heard through the master |
| station's electronic chime input screw terminals. | |
station or remote speakers. |
|
| |
Improper volume setting. | Adjust the volume of the electronic chime by turning volume | ||
| |||
|
| potentiometer located on the chime. | |
|
|
| |
|
|
17