Connections

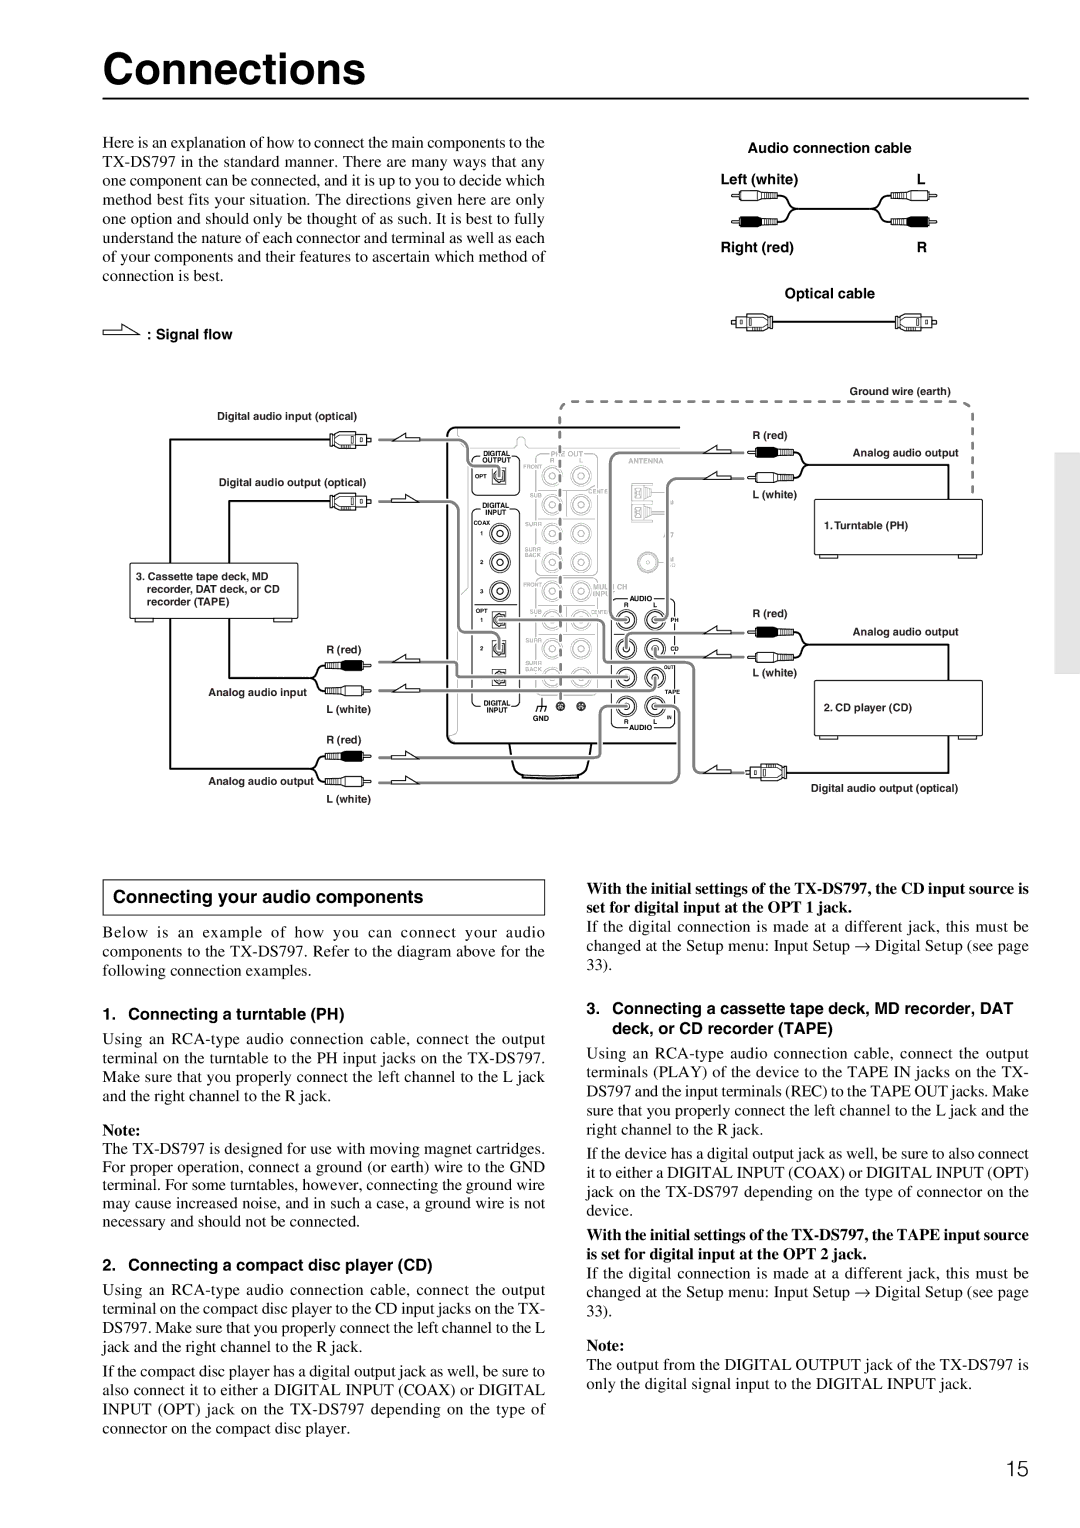
Here is an explanation of how to connect the main components to the TX-DS797 in the standard manner. There are many ways that any one component can be connected, and it is up to you to decide which method best fits your situation. The directions given here are only one option and should only be thought of as such. It is best to fully understand the nature of each connector and terminal as well as each of your components and their features to ascertain which method of connection is best.

: Signal flow

Audio connection cable


Left (white)

L

Right (red)

R

Optical cable


Ground wire (earth)

Digital audio input (optical)

Digital audio output (optical)

3.Cassette tape deck, MD recorder, DAT deck, or CD recorder (TAPE)

R (red)

Analog audio input

L (white)

R (red)

Analog audio output

L (white)

DIGITAL


PRE OUT


OUTPUT

FRONT

R

L

ANTENNA


OPT


SUB


CENTER


DIGITAL


AM


INPUT


COAX

SURR


1


SURR


BACK


FM

2


75


3

FRONT


MULTI CH


INPUT

AUDIO


R

OPT

SUB


L


CENTER


1


PH


SURR


2


CD


SURR


OUT


BACK


3


R


L

TAPE

DIGITAL


INPUT

GND


R

IN


L

AUDIO

R (red)

Analog audio output

L (white)

1. Turntable (PH)

R (red)

Analog audio output

L (white)

2. CD player (CD)

Digital audio output (optical)

Connecting your audio components

Below is an example of how you can connect your audio components to the TX-DS797. Refer to the diagram above for the following connection examples.

1. Connecting a turntable (PH)

Using an RCA-type audio connection cable, connect the output terminal on the turntable to the PH input jacks on the TX-DS797. Make sure that you properly connect the left channel to the L jack and the right channel to the R jack.

Note:

The TX-DS797 is designed for use with moving magnet cartridges. For proper operation, connect a ground (or earth) wire to the GND terminal. For some turntables, however, connecting the ground wire may cause increased noise, and in such a case, a ground wire is not necessary and should not be connected.

2. Connecting a compact disc player (CD)

Using an RCA-type audio connection cable, connect the output terminal on the compact disc player to the CD input jacks on the TX- DS797. Make sure that you properly connect the left channel to the L jack and the right channel to the R jack.

If the compact disc player has a digital output jack as well, be sure to also connect it to either a DIGITAL INPUT (COAX) or DIGITAL INPUT (OPT) jack on the TX-DS797 depending on the type of connector on the compact disc player.

With the initial settings of the TX-DS797, the CD input source is set for digital input at the OPT 1 jack.

If the digital connection is made at a different jack, this must be changed at the Setup menu: Input Setup Digital Setup (see page 33).

3.Connecting a cassette tape deck, MD recorder, DAT deck, or CD recorder (TAPE)

Using an RCA-type audio connection cable, connect the output terminals (PLAY) of the device to the TAPE IN jacks on the TX- DS797 and the input terminals (REC) to the TAPE OUT jacks. Make sure that you properly connect the left channel to the L jack and the right channel to the R jack.

If the device has a digital output jack as well, be sure to also connect it to either a DIGITAL INPUT (COAX) or DIGITAL INPUT (OPT) jack on the TX-DS797 depending on the type of connector on the device.

With the initial settings of the TX-DS797, the TAPE input source is set for digital input at the OPT 2 jack.

If the digital connection is made at a different jack, this must be changed at the Setup menu: Input Setup Digital Setup (see page 33).

Note:

The output from the DIGITAL OUTPUT jack of the TX-DS797 is only the digital signal input to the DIGITAL INPUT jack.

15

Page 15
Image 15
Onkyo TX-DS797 instruction manual Connections, Connecting your audio components, Connecting a turntable PH

TX-DS797 specifications

The Onkyo TX-DS797 is an iconic AV receiver that has left a lasting impression on home theater enthusiasts since its release. Known for its robust performance and extensive feature set, this receiver is designed to deliver an immersive audio-visual experience that can elevate any entertainment setup.

One of the standout features of the TX-DS797 is its impressive multi-channel amplification system. With a power output of 100 watts per channel, the receiver can drive a wide range of speakers, providing dynamic sound that fills the room. This power is complemented by Onkyo’s Wide Range Amplification Technology, which ensures clear and accurate sound reproduction across various frequencies. The receiver supports Dolby Digital, DTS, and THX audio formats, making it suitable for both movies and music.

The TX-DS797 is equipped with multiple inputs and outputs, allowing for extensive connectivity options. It includes six composite video inputs, three S-video inputs, and two component video inputs, making it easy to connect various devices such as DVD players, gaming consoles, and satellite receivers. Additionally, the receiver features a built-in AM/FM tuner and supports recording outputs, giving users the flexibility to manage their media.

In terms of audio processing, the TX-DS797 boasts a 24-bit/192 kHz DAC, ensuring high-fidelity audio playback. The receiver also supports various audio codecs, providing users with a diverse listening experience that caters to different preferences. The inclusion of the Onkyo’s proprietary DSP (Digital Signal Processing) allows for accurate simulation of different sound environments, enhancing the immersion during movie watching and music listening.

Furthermore, the TX-DS797 is designed with user convenience in mind. Its intuitive on-screen display makes navigation through various settings and configurations a straightforward process. It also comes with a remote control, allowing users to manage their audio-visual setups from the comfort of their couch.

With a sleek and modern design, the Onkyo TX-DS797 not only performs well but also adds an aesthetic appeal to any home theater environment. It offers an excellent balance of power, versatility, and advanced technology, making it an enduring choice for audiophiles and casual listeners alike. Whether you are watching a blockbuster film or listening to your favorite music, the TX-DS797 delivers an exceptional performance that is hard to beat.