Manuals
/
Onkyo
/
Home Audio
/
Stereo System
Onkyo
TX-SR573 First Time Setup, Assigning Digital Inputs to Sources, Changing the Input Display
Models:
TX-SR573
1
31
79
79
Download
79 pages
9.26 Kb
28
29
30
31
32
33
34
35
Troubleshooting
Install
Digital Signal Formats
indicator
Connecting Your Speakers
the preset number flashes
Supplied Accessories
First Time Setup
Adjusting the Bass & Treble
Memory Backup
Page 31
Image 31
Page 30
Page 32
Page 31
Image 31
Page 30
Page 32
Contents
AV Receiver
Contents
TX-SR573
Instruction Manual
AVIS
Important Safety Instructions
For U.S. models
Precautions
Memory Backup
4.Power
Processing
Supplied Accessories
Features
Remote Controller
Introduction
Contents
Turning On & First Time Setup
Using the Listening Modes
Front Panel
Front & Rear Panels
2 3 4 5 6 78 9J K L
Display
Front & Rear Panels—Continued
Front & Rear Panels—Continued
Rear Panel
Notes
Remote Controller
Installing the Batteries
Using the Remote Controller
About the Remote Controller Modes
Remote Controller—Continued
RECEIVER/TAPE Mode
ASTANDBY button
Remote Controller—Continued
Remote Controller-Continued
DVD Mode
Remote Controller—Continued
CD, MD & CDR Modes
Remote Controller—Continued
HDD Mode
About Speakers
Connecting Your Speakers
Attaching the Speaker Labels
Connecting Your Speakers—Continued
Speaker Connection Precautions
How Many Speakers?
Connecting Your Speakers—Continued
Connecting Speaker Set A
Connecting a Powered Subwoofer
Connecting Speaker Set B
Connecting the AM Loop Antenna
Connecting Antenna
Connecting the Indoor FM Antenna
Notes
Connecting Antenna—Continued
Connecting an Outdoor FM Antenna
Connecting an Outdoor AM Antenna
AV Connection Color Coding
Connecting Your Components
About AV Connections
Optical Digital Jacks
Audio Connection Formats
Connecting Your Components—Continued
Which Connections Should I Use?
Video Connection Formats
Connecting Your Components—Continued
Connecting a TV or Projector
Hint
Connecting Your Components—Continued
Connecting a DVD player
or the other
Connecting a VCR or DVD Recorder for Playback
Connecting Your Components—Continued
VCR, DVD recorder
Connecting Your Components—Continued
Connecting a VCR or DVD Recorder for Recording
With connection
Connecting Your Components—Continued
Step
Connecting a CD Player or Turntable
Connecting Your Components—Continued
CD Player or Turntable with Built-inPhono Preamp
Connecting Your Components—Continued
Connecting Another Component’s Power Cord
Cassette recorder, CDR, etc
Notes
Connecting -capableOnkyo Components
Connecting the Power Cord
Connecting Your Components—Continued
Smooth Operation in a Few Easy Steps
Turning On & Standby
Turning On the AV Receiver
TUNER Digital inputs cannot be assigned to
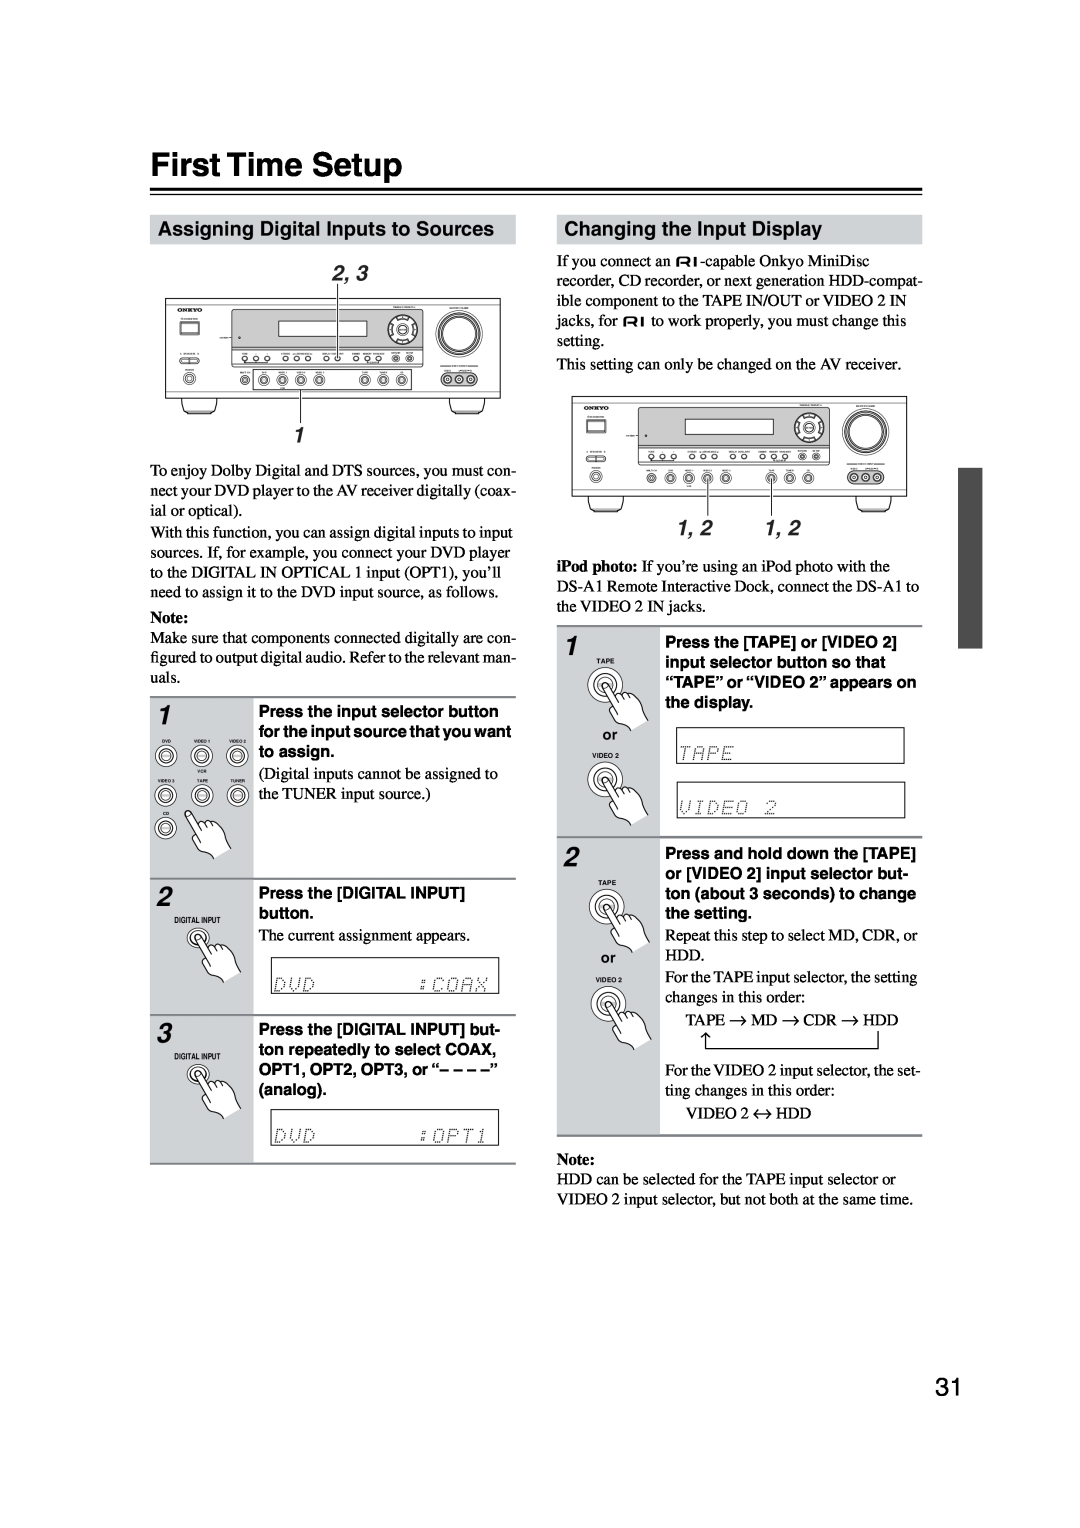
First Time Setup
Assigning Digital Inputs to Sources
Changing the Input Display
nected
First Time Setup—Continued
Speaker Configuration
Yes: Select if a subwoofer is con
Notes
First Time Setup—Continued
properly, press the remote controller’s TEST
None
Playing Your AV Components
Basic AV Receiver Operation
Interpreting Surround Channel Information
Using the Multichannel DVD Input
Playing Your AV Components—Continued
Displaying Source Information
Displaying AM/FM Radio Information
Tuning into AM/FM Radio Stations
Listening to the Radio
Listening to AM/FM Stations
Signing Up for XM Satellite Radio
Connecting the XM Antenna
Listening to the Radio—Continued
Listening to XM Satellite Radio
Channels cannot be selected while the
Selecting XM Radio Channels
indicator
Listening to the Radio—Continued
Listening to the Radio—Continued
Displaying XM Radio Information
Selecting XM Channels from the Front Panel
Listening to the Radio—Continued
Positioning the XM Antenna
XM Radio Messages
SETUP button
the preset number flashes
Presetting AM/FM Stations & XM Channels
Selecting Presets
Deleting Presets
Muting the AV Receiver
Setting the Display Brightness
Adjusting the Bass & Treble
Common Functions
Common Functions—Continued
Using the Sleep Timer
Adjusting Speaker Levels
Using Headphones
Selecting on the AV receiver
Using the Listening Modes
Selecting with the Remote Controller
Selecting the Listening Modes
Using the Listening Modes—Continued
Using the Listening Modes—Continued
About the Listening Modes
Orchestra
Onkyo Original DSP Modes
Using the Listening Modes—Continued
Mono Movie
Using the Listening Modes—Continued
Using the CinemaFILTER
Using the Late Night Function Dolby Digital only
Using the Audio Adjust Settings
Dolby Digital EX Input Signal Setting
Input Channel Settings
PL II & PL IIx Music Mode Settings
DTS Neo:6 Music Mode Setting
2.Prepare the VCR for recording
Recording
Recording the Input Source
Recording from Different Sources
Double Bass
Advanced Setup
Advanced Speaker Settings
Crossover Frequency
Notes
Advanced Setup—Continued
Speaker Distance
Speaker Levels
6Press the SETUP button
Digital Signal Formats
Advanced Setup—Continued
buttons to adjust the speaker
Controlling Other Components
Entering Remote Control Codes
Notes
Resetting the REMOTE MODE Buttons
Resetting the Remote Controller
Controlling Other Components—Continued
Controlling a TV
Controlling Other Components—Continued
Learning Commands from Other Remote Controllers
Notes
Deleting Macros
Using Macros
Making Macros
Running Macros
Power
Troubleshooting
Audio
Video
Troubleshooting—Continued
Tuner
Troubleshooting—Continued
Remote Controller
Recording
Others
Tuner Section
Specification
Amplifier Section
Video Section
Memo
ONKYO CHINA LIMITED
ONKYO U.S.A. CORPORATION
ONKYO EUROPE ELECTRONICS GmbH
ONKYO EUROPE UK Office
Page
Page
Page
Page
Page
Page
Page
Page
Page
Page
Page
Page
Page
Top
Page
Image
Contents