Oregon Scientific WMR200 manual Montagem DA Unidade Remota, Por, Para montar o sensor de vento

Models: WMR200

1 95
Download 95 pages 25.14 Kb
Page 77
Image 77

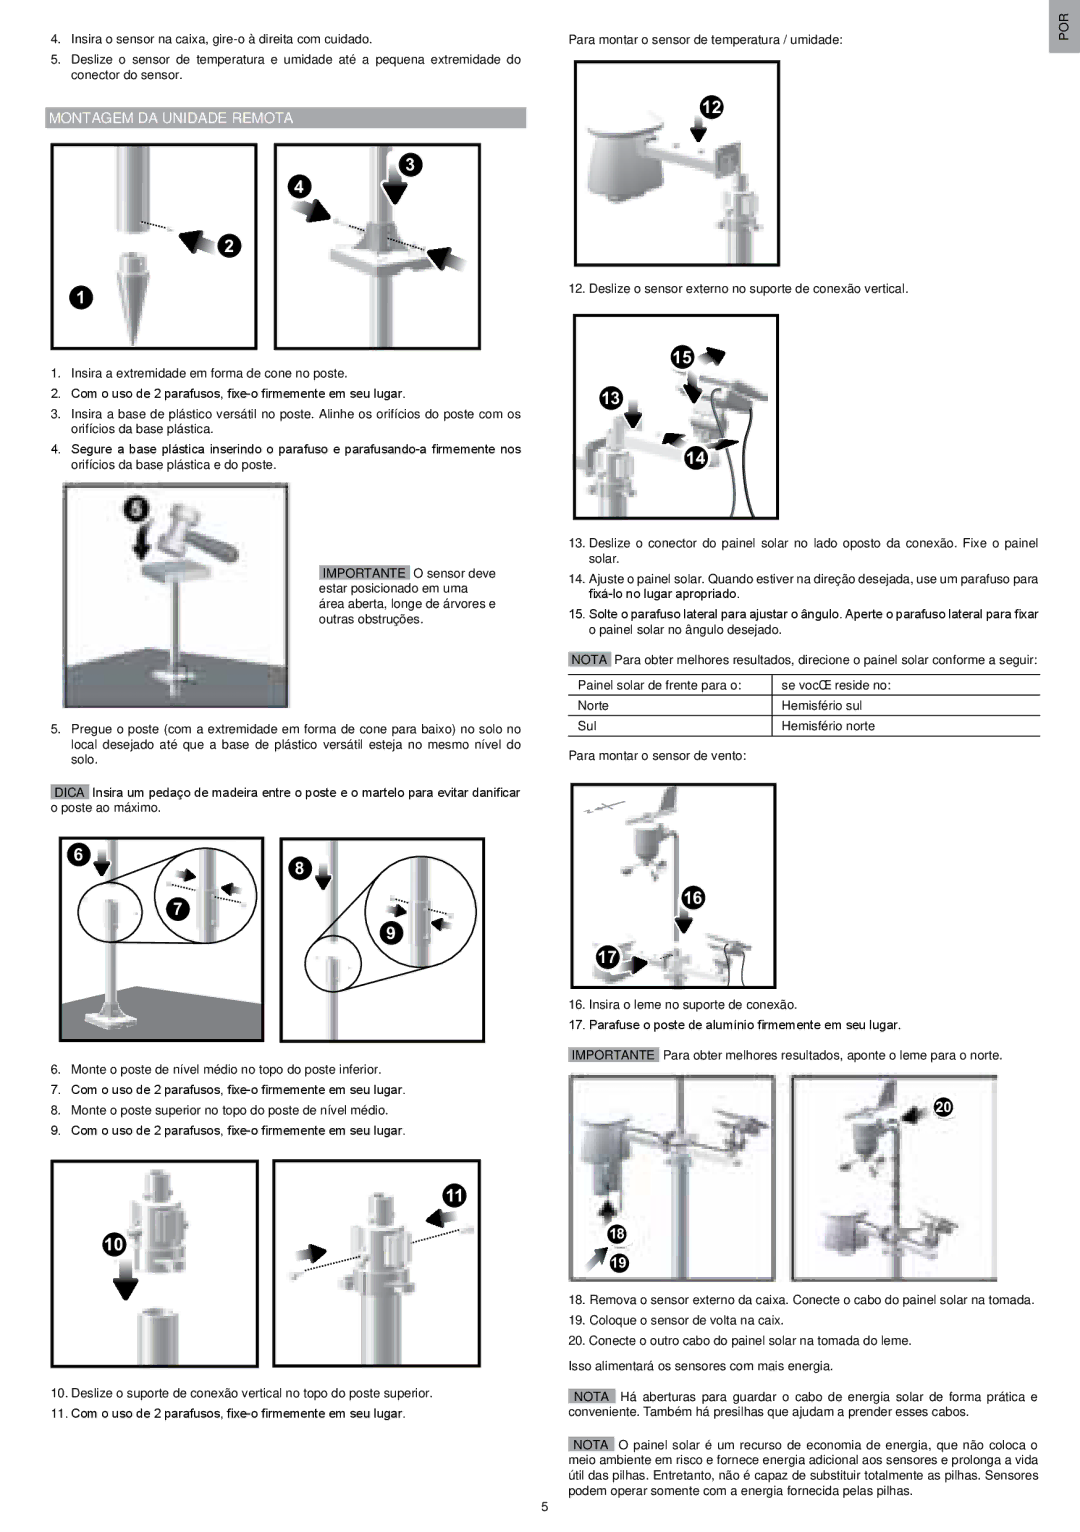
4.Insira o sensor na caixa, gire-o à direita com cuidado.

5.Deslize o sensor de temperatura e umidade até a pequena extremidade do conector do sensor.

MONTAGEM DA UNIDADE REMOTA

Para montar o sensor de temperatura / umidade:

POR


12

2

1

3

4

12. Deslize o sensor externo no suporte de conexão vertical.

15

1.Insira a extremidade em forma de cone no poste.

2.Com o uso de 2 parafusos, fixe-o firmemente em seu lugar.

3.Insira a base de plástico versátil no poste. Alinhe os orifícios do poste com os orifícios da base plástica.

4.Segure a base plástica inserindo o parafuso e parafusando-a firmemente nos orifícios da base plástica e do poste.

IMPORTANTE O sensor deve estar posicionado em uma área aberta, longe de árvores e outras obstruções.

5.Pregue o poste (com a extremidade em forma de cone para baixo) no solo no local desejado até que a base de plástico versátil esteja no mesmo nível do solo.

DICA Insira um pedaço de madeira entre o poste e o martelo para evitar danificar o poste ao máximo.

13

14

13.Deslize o conector do painel solar no lado oposto da conexão. Fixe o painel solar.

14.Ajuste o painel solar. Quando estiver na direção desejada, use um parafuso para

fixá-lo no lugar apropriado.

15.Solte o parafuso lateral para ajustar o ângulo. Aperte o parafuso lateral para fixar o painel solar no ângulo desejado.

NOTA Para obter melhores resultados, direcione o painel solar conforme a seguir:

Painel solar de frente para o:

se você reside no:

Norte

Hemisfério sul


Sul

Hemisfério norte

Para montar o sensor de vento:


6

7

8

9

16

17

16.Insira o leme no suporte de conexão.

17.Parafuse o poste de alumínio firmemente em seu lugar.

IMPORTANTE Para obter melhores resultados, aponte o leme para o norte.

6.Monte o poste de nível médio no topo do poste inferior.

7.Com o uso de 2 parafusos, fixe-o firmemente em seu lugar.

8.Monte o poste superior no topo do poste de nível médio.

9.Com o uso de 2 parafusos, fixe-o firmemente em seu lugar.

11

10

10.Deslize o suporte de conexão vertical no topo do poste superior.

11.Com o uso de 2 parafusos, fixe-o firmemente em seu lugar.

20

18

19

18.Remova o sensor externo da caixa. Conecte o cabo do painel solar na tomada.

19.Coloque o sensor de volta na caix.

20.Conecte o outro cabo do painel solar na tomada do leme.

Isso alimentará os sensores com mais energia.

NOTA Há aberturas para guardar o cabo de energia solar de forma prática e conveniente. Também há presilhas que ajudam a prender esses cabos.

NOTA O painel solar é um recurso de economia de energia, que não coloca o meio ambiente em risco e fornece energia adicional aos sensores e prolonga a vida útil das pilhas. Entretanto, não é capaz de substituir totalmente as pilhas. Sensores podem operar somente com a energia fornecida pelas pilhas.

5

Page 77
Image 77
Oregon Scientific WMR200 manual Montagem DA Unidade Remota, Para montar o sensor de temperatura / umidade, Por

WMR200 specifications

The Oregon Scientific WMR200 is a versatile and advanced weather station designed for enthusiasts and professionals alike. Renowned for its user-friendly interface and robust functionality, the WMR200 is an excellent tool for monitoring both indoor and outdoor weather conditions.

One of the main features of the WMR200 is its array of sensors that provide comprehensive weather data. It includes an anemometer for measuring wind speed and direction, a rain gauge for precipitation measurement, and a thermo-hygrometer for tracking temperature and humidity levels. This combination allows users to analyze various weather elements, enhancing their understanding of local climate patterns.

The wireless technology embedded in the WMR200 is another key characteristic. The system utilizes advanced wireless transmission that allows sensors to communicate wirelessly with the main console, reducing the need for cumbersome cables. This feature not only simplifies setup but also enhances the overall aesthetic of the installation. The range of the wireless transmission is impressive, typically covering distances of up to 100 meters, depending on environmental factors.

The main console of the WMR200 features a clear LCD display that provides real-time readings of the collected data. Users can easily switch between various weather parameters, ensuring they have the most pertinent information at their fingertips. Additionally, the console can store historical weather data, enabling users to track changes over time and identify trends.

Another significant advantage of the WMR200 is its compatibility with online weather services. Users can sync their weather station with various online platforms, allowing them to share their data with a broader community or access specific analytical tools. This connectivity extends the utility of the WMR200 beyond individual use, fostering collaboration among amateur meteorologists and enthusiasts.

Furthermore, the WMR200 is designed with durability in mind. The sensors are built to withstand various weather conditions, ensuring accurate readings regardless of the elements. The materials used in the construction of the unit are weather-resistant, making it suitable for outdoor installation.

In summary, the Oregon Scientific WMR200 combines advanced technology with user-friendly design, catering to a diverse audience interested in weather observation. Its comprehensive sensor array, wireless features, historical data storage, and online connectivity make it an essential tool for anyone keen on understanding and monitoring weather dynamics. Whether for personal curiosity or professional applications, the WMR200 stands out as a reliable and effective weather station.