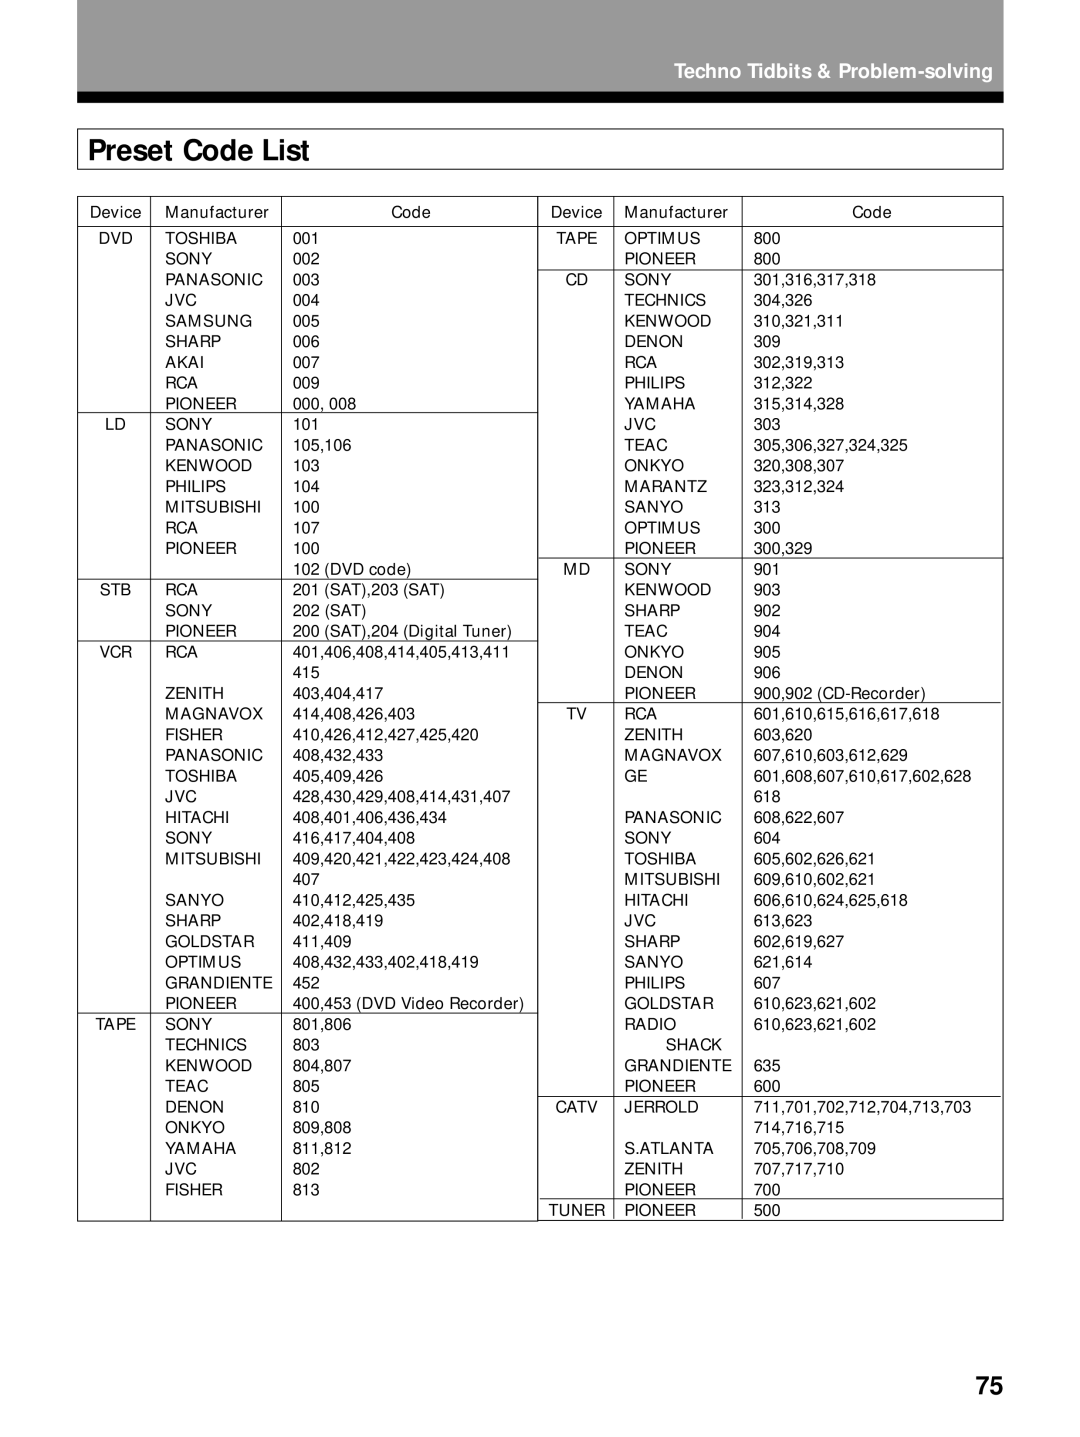
VSX-27TX VSX-26TX VSX-24TX
AUDIO/VIDEO MULTI-CHANNELRECEIVER
Operating Instructions
ET NE SÉPARE PAS L’APPAREIL DE LA SOURCE DE
For Canadian model
IMPORTANT NOTICE
L’INTERRUPTEUR EST CONNECTÉ AU SECONDAIRE
IMPORTANT SAFETY INSTRUCTIONS
Information to User
True Home Cinema with THX Certification
Features
Illuminated Remote Control of Other Components
Direct Energy MOS amplifier
Using the Tuner
Table of Contents
PREPARATION SET UP OPERATION
Surround Sound Set Up
SET UP
Checking the Supplied Accessories
How to Use This Manual
Preparing the Remote Control
PREPARATION
Installing the Receiver
Operating range of remote control unit
Opening the Front Panel
7Audio cords
Connecting Your Equipment
Cassette deck placement
Audio Components
7Audio/Video cords
Connecting Your Equipment
Video Components
Front
or standard video cord
Digital Connections
7Digital audio cords/Optical cables
Digital audio cord
DVD/LD player or LD player VSX-26TX/24TXmodels
When playing LD recorded in Dolby Digital
Example Connection for a DVD/LD or LD player
VSX-27TXmodel
External Decoder Input
Connecting Your Equipment
VSX-27TX
7AM loop antenna
Using external antennas
Vinyl-coatedwire
Antennas
Front Speakers
Powered sub woofer
Speakers
7Speaker terminals
STANDBY/ON
Speaker placement
Speaker impedance 26TX and 24TX only
while holding down the SPEAKERS button
UNSWITCHED 100 W 0.8 A MAX
Connecting additional amplifiers
Power connections AC OUTLETS
SWITCHED TOTAL 100 W 0.8 A MAX
Surround/dts mode indicators
1 SIGNAL SELECT indicators
8 STEREO indicator
9 Radio Frequency/Function indicator
Front Panel VSX-27TX/26TX
2STANDBY indicator
=MASTER VOLUME
8Source indicators VSX-27TXonly
#MIDNIGHT button See p.41
SIGNAL SELECT button See p.40
@ LOUDNESS button See p.42
TAPE 2 MONITOR button See p.60
9FL DIMMER button See p.43
MASTER VOLUME
Front Panel VSX-24TX
8TAPE 2 MONITOR button See p.60
TUNER CONTROL button See p.44-47
$ SIGNAL SELECT button See p.40
# DIGITAL NR button See p.41
+ SPEAKERS A/B buttons
2 MULTI CONTROL buttons
Remote Control
1 2 3 4 5 6
1 SOURCE button See p.52-59
SIGNAL SELECT button
8SYSTEM SET UP button
9REMOTE SETUP button
#MASTER VOLUME button
On Screen Display
Surround Sound Set Up
Setting Up for Surround Sound
2 Press SYSTEM SETUP button
Speaker Setting See p.26-27
SET UP
Surround Sound Set Up
4 Go on to the next page to continue set up
Press the button
Speaker Setting
1 Select SPEAKER SETTING with the 5´ buttons
Press ENTER
SUB WOOFER default setting is YES
FRONT default setting is LARGE
CENTER default setting is LARGE
SURROUND default setting is LARGE
the distance from your listening position to each
Channel Delay
speaker using the commands below
Use the 5´ buttons to select a speaker. Specify
2 Select aTEST TONE mode
CHANNEL DELAY, it will already be selected
Channel Level
1 Select CHANNEL LEVEL if continuing from
In AUTO mode
If you are using a Sound Pressure Level SPL meter
To exit before outputting the TEST TONE
To exit while outputting the TEST TONE
speakers
3 Select EXIT to return to the SYSTEM SETUP MENU
Crossover Network
2 Specify the crossover frequency for your small
Surround Sound Set Up
SYSTEM SETUP MENU
Bass Peak Level Manager
3 Select EXIT and press ENTER to return to the
Surround Sound Set Up
D-RangeControl
2 Use the 2 or 3 arrows to choose OFF, MID or
SET UP
terminal
Digital-InSelect
Use the 2 or 3 to choose the input function that
matches the component hooked up to that digital
OPERATION
1 Turn on the power of the playback component
Basic Playback
Playing Sources with Stereo Sound
ADVANCED THEATER modes
Sound Modes
STANDARD mode
HOME THX CINEMA mode
JAZZ
DSP modes
Stereo mode
HALL
STANDARD
Selecting a Sound Mode
Surround operation
Select the sound mode
Basic Playback
Playing Sources with Dolby Digital or DTS Sound
1 Turn on the receiver
5 Play a source for example, a DVD player
VSX-26TX/24TXmodels =ANALOG DIGITAL+
Switching ANALOG/DIGITAL Signal Input
SIGNAL SELECT
VSX-27TXmodel = AUTO = ANALOG = DIGITAL = AC-3RF
Press MIDNIGHT
1 Press STEREO on the remote control or on the
Listening in MIDNIGHT LISTENING Mode
front panel
Press EXTERNAL DECODER IN
External decoder playback
96kHz 24bit Performance
Listening in LOUDNESS Mode
Direct playback
Adjusting bass and treble tone control
Press TREBLE -/+to adjust the high frequencies
Press BASS -/+to adjust the low frequencies
For Automatic Tuning
Using the Tuner
Automatic and Manual Tuning
4 Adjust the volume
To cancel before inputting the frequency
Direct Access Tuning
Using the Tuner
Access tuning mode
2 Press MEMORY to activate the memory function
Using the front panel
Memorizing Frequently Used Stations
1 Tune in the desired station
2 Press CLASS repeatedly to select a class number
Using the remote control
Recalling Memorized Stations
1 Press TUNER
To cancel the PRESET RECALL SETUP mode
Remote Control of Other components
Recalling preset codes
2 Press REMOTE SETUP
component you want to control
Remote Control of Other Components
controlled, enter the 3 digit setup code
4 Press the MULTI CONTROL button for the
The REMOTE SET UP menu appears on your TV screen
Press REMOTE SETUP
Press REMOTE SETUP and 2 at the same time to
select the LEARNING SETUP mode
To program operations for another component
Press REMOTE SETUP to exit the LEARNING SETUP
5 Press the button to be programmed
mode
TOP MENU
Using Remote Control with Other Components
DVD or LD player operations
1SOURCE
=MENU
VCR & DVD video recorder operations
0CHANNEL -/+
ENTER TV/VCR
Remote Control of Other Components
CD player operations
5 Number buttons
0DISC
Remote Control of Other Components
MD operations
6 +10
0DISC DISP/CHARA
4GUIDE
STB satellite tuner operations
2 ÷7÷3÷8÷1 A/B/C/D/E
3Number buttons
3 DTV ON/OFF
STB DTV operations
1 SOURCE
2 DTV MENU
Control to Control Other Components,“ p
TV operations
2DTV MENU
96 5÷÷2÷3÷ENTER
1 SOURCE
Cassette deck operations
5Number buttons 1~6
Remote Control of Other Components
Recording from Audio Components
Using Other Functions
that function. Remember, SIGNAL SELECT must be
source component TAPE 2 indicator off
1 Prepare the source you want to record and put
Using Other Functions
the receiver in that function. Set the SIGNAL
Recording from Digital Audio Components
record and put the receiver in that function
Set the SIGNAL SELECT to analog
Recording from Video Components
1 First, decide the component youd like to
1 Turn on your TV and the receiver
Multi Operations
Using Other Functions
OPERATION
Performing multi operations
Using the system off button
7 Press REMOTE SETUP to exit the MULTI
OPERATION SETUP mode
Remote Back Light
Setting up the direct function
Press REMOTE SETUP and 4 at the same time
3 1 1,4
1 Press and hold both REMOTE SETUP and 8 for
Resetting the Remote Control
Erasing the learned remote control commands
Erasing all signals learned & preset codes
Sub room
Set up example
Multi-Room
MULTI-ROOMconnections
Using Other Functions
MULTI-ROOMset up VSX-27TX/26TXonly
2 Press SYSTEM SETUP on the remote control
3,4,5 2,6
the INPUT SELECTOR
3,4,5
1 Press the MULTI ROOM & SOURCE button
2 Press the CONTROL button
STATION -/+
2 Press VOLUME +/- to adjust the volume
CLASS
RECEIVER
terminal of another
Remote Control
PIONEER component bearing the ë mark
To CONTROL IN
Comparison with Dolby Pro Logic Surround
Techno Tidbits & Problem-solving
Dolby Digital
Laser disc format
Surround
Techno Tidbits & Problem-solving
Dolby Digital
Dolby Pro Logic
Techno Tidbits & Problem-solving
Preset Code List
Remedy
Troubleshooting
Symptom
Cause
Remedy
Techno Tidbits & Problem-solving
Symptom
Cause
VSX-24TX
Specifications
VSX-27TX Amplifier Section
VSX-26TX
8 0 0 - 4 2 1
We Want You Listening For A Lifetime
Power cord CAUTION
Maintenance of External Surfaces
EIA