Connecting Your Equipment
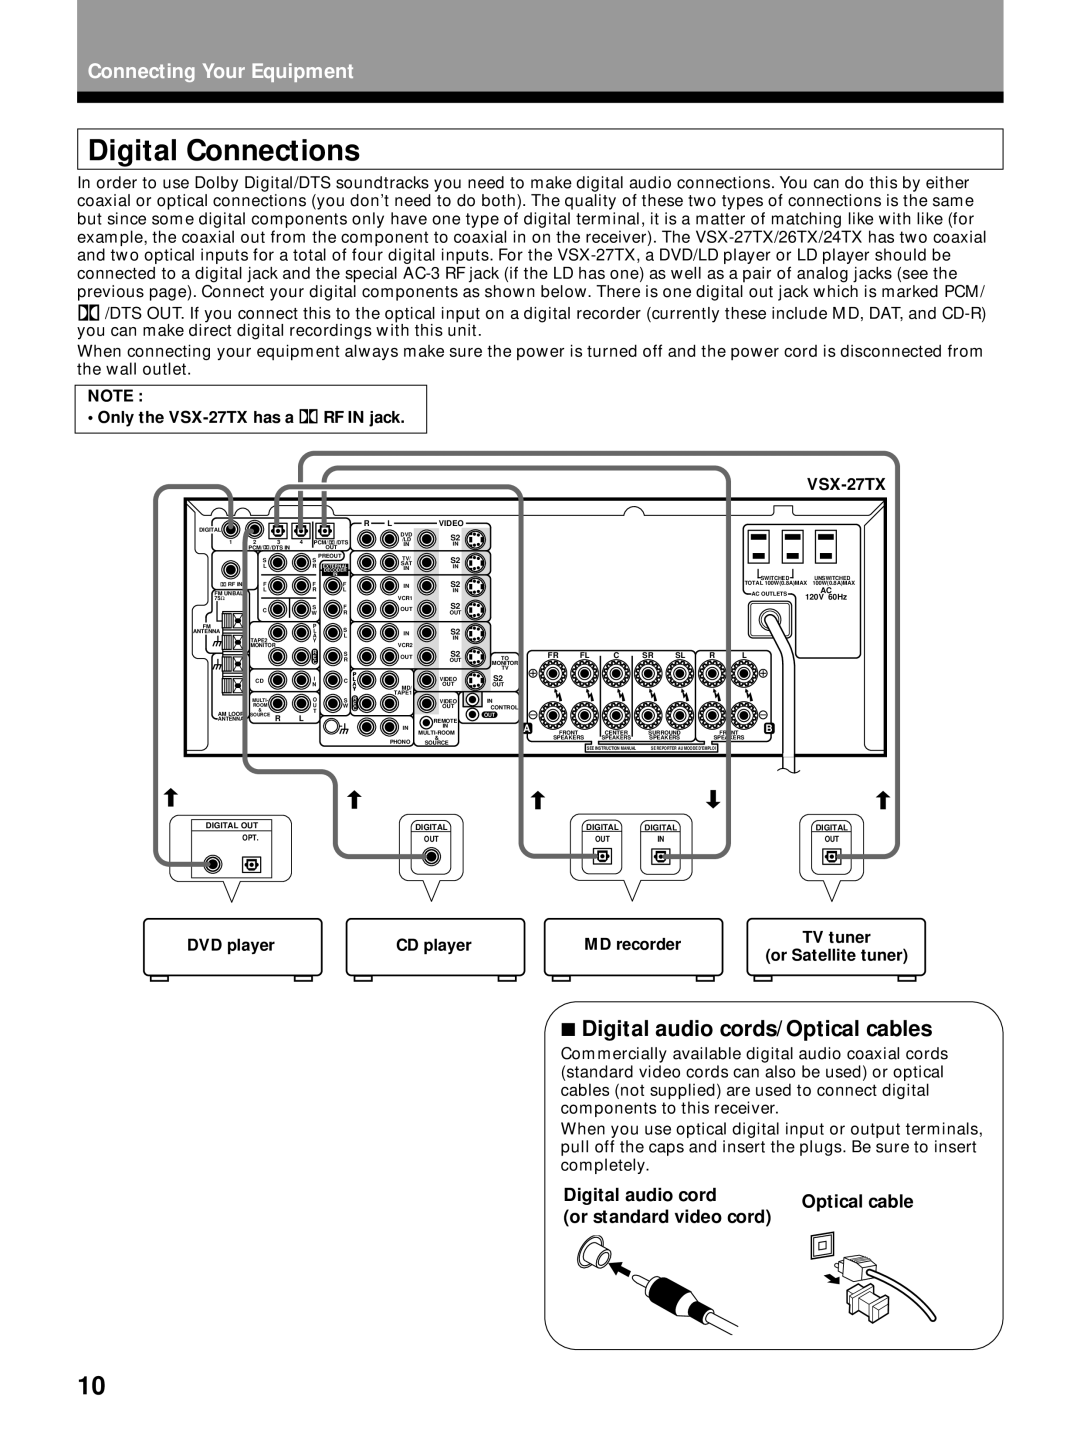
Digital Connections
In order to use Dolby Digital/DTS soundtracks you need to make digital audio connections. You can do this by either coaxial or optical connections (you don’t need to do both). The quality of these two types of connections is the same but since some digital components only have one type of digital terminal, it is a matter of matching like with like (for example, the coaxial out from the component to coaxial in on the receiver). The
![]()
![]() /DTS OUT. If you connect this to the optical input on a digital recorder (currently these include MD, DAT, and
/DTS OUT. If you connect this to the optical input on a digital recorder (currently these include MD, DAT, and
When connecting your equipment always make sure the power is turned off and the power cord is disconnected from the wall outlet.
NOTE :
• Only the VSX-27TX has a 
 RF IN jack.
|
|
|
|
|
|
|
|
|
|
|
|
|
|
|
|
|
|
| |
DIGITAL |
|
|
|
|
|
| R | L | VIDEO |
|
|
|
|
|
|
|
|
|
|
|
|
|
|
|
|
| DVD | S2 |
|
|
|
|
|
|
|
|
|
| |
|
|
|
|
|
|
|
|
|
|
|
|
|
|
|
|
|
| ||
1 | 2 | 3 | 4 | PCM/ | /DTS |
| /LD |
|
|
|
|
|
|
|
|
|
| ||
| IN | IN |
|
|
|
|
|
|
|
|
|
| |||||||
| PCM/ | /DTS IN |
|
| OUT |
|
|
|
|
|
|
|
|
|
|
|
|
| |
| S |
|
| S | PREOUT |
| TV/ | S2 |
|
|
|
|
|
|
|
|
|
| |
|
|
|
|
|
|
|
|
|
|
|
|
|
|
|
| ||||
| L |
|
| R | EXTERNAL |
| SAT | IN |
|
|
|
|
|
|
|
|
|
| |
|
|
|
| IN |
|
|
|
|
|
|
|
|
|
| |||||
|
|
|
|
| DECODER |
|
|
|
|
|
|
|
|
|
|
|
| ||
|
|
|
|
|
| IN |
|
|
|
|
|
|
|
|
|
| SWITCHED |
| UNSWITCHED |
|
|
|
|
|
|
|
|
| S2 |
|
|
|
|
|
|
|
| ||
RF IN | F |
|
| F |
| F |
| IN |
|
|
|
|
|
|
| TOTAL 100W(0.8A)MAX | 100W(0.8A)MAX | ||
FM UNBAL | L |
|
| R |
| L |
| VCR1 | IN |
|
|
|
|
|
|
| AC OUTLETS |
| AC |
75Ω |
|
|
|
|
|
|
| S2 |
|
|
|
|
|
|
|
| 120V 60Hz | ||
| C |
|
| S |
| F |
| OUT |
|
|
|
|
|
|
|
|
|
| |
|
|
| W |
| R |
| OUT |
|
|
|
|
|
|
|
|
|
| ||
|
|
|
|
|
|
|
|
|
|
|
|
|
|
|
|
| |||
FM |
|
|
| P |
| S |
|
| S2 |
|
|
|
|
|
|
|
|
|
|
ANTENNA |
|
|
| L |
|
| IN |
|
|
|
|
|
|
|
|
|
| ||
|
|
|
| A |
| L |
|
| IN |
|
|
|
|
|
|
|
|
|
|
| TAPE2 |
|
| Y |
|
|
|
|
|
|
|
|
|
|
|
|
|
| |
| MONITOR |
|
|
|
|
| VCR2 |
|
|
|
|
|
|
|
|
|
|
| |
|
|
|
| R |
| S |
|
| S2 |
| FR | FL | C | SR | SL | R | L |
|
|
|
|
|
| E |
|
| OUT | TO |
|
| |||||||||
|
|
|
| C |
| R |
|
| OUT | MONITOR |
|
|
|
|
|
|
|
|
|
|
|
|
|
|
|
| P |
|
| TV |
|
|
|
|
|
|
|
|
|
|
|
|
| I |
|
|
|
| S2 |
|
|
|
|
|
|
|
|
| |
| CD |
|
|
| C | L |
| VIDEO |
|
|
|
|
|
|
|
|
| ||
|
|
|
| N |
|
| A | MD/ | OUT | OUT |
|
|
|
|
|
|
|
|
|
|
|
|
|
|
|
| Y |
|
|
|
|
|
|
|
|
|
|
| |
|
|
|
|
|
|
| R | TAPE1 |
|
|
|
|
|
|
|
|
|
|
|
| MULTI- |
|
| O |
| S |
| VIDEO | IN |
|
|
|
|
|
|
|
|
| |
| ROOM |
|
| U |
| W | E |
| OUT | CONTROL |
|
|
|
|
|
|
|
|
|
|
|
|
| C |
|
|
|
|
|
|
|
|
|
| |||||
AM LOOP | & |
|
| T |
|
|
|
|
| OUT |
|
|
|
|
|
|
|
|
|
SOURCE | R | L |
|
|
|
|
|
|
|
|
|
|
|
|
|
|
| ||
ANTENNA |
|
|
|
|
|
| REMOTE | A |
|
|
|
|
|
| B |
|
| ||
|
|
|
|
|
|
|
| IN | IN |
|
|
|
|
|
|
|
| ||
|
|
|
|
|
|
|
|
|
| FRONT | CENTER | SURROUND | FRONT |
|
| ||||
|
|
|
|
|
|
|
| PHONO | & |
| SPEAKERS | SPEAKERS | SPEAKERS | SPEAKERS |
|
| |||
|
|
|
|
|
|
|
| SOURCE |
|
| SEE INSTRUCTION MANUAL | SE REPORTER AU MOODE D'EMPLOI |
|
|
| ||||
|
|
|
|
|
|
|
|
|
|
|
|
|
|
| |||||
DIGITAL OUT
OPT.
DIGITAL | DIGITAL | DIGITAL | DIGITAL |
OUT | OUT | IN | OUT |
DVD player | CD player | MD recorder | TV tuner | |
(or Satellite tuner) | ||||
|
|
|
7Digital audio cords/Optical cables
Commercially available digital audio coaxial cords (standard video cords can also be used) or optical cables (not supplied) are used to connect digital components to this receiver.
When you use optical digital input or output terminals, pull off the caps and insert the plugs. Be sure to insert completely.
Digital audio cord | Optical cable | |
(or standard video cord) | ||
|
10