Connecting Your Equipment
Antennas
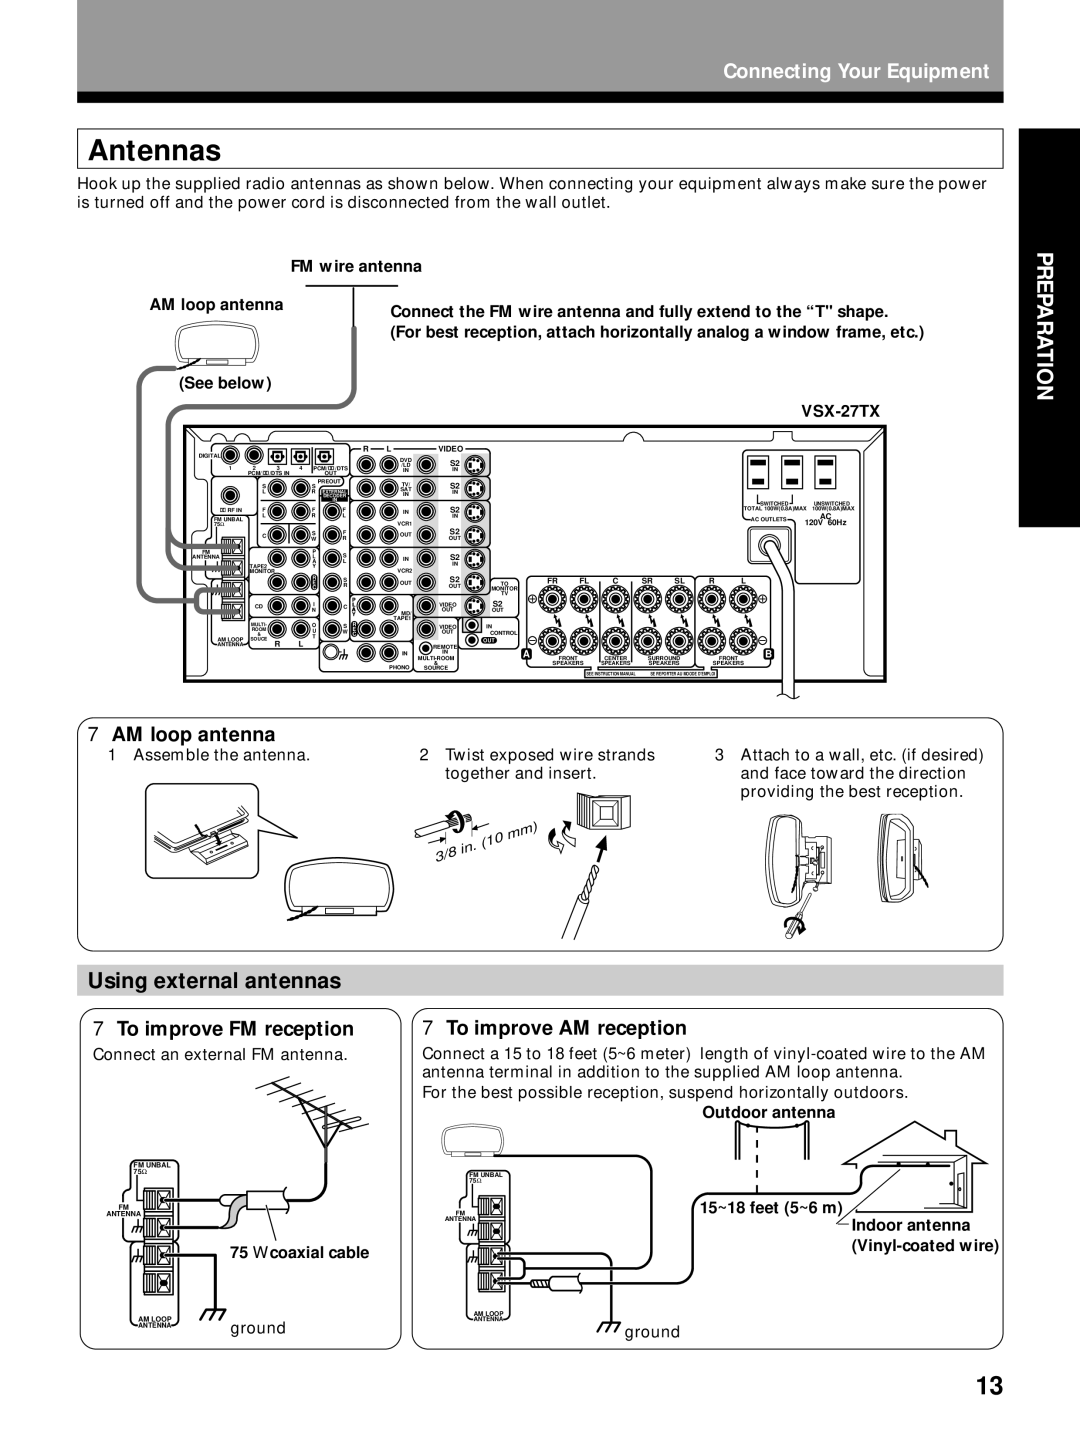
Hook up the supplied radio antennas as shown below. When connecting your equipment always make sure the power is turned off and the power cord is disconnected from the wall outlet.
| FM wire antenna | |||
AM loop antenna |
|
|
|
|
|
| Connect the FM wire antenna and fully extend to the “T" shape. | ||
|
|
| ||
|
|
| (For best reception, attach horizontally analog a window frame, etc.) | |
(See below)
|
|
|
|
|
|
|
|
|
|
|
|
|
|
|
|
|
|
| |
DIGITAL |
|
|
|
|
|
| R | L | VIDEO |
|
|
|
|
|
|
|
|
|
|
|
|
|
|
|
|
| DVD | S2 |
|
|
|
|
|
|
|
|
|
| |
|
|
|
|
|
|
|
|
|
|
|
|
|
|
|
|
|
| ||
1 | 2 | 3 | 4 | PCM/ | /DTS |
| /LD |
|
|
|
|
|
|
|
|
|
| ||
| IN | IN |
|
|
|
|
|
|
|
|
|
| |||||||
| PCM/ | /DTS IN |
|
| OUT |
|
|
|
|
|
|
|
|
|
|
|
|
| |
| S |
|
| S | PREOUT |
| TV/ | S2 |
|
|
|
|
|
|
|
|
|
| |
|
|
|
|
|
|
|
|
|
|
|
|
|
|
|
| ||||
| L |
|
| R | EXTERNAL |
| SAT | IN |
|
|
|
|
|
|
|
|
|
| |
|
|
|
| IN |
|
|
|
|
|
|
|
|
|
| |||||
|
|
|
|
| DECODER |
|
|
|
|
|
|
|
|
|
|
|
| ||
|
|
|
|
|
| IN |
|
|
|
|
|
|
|
|
|
| SWITCHED |
| UNSWITCHED |
RF IN | F |
|
| F |
| F |
| IN | S2 |
|
|
|
|
|
|
| TOTAL 100W(0.8A)MAX | 100W(0.8A)MAX | |
FM UNBAL | L |
|
| R |
| L |
| VCR1 | IN |
|
|
|
|
|
|
| AC OUTLETS |
| AC |
75Ω |
|
|
|
|
|
|
| S2 |
|
|
|
|
|
|
|
| 120V 60Hz | ||
| C |
|
| S |
| F |
| OUT |
|
|
|
|
|
|
|
|
|
| |
|
|
| W |
| R |
| OUT |
|
|
|
|
|
|
|
|
|
| ||
|
|
|
|
|
|
|
|
|
|
|
|
|
|
|
|
| |||
FM |
|
|
| P |
| S |
|
| S2 |
|
|
|
|
|
|
|
|
|
|
ANTENNA |
|
|
| L |
|
| IN |
|
|
|
|
|
|
|
|
|
| ||
|
|
|
| A |
| L |
|
| IN |
|
|
|
|
|
|
|
|
|
|
| TAPE2 |
|
| Y |
|
|
|
|
|
|
|
|
|
|
|
|
|
| |
| MONITOR |
|
|
|
|
| VCR2 |
|
|
|
|
|
|
|
|
|
|
| |
|
|
|
| R |
| S |
|
| S2 |
| FR | FL | C | SR | SL | R | L |
|
|
|
|
|
| E |
|
| OUT | TO |
|
| |||||||||
|
|
|
| C |
| R |
|
| OUT | MONITOR |
|
|
|
|
|
|
|
|
|
|
|
|
|
|
|
| P |
|
| TV |
|
|
|
|
|
|
|
|
|
|
|
|
| I |
|
|
|
| S2 |
|
|
|
|
|
|
|
|
| |
| CD |
|
|
| C | L |
| VIDEO |
|
|
|
|
|
|
|
|
| ||
|
|
|
| N |
|
| A | MD/ | OUT | OUT |
|
|
|
|
|
|
|
|
|
|
|
|
|
|
|
| Y |
|
|
|
|
|
|
|
|
|
|
| |
|
|
|
|
|
|
| R | TAPE1 |
|
|
|
|
|
|
|
|
|
|
|
| MULTI- |
|
| O |
| S |
| VIDEO | IN |
|
|
|
|
|
|
|
|
| |
| ROOM |
|
| U |
| W | E |
| OUT | CONTROL |
|
|
|
|
|
|
|
|
|
| & |
|
|
| C |
|
|
|
|
|
|
|
|
|
| ||||
AM LOOP | SOUCE | R | L | T |
|
|
|
|
| OUT |
|
|
|
|
|
|
|
|
|
ANTENNA |
|
|
|
|
|
| REMOTE | A |
|
|
|
|
|
| B |
|
| ||
|
|
|
|
|
|
|
| IN | IN |
| FRONT | CENTER | SURROUND | FRONT |
|
| |||
|
|
|
|
|
|
|
|
|
|
|
| ||||||||
|
|
|
|
|
|
|
| PHONO | & |
| SPEAKERS | SPEAKERS | SPEAKERS | SPEAKERS |
|
| |||
|
|
|
|
|
|
|
| SOURCE |
|
|
|
|
|
|
|
|
|
| |
|
|
|
|
|
|
|
|
|
|
|
| SEE INSTRUCTION MANUAL | SE REPORTER AU MOODE D'EMPLOI |
|
|
| |||
7AM loop antenna
1 Assemble the antenna. | 2 Twist exposed wire strands | 3 Attach to a wall, etc. (if desired) |
| together and insert. | and face toward the direction |
|
| providing the best reception. |
PREPARATION
Using external antennas
7To improve FM reception
Connect an external FM antenna.
7To improve AM reception
Connect a 15 to 18 feet (5~6 meter) length of
For the best possible reception, suspend horizontally outdoors.
FM UNBAL 75Ω
FM |
ANTENNA |
AM LOOP |
ANTENNA |
75 Ω coaxial cable
ground
| Outdoor antenna |
FM UNBAL |
|
75Ω |
|
FM | 15~18 feet (5~6 m) |
ANTENNA | Indoor antenna |
| |
| |
AM LOOP |
|
ANTENNA | ground |
|
13