E
N
G
L
I
S
H
53
Wiring (continued)
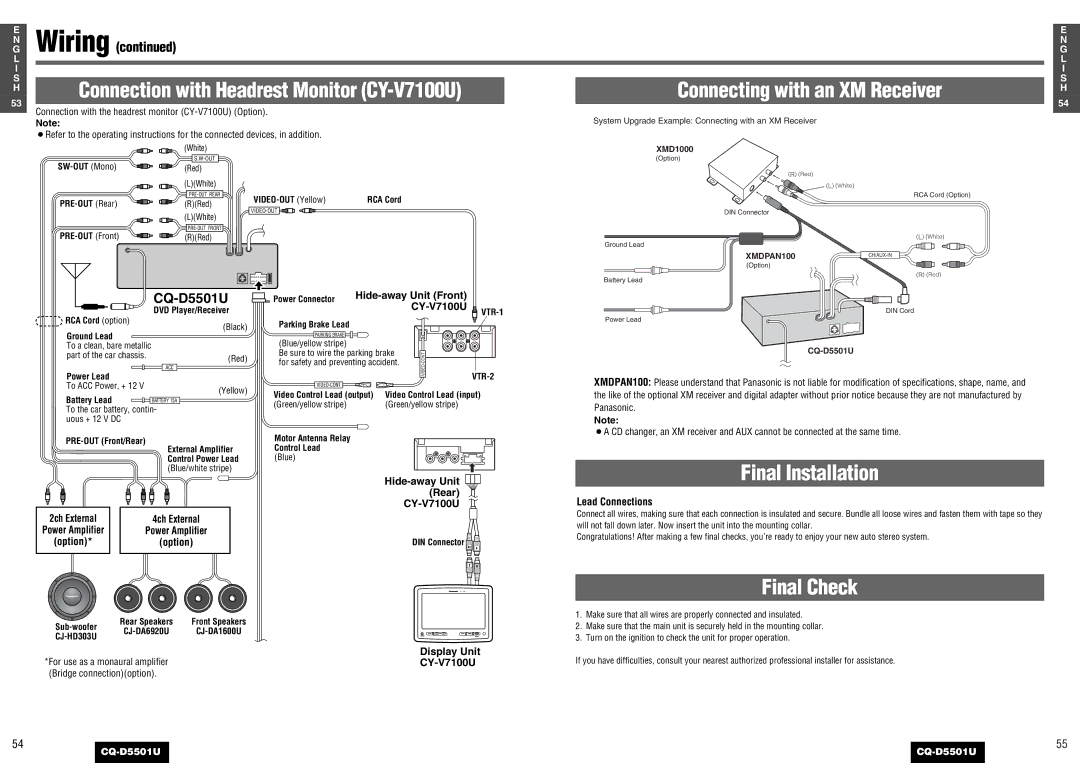
Connection with Headrest Monitor (CY-V7100U)
Connection with the headrest monitor
Note:
¡Refer to the operating instructions for the connected devices, in addition.
|
| E |
|
| N |
|
| G |
|
| L |
|
| I |
|
| S |
Connecting with an XM Receiver |
| |
| H | |
|
| |
|
| 54 |
|
| |
|
|
|
System Upgrade Example: Connecting with an XM Receiver
(White)
(Red)
(L)(White)
(R)(Red)
(L)(White)
(R)(Red)
RCA Cord |
![]()
![]()
![]()
![]()
![]()
XMD1000
(Option)
(R) (Red)
(L) (White)
DIN Connector
Ground Lead
XMDPAN100
(Option)
Battery Lead
RCA Cord (Option)
(L) (White)
(R) (Red)
![]() RCA Cord (option)
RCA Cord (option)
Ground Lead
CQ-D5501U
DVD Player/Receiver
(Black)
Power Connector |
|
|
|
| |
|
| |
|
| |
Parking Brake Lead |
|
|
PARKING BRAKE |
|
|
Power Lead
DIN Cord
To a clean, bare metallic part of the car chassis.
(Red)
ACC
(Blue/yellow stripe) |
|
| |||
Be sure to wire the parking brake |
|
| |||
| |||||
for safety and preventing accident. |
| ||||
VIDEO |
| ||||
|
|
|
|
| |
|
|
|
|
|
|
|
|
|
|
|
|
|
|
|
|
|
|
|
|
|
|
|
|
Power Lead |
| |
To ACC Power, + 12 V | (Yellow) | |
Battery Lead | ||
BATTERY 15A |
To the car battery, contin- uous + 12 V DC
External Amplifier
Control Power Lead (Blue/white stripe)
2ch External | 4ch External |
Power Amplifier | Power Amplifier |
(option)* | (option) |
Rear Speakers | Front Speakers | ||
|
|
| |
Video Control Lead (output) | Video Control Lead (input) |
(Green/yellow stripe) | (Green/yellow stripe) |
Motor Antenna Relay Control Lead (Blue)
DIN Connector ![]()
![]()
![]()
![]()
PHONES
XMDPAN100: Please understand that Panasonic is not liable for modification of specifications, shape, name, and the like of the optional XM receiver and digital adapter without prior notice because they are not manufactured by Panasonic.
Note:
¡A CD changer, an XM receiver and AUX cannot be connected at the same time.
Final Installation
Lead Connections
Connect all wires, making sure that each connection is insulated and secure. Bundle all loose wires and fasten them with tape so they will not fall down later. Now insert the unit into the mounting collar.
Congratulations! After making a few final checks, you’re ready to enjoy your new auto stereo system.
Final Check
1.Make sure that all wires are properly connected and insulated.
2.Make sure that the main unit is securely held in the mounting collar.
3.Turn on the ignition to check the unit for proper operation.
54
Display Unit
*For use as a monaural amplifierCY-V7100U(Bridge connection)(option).
- | + | - | + | - | + | - | + |
If you have difficulties, consult your nearest authorized professional installer for assistance.
55