E N G L I
Installation
E N G L I
S
H
47
![]() Warning
Warning
❐This installation information is designed for professional installers with knowledge of automobile electrical safety sys- tems and is not intended for
❐If your car is equipped with air bag and/or
FAILURE TO FOLLOW THE PROCEDURE MAY RESULT IN THE UNINTENDED DEPLOYMENT OF AIR BAGS OR ACTIVA- TION OF THE
Consult a professional for installation.
Verify the radio using the antenna and speakers before installation.
Mounting Angle |
|
| Mounting Space |
|
|
| ||
side to side | : horizontal | 0 – 30° |
|
|
|
| 5353mmmm {2 3/32”} |
|
front to rear | : 0 – 30° |
|
|
|
|
| ||
|
|
|
|
|
|
| ||
|
|
|
|
| 182 mm | 5 | ”} |
|
Supplied Hardware |
|
|
| 182 mm {7 /32 |
| |||
|
|
| 44..55 |
|
|
| ||
No. | Item | Diagram | Q'ty | No. | Item |
| Diagram | Q'ty |
Mounting Collar |
| 1 |
| Trim Plate |
|
| 1 | |
| (YEFX0217263) |
|
|
| (YEFC05652) |
|
| |
S
H
48
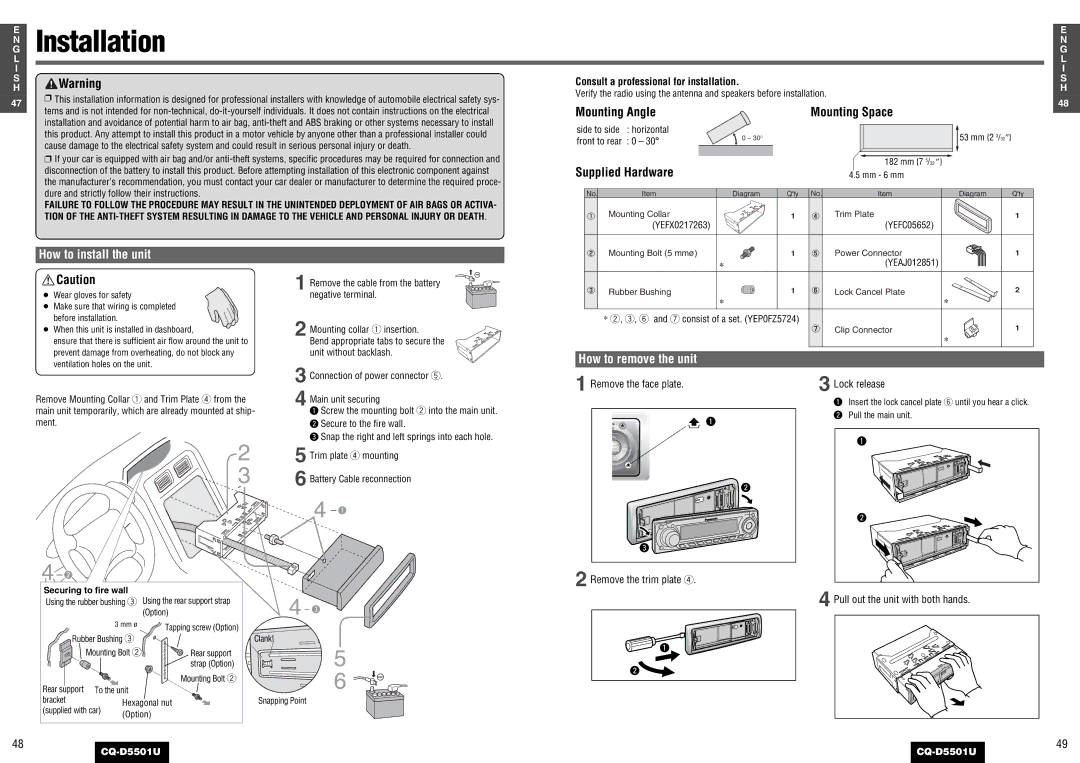
How to install the unit
![]() Caution
Caution
¡ Wear gloves for safety |
¡ Make sure that wiring is completed |
before installation. |
¡ When this unit is installed in dashboard, |
ensure that there is sufficient air flow around the unit to |
prevent damage from overheating, do not block any |
1
2
Remove the cable from the battery negative terminal.
Mounting collar q insertion.
Bend appropriate tabs to secure the unit without backlash.
Mounting Bolt (5 mmø) | 1 | Power Connector | 1 |
| * | (YEAJ012851) |
|
|
|
| |
Rubber Bushing | 1 | Lock Cancel Plate | 2 |
| * |
| * |
* w, e, y and u consist of a set. (YEP0FZ5724) |
| 1 | |
|
| Clip Connector | |
*
ventilation holes on the unit. |
Remove Mounting Collar q and Trim Plate r from the main unit temporarily, which are already mounted at ship- ment.
2
3
3
4
5
6
Connection of power connector t.
Main unit securing
qScrew the mounting bolt w into the main unit. w Secure to the fire wall.
e Snap the right and left springs into each hole.
Trim plate r mounting
Battery Cable reconnection
How to remove the unit
1 Remove the face plate.
![]() q
q
w
3 Lock release
qInsert the lock cancel plate y until you hear a click. w Pull the main unit.
q
48
4 w
Securing to fire wall
Using the rubber bushing e Using the rear support strap
|
|
| (Option) | |
|
| 3 mm ø | Tapping screw (Option) | |
| Rubber Bushing e |
| ||
| Mounting Bolt w | Rear support | ||
|
|
| strap (Option) | |
Rear support To the unit | Mounting Bolt w | |||
| ||||
bracket |
| Hexagonal nut | ||
(supplied with car) | ||||
(Option) | ||||
|
| |||
4 q
4 e
Clank!
5
6 ![]()
![]()
![]()
![]()
Snapping Point
e
2 Remove the trim plate r.
q
w
w
4 Pull out the unit with both hands.
49
