Recording pictures (advanced)
Using the Optical Image Stabilizer
Preparation
• Set the mode dial except for [ ![]() ]. (P28)
]. (P28)
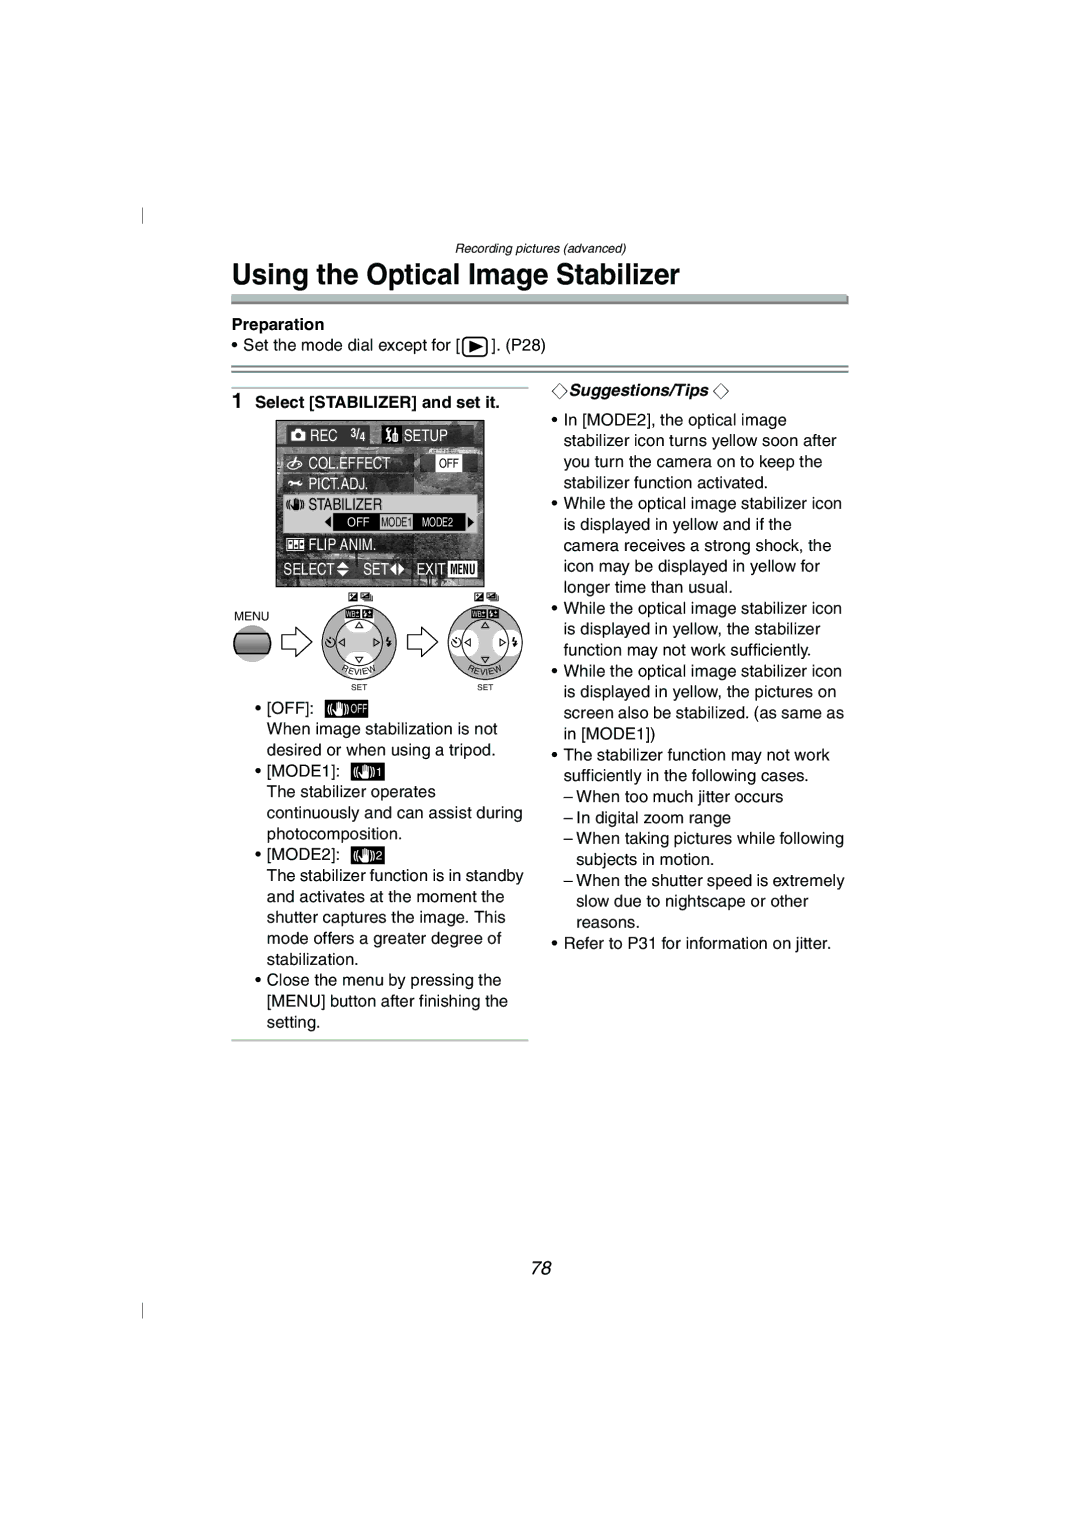
1Select [STABILIZER] and set it.
|
|
|
|
|
|
|
|
|
|
|
|
|
|
|
|
|
|
|
|
|
|
|
|
|
|
|
|
| REC |
| 3/4 |
|
|
|
| SETUP |
|
|
|
|
|
| |||||||||
|
|
| COL.EFFECT |
|
|
|
|
|
|
|
| ||||||||||||||
|
|
|
| OFF |
|
|
|
|
|
|
| ||||||||||||||
|
|
| PICT.ADJ. |
|
|
|
|
|
|
|
|
|
|
|
|
|
|
| |||||||
|
|
| STABILIZER |
|
|
|
|
|
|
|
|
|
|
| |||||||||||
|
|
|
|
|
|
| OFF |
| MODE1 | MODE2 |
|
|
|
|
|
|
| ||||||||
|
|
| FLIP ANIM. |
|
|
|
|
|
|
|
|
|
|
| |||||||||||
|
| SELECT |
|
|
|
| SET | EXIT |
|
|
|
| |||||||||||||
|
|
|
|
|
| MENU | |||||||||||||||||||
|
|
|
|
|
|
|
|
|
|
|
|
|
|
|
|
|
|
|
|
|
|
|
|
|
|
MENU |
|
|
|
|
|
|
|
|
|
|
|
|
|
|
|
|
|
|
|
| |||||
| WB |
|
|
|
|
|
|
|
|
|
|
| WB |
|
|
| |||||||||
|
|
|
|
|
|
|
|
|
|
|
| ||||||||||||||
|
|
|
|
|
| R | EVIEW |
|
|
|
| R | EVIEW | ||||||||||||
|
|
|
|
|
|
|
|
|
|
|
| ||||||||||||||
|
|
|
|
|
|
|
| SET |
|
|
|
|
|
|
|
|
| SET | |||||||
• [OFF]: |
|
|
|
|
|
|
|
|
|
|
|
|
|
|
|
|
|
|
| ||||||
|
| OFF |
|
|
|
|
|
|
|
|
|
|
|
|
|
|
|
| |||||||
When image stabilization is not | |||||||||||||||||||||||||
desired or when using a tripod. | |||||||||||||||||||||||||
• [MODE1]: |
|
|
|
|
|
|
|
|
|
|
|
|
|
|
|
|
|
|
| ||||||
|
|
|
|
| 1 |
|
|
|
|
|
|
|
|
|
|
|
|
| |||||||
The stabilizer operates |
|
|
|
|
|
| |||||||||||||||||||
continuously and can assist during | |||||||||||||||||||||||||
photocomposition. |
|
|
|
|
|
|
|
|
|
|
| ||||||||||||||
• [MODE2]: |
|
|
|
|
|
|
|
|
|
|
|
|
|
|
|
|
|
|
| ||||||
|
|
|
|
| 2 |
|
|
|
|
|
|
|
|
|
|
|
|
| |||||||
The stabilizer function is in standby and activates at the moment the shutter captures the image. This mode offers a greater degree of stabilization.
•Close the menu by pressing the [MENU] button after finishing the
setting.
¬Suggestions/Tips ¬
•In [MODE2], the optical image stabilizer icon turns yellow soon after you turn the camera on to keep the stabilizer function activated.
•While the optical image stabilizer icon is displayed in yellow and if the camera receives a strong shock, the icon may be displayed in yellow for longer time than usual.
•While the optical image stabilizer icon is displayed in yellow, the stabilizer function may not work sufficiently.
•While the optical image stabilizer icon is displayed in yellow, the pictures on screen also be stabilized. (as same as in [MODE1])
•The stabilizer function may not work sufficiently in the following cases.
–When too much jitter occurs
–In digital zoom range
–When taking pictures while following subjects in motion.
–When the shutter speed is extremely slow due to nightscape or other reasons.
•Refer to P31 for information on jitter.
78
