Operating Instructions
Information for Your Safety
Dear Customer
FCC Note U.S. only
DMC-LX1
If you see this symbol
About Condensation When the lens Is fogged up
If you will not be using the camera for Long time
About the Lens
About These Operating Instructions
About illustrations in these operating instructions
About illustrations of the cursor button and the joystick
Contents
Connecting to a PC or Printer
Playback advanced
Others
Shooting with the extended optical Zoom
Standard Accessories
Battery Pack CGA-S005A
SD Memory Card 32 MB
RP-SD032BVE0
Names of the Components
Lens part
AF Assist Lamp P77
Flash P32
18 19 2728
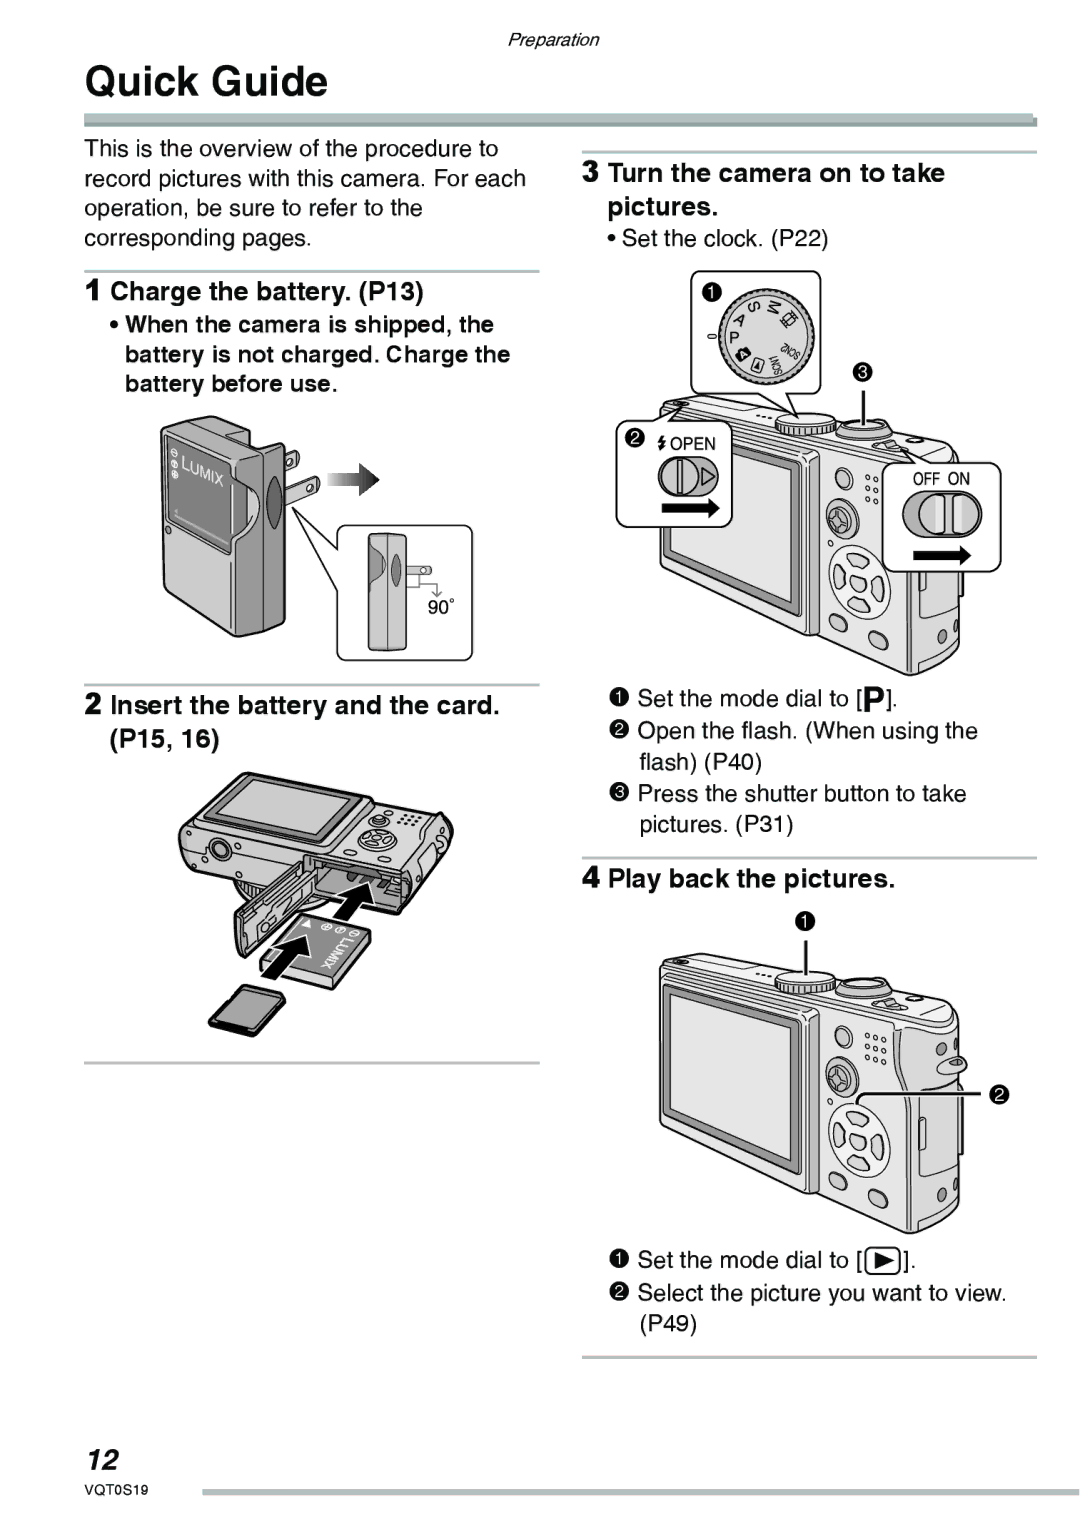
Charge the battery. P13
Insert the battery and the card. P15
Quick Guide
Turn the camera on to take pictures
Charging the Battery with the Charger
About the Battery
Inserting/Removing the Battery
Inserting/Removing the Card
Access to the card
About the Card
About handling a card
SD Memory Card supplied MultiMediaCard optional
Approximate number of recordable pictures and the size
Aspect ratio Picture size
2048×1360 pixels
16 MB 32 MB 64 MB 128 MB
170
Tiff
Attaching the Lens Cap/Strap
Pass the strap through the hole at the Strap Eyelet
Attach the lens cap
Lens Cap
Setting Date/Time Clock Set
Initial setting
Select M/D/Y, D/M/Y or Y/M/D
Set date and time
Setup Menu
Press the Menu button Select the Setup Menu
Remove the lens cap and turn the camera on
Select the desired item
5POWER Save 1 MIN./2 MIN./5 MIN./10 MIN
Menu Functions
XMF Assist
9VOLUME
2NO.RESET
Reset
4USB Mode
Xvideo OUT
TV Aspect
OFF
Language
Playback mode P49
About the LCD Monitor
Selecting the screen to be used
LCD monitor LCD
Recording guide line
Highlight display
No highlight display
With highlight display
Histogram
Example of histogram
Under Exposed B Properly Exposed C Over Exposed *Histogram
Mode Dial
Program AE mode P31
Auto mode P35
Taking Pictures
Take a picture
Program AE
Focusing
Correct posture for taking good Pictures
To take pictures without blurring
Jitter camera shake
Direction detection function
Exposure
Program shift
Example of Program shift
Taking Pictures in Auto Mode
Settings in Auto mode
Zoom P78 Other Settings in Auto mode
Select the desired item and set the desired value
You cannot set the following items in the Auto mode
Video OUT TV Aspect
COL.EFFECT
Checking the Recorded Picture Review
Press r
Enlarge and shift the picture
Using the Optical Zoom
To make subjects appear further away use Wide
Tele
To further increase the zoom
Optical zoom is set to Wide 1× when the camera is turned on
Taking Pictures using the Built-in Flash
Slide the Open switch a
Switching to the appropriate flash Setting
To open the flash
Auto
Forced on Forced OFF
Flash is not activated in any recording condition
Available flash settings by recording mode
ISO80
Do not stare at the photo flash from
Close proximity
If you bring the flash too close to
Discolored by its heat and lighting
Taking Pictures with the Self-timer
Switch the self-timer setting
Focus on the subject to take the picture
Compensating the Exposure
Over exposed
Compensate the exposure toward negative
Properly Exposed Under exposed
Taking Pictures using Auto Bracket
Optical Image Stabilizer Stabilizer
MODE1
MODE2
Taking Pictures using Burst Mode
Transfer speed of the card has no effect on the burst speed
Playing Back Pictures
Select the picture
Switch to multi screen
16/25 Pictures Multi Playback
Select the pictures
Using the Playback Zoom
To delete a picture during the playback zoom
Deleting Pictures
Select the picture to be deleted
Select Multi Delete
Select the pictures to be deleted
Delete the pictures
Select ALL Delete
Delete all of the pictures
It is possible to delete up to 50 pictures all at once
Using the Mode Dial
Aperture-priority AE
Set the aperture value and take the picture
Aperture value e Increase Decrease
Shutter-priority AE
Set the shutter speed and take the picture
Shutter speed e Faster Slower
Manual exposure
Set the aperture value and the shutter speed
Press the shutter button halfway
Manual Exposure Assistance
Recording pictures advanced
Aperture Value and Shutter Speed Aperture-priority AE
Shutter-priority AE
Motion picture mode
Select PICT.MODE
Press the shutter button fully to start the recording
Available recording time seconds
Card
16 MB 32 MB
Motion pictures cannot be recorded without audio
RS Scene mode
Night Portrait P64 Night Scenery P64
Baby P65 Soft Skin P66 Candle Light P66 Party P67
Fireworks P67
Portrait mode Sports mode
Technique for Sports mode
Food mode Scenery mode
Technique for Night portrait mode
Technique for Night scenery mode
Age display setting
Birthday setting
To not show age, select Without AGE, and press q
Soft skin mode Candle light mode
Technique for Candle light mode
Technique for Party mode
Technique for Fireworks mode
Setting the shutter speed
Technique for Starry sky mode
This mode allows you to take a picture of yourself
Technique for Self-portrait mode
Using the REC mode menu
Metering Mode P75
Sensitivity P73
AF Assist Lamp P77
For auto setting auto
White Balance W.BALANCE
Auto White Balance
Setting the White Balance manually White set p
About the white balance fine adjustment
About the white balance
About the white set
ISO Sensitivity Sensitivity
Picture Size PICT.SIZE
Quality Quality
Audio REC Audio DUB Resize Trimming
Metering Mode
Audio Recording Audio REC
AF Mode AF Mode
High speed AF H mode
Continuous AF CONT.AF
AF Assist Lamp
Digital Zoom D.ZOOM
Color Effect COL.EFFECT
Cool
Warm
Picture Adjustment PICT.ADJ
Flip Animation Flip Anim
Select Flip Anim
Capture pictures for flip animation
Select Picture Capture
Select Create Motion Picture
Select Frame Rate and set the number of frames
Select Create Motion Picture and create a flip animation
File number appears after creating a flip animation
Playing back created flip animations
Using the Quick setting
Quick setting menu appears
Select the menu and press to enter
Slide the focus switch to MF
AF Auto focus AFw Macro mode MF Manual focus
Taking Pictures with Manual Focus
Take the picture
MF assistance
Technique for Manual focus
Prefocus
AF/AE Lock AF Auto focus/AE Auto exposure
Press AF/AE Lock button a
AF/AE Lock
AF Lock
AF Macro mode
Select AF w with the focus switch
Focus range
Setting the aspect ratio
Shooting with the extended optical zoom
Move the zoom lever toward T
Playing Back Pictures with Audio/Motion pictures
To pause
Using the Play mode menu
Playing Back with Slide Show
Select ALL or
Select Start
Favorites setting Favorite
Select on to set it
During playback, select ALL
To delete all pictures except those in your favorites list
Select on to set it
Example When rotating clockwise a
Rotating the Picture Rotate
Select the picture to be rotated and set it
Select the direction to rotate the picture
Setting the Picture to be
Select SINGLE, Multi or Cancel
To cancel all settings Select YES to cancel all settings
To print the date
Multi setting/To cancel all settings
Cancel The protect icon c disappears
SET
Protect icon c
Select the picture and start audio recording
Stop audio recording
You can record the audio after taking a picture
Select the size and set it
Resizing the Pictures Resize
Select the picture and set it
100
Select YES or no and set it
Trimming the Pictures
Select the picture to trim and set it
101
Enlarge or decrease the picture
Shift the picture and press the shutter button fully to set
When you select YES, the picture is overwritten
102
Changing the Aspect Ratio
Select Or h and set it
Clean up the Card Clean UP
Select YES to clean up
103
Initializing the Card Format
Playing Back Pictures with a TV Screen
104
Playing back pictures with Supplied cable
Turn the camera and the TV off Set the TV ASPECT. P26
Before Connecting with USB Connection Cable
Select USB Mode
105
Select PC or PictBridge PTP
Connecting to a PC
106
Windows
Macintosh
Folder numbers are updated when
About PictBridge PTP setting
107
Folder Composition
Connecting to a PictBridge-compliant Printer
108
Set the print settings
109
Select a picture to be printed
110
Select Print Start and then print out the picture
Select Dpof Picture
Layout
Setting the date printing with Dpof print in advance
111
Screen Display
112
Recording
AF-L AF/AE Lock display P85
1000 DEC.20.2005
113
114
When you go out, bring charged spare batteries
Dispose of an unusable battery
115
Do not bend or drop the card
This Memory Card is Protected Cancel the card lock
Please Check the Card Data reading error
Please Check the Card Data writing error
Message Display
117
Troubleshooting
118
119
120
121
122
Specifications
123
124
Digital Camera Accessory System
125
Digital Camera Accessory Order Form
Accessory # Description Price Each Quantity Total Price
126
For USA Customers
Request for Service Notice For USA Only
127
Limited Warranty For USA Only
Limited Warranty Coverage
128
Carry-In or Mail-In Service
129
Customer Services Directory For USA Only
Centralized Factory Servicenter
130
1705 N. Randall Road
Index
131
132
Spanish Quick Use Guide/Guía rápida en español
133
Cargue la batería
Reproduzca las imágenes
134
135
One Panasonic Way, Secaucus, NJ
Panasonic Puerto Rico, Inc
Panasonic Canada Inc
Ambler Drive, Mississauga, Ontario, L4W 2T3