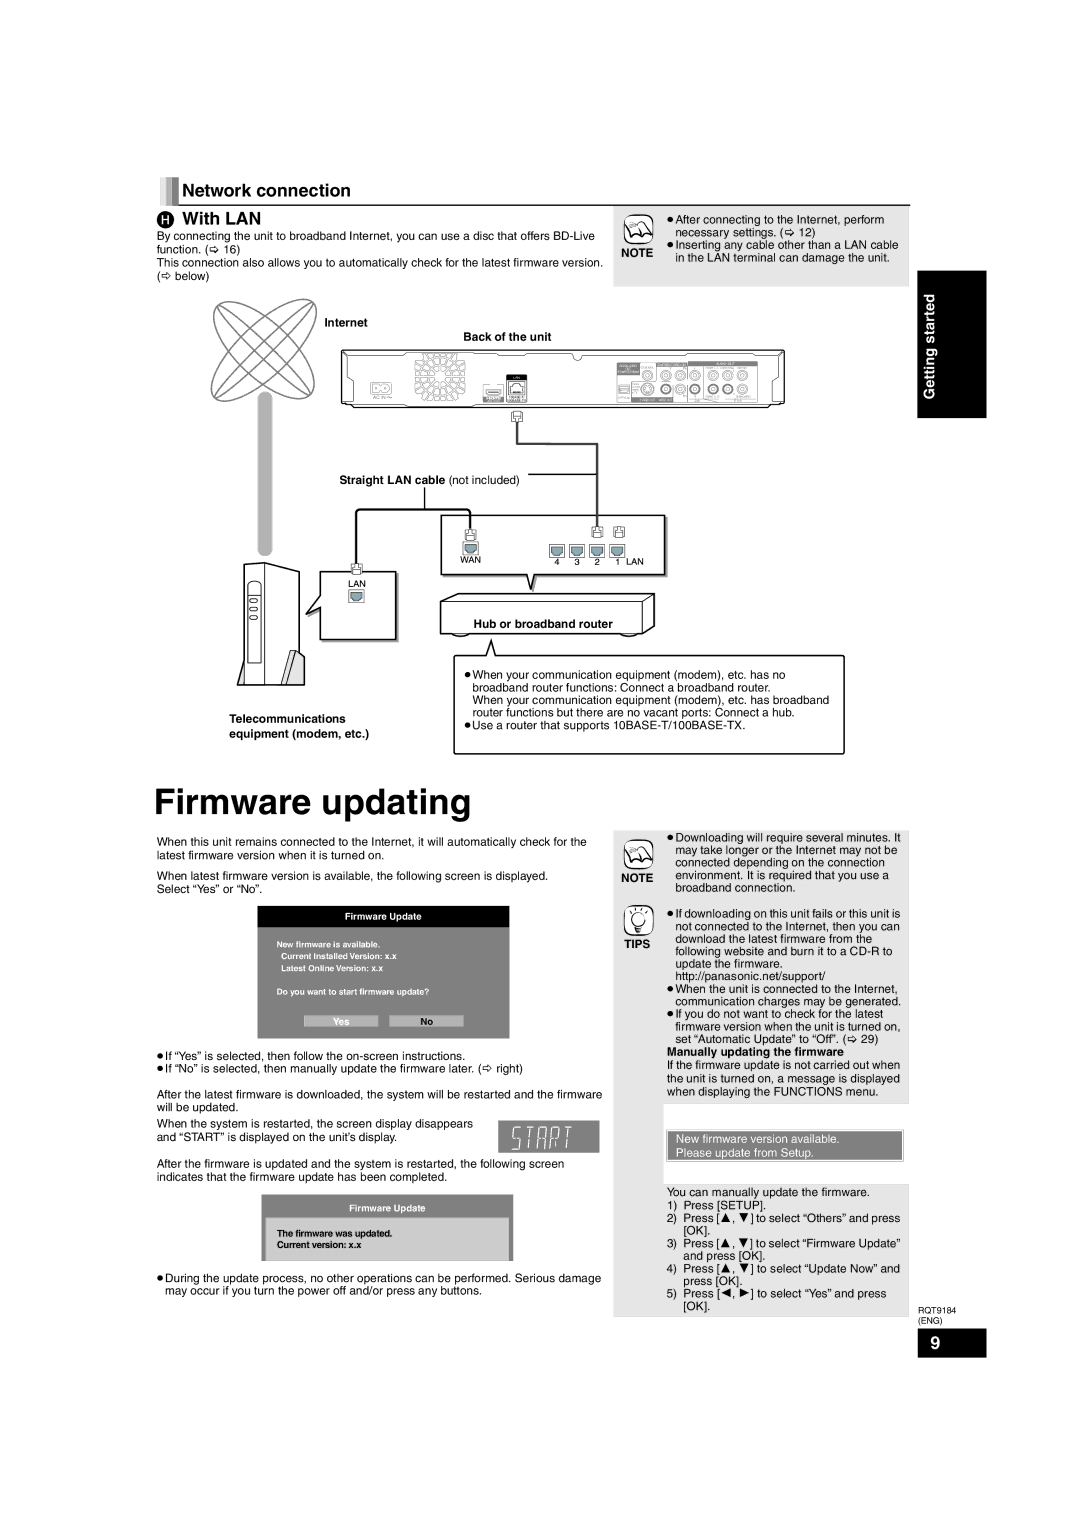

 Network connection
H With LAN |
|
|
|
|
|
|
| ≥After connecting to the Internet, perform | |||||||
By connecting the unit to broadband Internet, you can use a disc that offers |
|
|
| necessary settings. (> 12) | |||||||||||
|
| ≥Inserting any cable other than a LAN cable | |||||||||||||
function. (> 16) |
|
|
|
|
| NOTE | |||||||||
This connection also allows you to automatically check for the latest firmware version. |
|
|
| in the LAN terminal can damage the unit. | |||||||||||
|
|
|
|
|
|
|
| ||||||||
(B below) |
|
|
|
|
|
|
|
|
|
|
|
|
| ||
Internet |
|
|
|
|
|
|
|
|
|
|
|
|
| ||
Back of the unit |
|
|
|
|
|
|
|
| |||||||
|
|
|
|
|
|
|
| DIGITAL AUDIO |
| COMPONENT VIDEO OUT |
| AUDIO OUT |
|
| |
|
|
|
|
|
|
|
| COAXIAL | L | FRONT L /L SURROUND | CENTER | ||||
|
|
|
|
|
|
|
| OUT |
| Y | PB |
| L |
|
|
|
|
|
|
|
|
|
| (PCM/BITSTREAM) |
|
|
|
|
|
|
|
|
|
|
| LAN |
|
|
|
|
|
|
|
| |||
|
|
|
|
|
|
|
| Please |
|
|
|
|
|
|
|
|
|
|
|
|
|
|
| connect |
|
|
|
|
|
| |
|
|
|
|
|
|
|
| directly |
|
|
|
|
|
|
|
AC IN |
|
|
|
|
|
|
| to TV. |
|
| PR R | R | SUBWOOFER | ||
OPTICAL |
|
| FRONT R /R | ||||||||||||
AV OUT |
| S VIDEO OUT VIDEO OUT |
| 2ch | 5.1ch |
| |||||||||
|
|
|
|
|
|
|
|
|
|
|
|
|
|
|
|
|
|
|
|
|
|
|
|
|
|
|
|
|
|
|
|
|
|
|
|
|
|
|
|
|
|
|
|
|
|
|
|
Straight LAN cable (not included)
|
|
|
|
|
|
|
| |
|
|
|
|
|
|
|
| |
|
|
|
|
|
| Hub or broadband router |
| |
|
|
|
|
|
| |||
|
|
|
|
|
|
|
| |
|
|
|
|
|
| ≥When your communication equipment (modem), etc. has no | ||
|
|
|
|
|
| broadband router functions: Connect a broadband router. | ||
|
|
|
|
|
| When your communication equipment (modem), etc. has broadband | ||
Telecommunications | router functions but there are no vacant ports: Connect a hub. | |||||||
≥Use a router that supports | ||||||||
equipment (modem, etc.) | ||||||||
|
| |||||||
Getting started
Firmware updating
When this unit remains connected to the Internet, it will automatically check for the latest firmware version when it is turned on.
When latest firmware version is available, the following screen is displayed. Select “Yes” or “No”.
Firmware Update
New firmware is available.
Current Installed Version: x.x
Latest Online Version: x.x
Do you want to start firmware update?
YesNo
≥If “Yes” is selected, then follow the
≥If “No” is selected, then manually update the firmware later. (B right)
After the latest firmware is downloaded, the system will be restarted and the firmware will be updated.
When the system is restarted, the screen display disappears and “START” is displayed on the unit’s display.
After the firmware is updated and the system is restarted, the following screen indicates that the firmware update has been completed.
Firmware Update
The firmware was updated.
Current version: x.x
≥During the update process, no other operations can be performed. Serious damage may occur if you turn the power off and/or press any buttons.
NOTE
TIPS
≥Downloading will require several minutes. It may take longer or the Internet may not be connected depending on the connection environment. It is required that you use a broadband connection.
≥If downloading on this unit fails or this unit is not connected to the Internet, then you can download the latest firmware from the following website and burn it to a
update the firmware. http://panasonic.net/support/
≥When the unit is connected to the Internet, communication charges may be generated.
≥If you do not want to check for the latest
firmware version when the unit is turned on, set “Automatic Update” to “Off”. (> 29)
Manually updating the firmware
If the firmware update is not carried out when the unit is turned on, a message is displayed when displaying the FUNCTIONS menu.
New firmware version available.
Please update from Setup.
You can manually update the firmware.
1) | Press [SETUP]. |
2) | Press [3, 4] to select “Others” and press |
| [OK]. |
3) | Press [3, 4] to select “Firmware Update” |
| and press [OK]. |
4) | Press [3, 4] to select “Update Now” and |
| press [OK]. |
5) | Press [2, 1] to select “Yes” and press |
| [OK]. |
RQT9184
(ENG)
9
