Panasonic DMR-ES10 warranty Press DVD Power, Press Enter

Models: DMR-ES10

1 48
Download 48 pages 27.41 Kb
Page 10
Image 10

STEP 2 Plug-in Auto Tuning

started


OPEN/CLOSE

REC


CH


Getting


IN2


POWER 8


2 CH 1


DVD POWER

TV


^ DVD POWER

POWER


INPUT SELECT

TV/VIDEO

CH

VOLUME


Numbered


1 2 CH


buttons


AUDIO


CANCEL


VCR Plus+

CM SKIP


SKIP

SLOW/SEARCH


DIRECT NAVIGATOR


FUNCTIONS


TOP MENU


e, r, w, q


ENTER


SUB MENU


RETURN


RETURN


SCHEDULE

DISPLAY

STATUS

TIME SLIP


REC REC MODE

ERASE

ADD/DLT

ADD/DLT


CREATE


OPEN/CLOSE

SETUP

F Rec


CHAPTER


SETUP


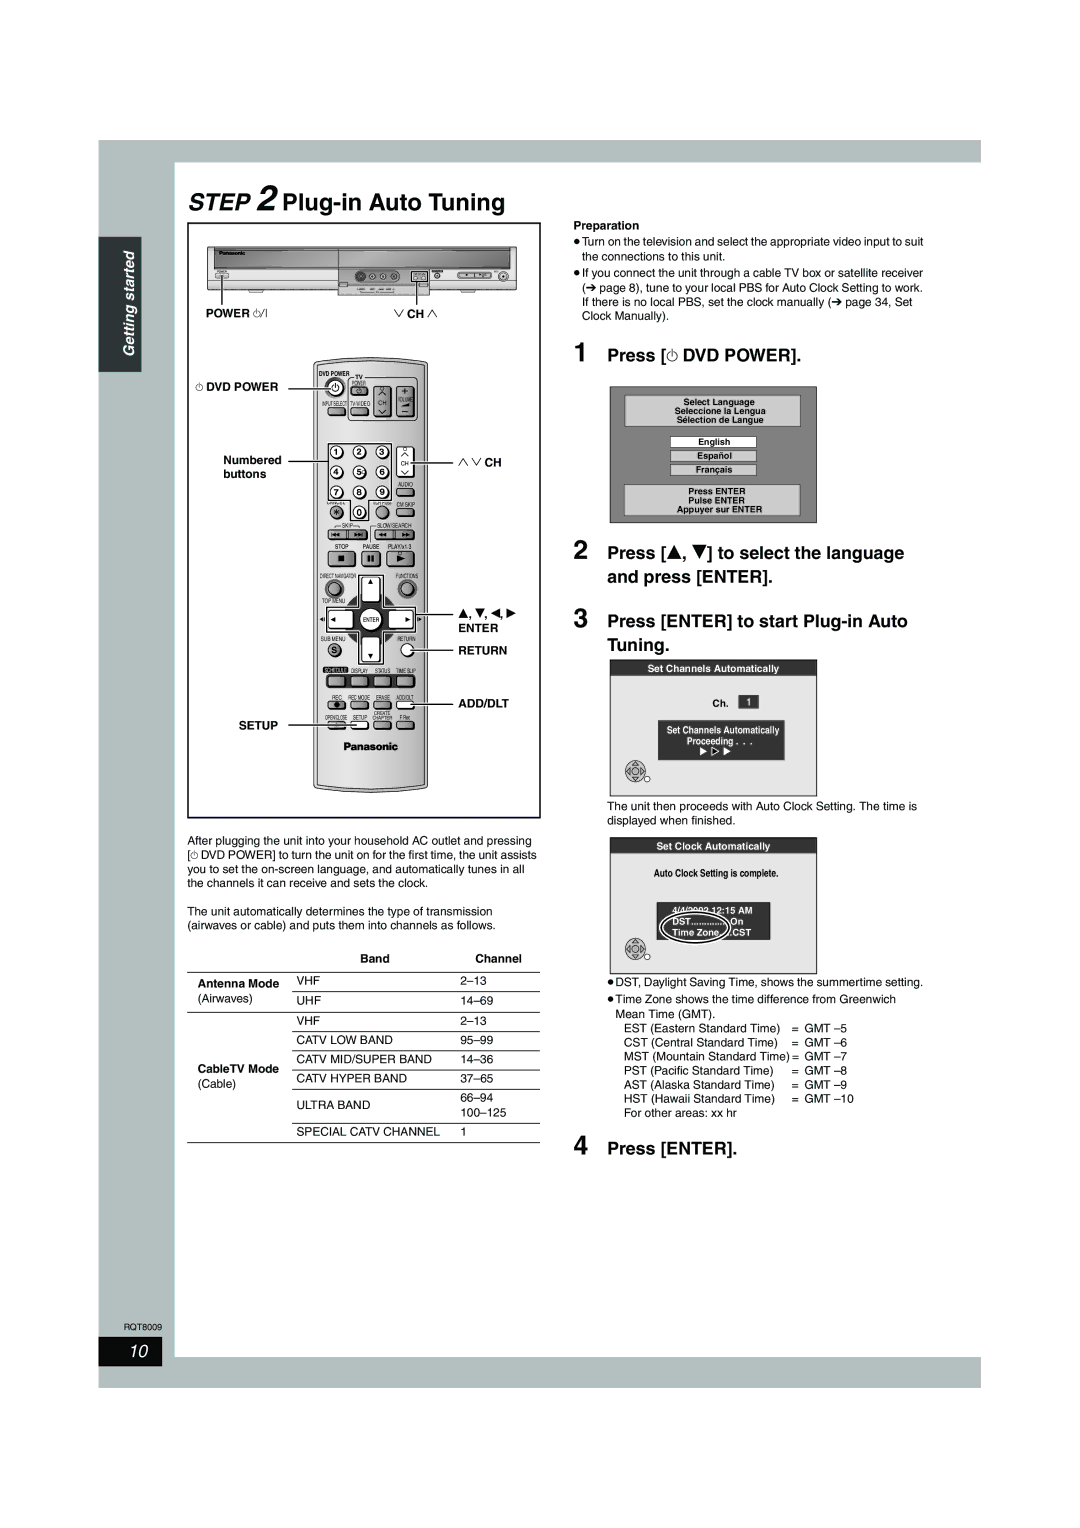
After plugging the unit into your household AC outlet and pressing [^ DVD POWER] to turn the unit on for the first time, the unit assists you to set the on-screen language, and automatically tunes in all the channels it can receive and sets the clock.

The unit automatically determines the type of transmission (airwaves or cable) and puts them into channels as follows.


Band

Channel


Antenna Mode

VHF

2–13

(Airwaves)

UHF

14–69


VHF

2–13


CATV LOW BAND

95–99


CableTV Mode

CATV MID/SUPER BAND

14–36


CATV HYPER BAND

37–65

(Cable)


ULTRA BAND

66–94


100–125


SPECIAL CATV CHANNEL

1


RQT8009

Preparation

Turn on the television and select the appropriate video input to suit the connections to this unit.

If you connect the unit through a cable TV box or satellite receiver (page 8), tune to your local PBS for Auto Clock Setting to work. If there is no local PBS, set the clock manually (page 34, Set Clock Manually).

1 Press [^ DVD POWER].

Select Language

Seleccione la Lengua

Sélection de Langue

English

Español

Français

Press ENTER

Pulse ENTER

Appuyer sur ENTER

2 Press [e, r] to select the language and press [ENTER].

3 Press [ENTER] to start Plug-in Auto Tuning.

Set Channels Automatically

Ch. 1

Set Channels Automatically

Proceeding . . .

The unit then proceeds with Auto Clock Setting. The time is displayed when finished.

Set Clock Automatically

Auto Clock Setting is complete.

4/4/2002 12:15 AM

DST

On

Time Zone

CST

DST, Daylight Saving Time, shows the summertime setting.

Time Zone shows the time difference from Greenwich

Mean Time (GMT).


EST (Eastern Standard Time)

= GMT –5

CST (Central Standard Time)

= GMT –6

MST (Mountain Standard Time) = GMT –7

PST (Pacific Standard Time)

= GMT –8

AST (Alaska Standard Time)

= GMT –9

HST (Hawaii Standard Time)

= GMT –10

For other areas: xx hr


4 Press [ENTER].

10

Page 10
Image 10
Panasonic DMR-ES10 warranty Press DVD Power, Press Enter

DMR-ES10 specifications

The Panasonic DMR-ES10 is a versatile and compact DVD recorder that gained popularity for its user-friendly features and impressive performance in the early 2000s. This model is a testament to Panasonic's innovation in home entertainment technology, particularly in the realm of digital video recording.

One of the standout features of the DMR-ES10 is its ability to record in multiple modes, including standard play (SP), long play (LP), and EP modes. This flexibility allows users to choose between higher-quality recordings or extended playtime on a single disc, catering to varying needs whether recording a full-length movie or a series of television shows. With its ability to handle both DVD-R and DVD-RAM formats, the DMR-ES10 offers added convenience and versatility for users looking to archive their favorite programs or movies.

The DMR-ES10 is equipped with a built-in digital tuner, allowing users to record digital television broadcasts directly onto DVD. This feature was particularly important at the time as it facilitated the transition from analog to digital broadcasting. As such, users could enjoy high-quality recordings without the need for an additional external tuner.

Another key characteristic of the DMR-ES10 is its user-friendly interface. The device includes an intuitive on-screen menu and various editing features, enabling users to easily navigate their recordings. Functions like chapter creation and title editing make it simple for users to personalize their DVDs, enhancing the overall viewing experience.

In terms of connectivity, the DMR-ES10 offers several options, including composite and S-Video outputs, making it compatible with a variety of TVs and systems. It also features a convenient front panel USB port, allowing for direct access to compatible devices and easy file transfers.

Panasonic's commitment to delivering high-quality video is evident in the DMR-ES10's advanced video processing technology. It incorporates the company's proprietary video quality improvement technologies to ensure clear and vibrant playback, whether the source is a recorded DVD or an external input.

Overall, the Panasonic DMR-ES10 combines advanced recording capabilities, flexibility, and user-oriented features, making it an excellent choice for those looking to create and manage their digital media. While newer technologies have emerged, the DMR-ES10 remains a significant model in the evolution of DVD recorders, reflecting Panasonic's legacy of innovation and quality in consumer electronics.