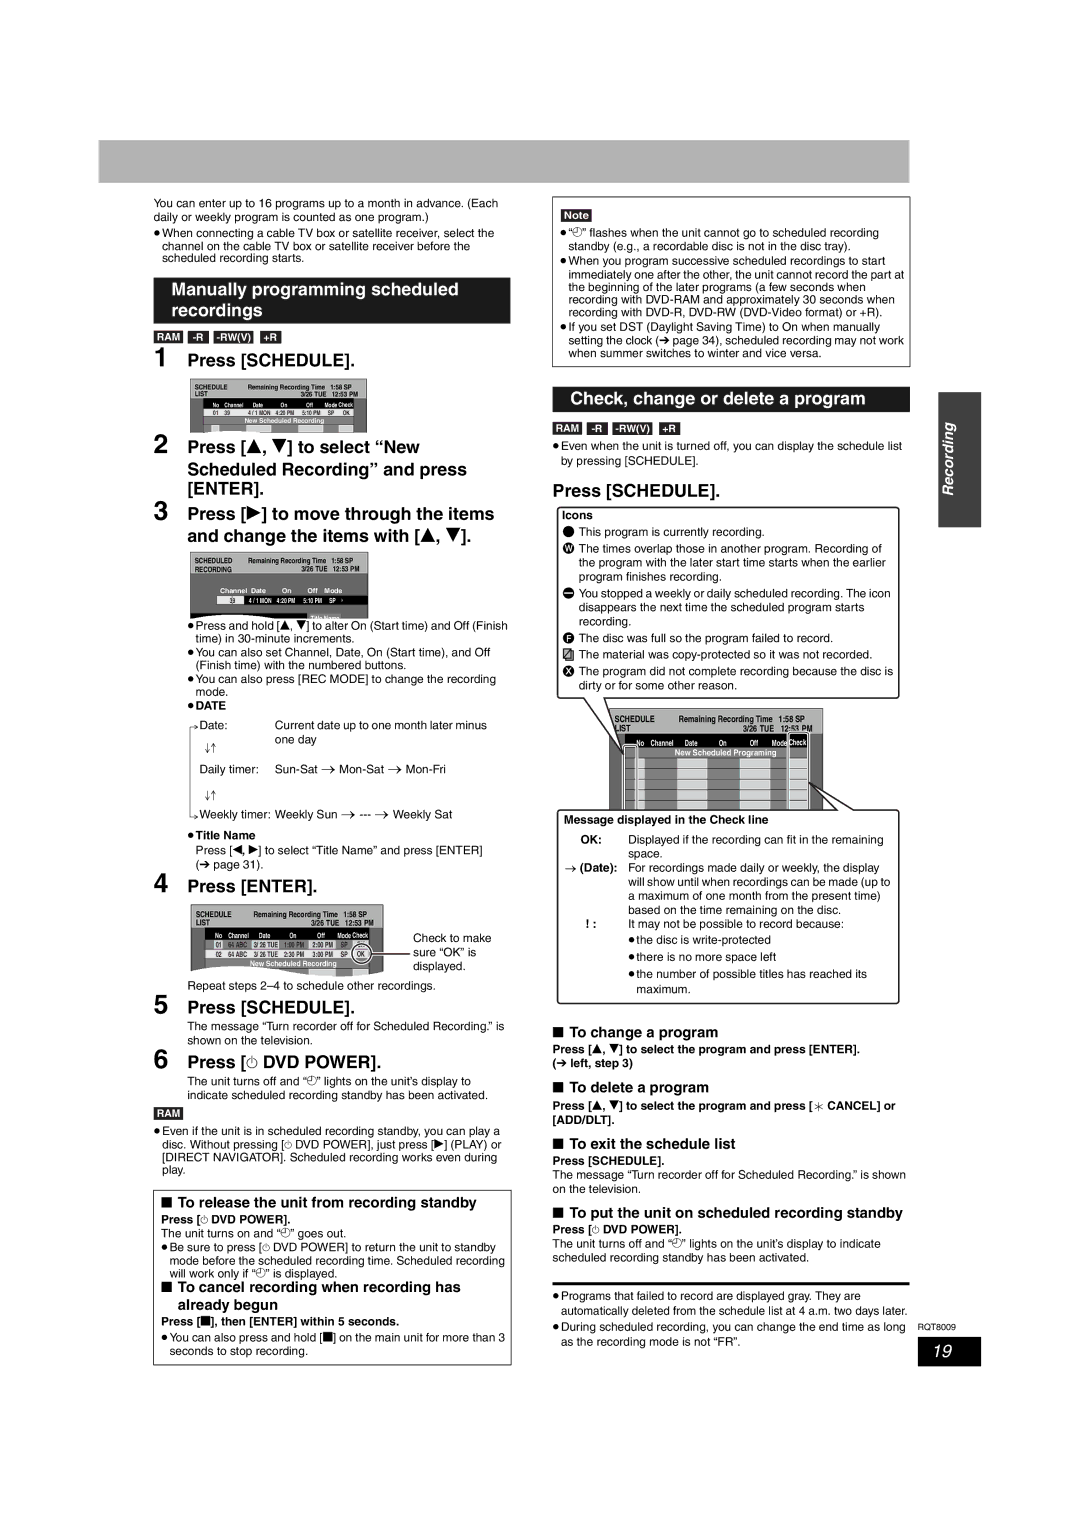
You can enter up to 16 programs up to a month in advance. (Each daily or weekly program is counted as one program.)

When connecting a cable TV box or satellite receiver, select the channel on the cable TV box or satellite receiver before the scheduled recording starts.

Manually programming scheduled recordings

RAM -R -RW(V) +R

1 Press [SCHEDULE].

SCHEDULE

Remaining Recording Time

1:58 SP

LIST


3/26 TUE

12:53 PM


No

Channel

Date

On

Off Mode Check


01

39

4 / 1 MON

4:20 PM

5:10 PM

SP OK


New Scheduled Recording


2 Press [e, r] to select “New Scheduled Recording” and press [ENTER].

3 Press [q] to move through the items and change the items with [e, r].


SCHEDULED Remaining Recording Time

1:58 SP


RECORDING


3/26 TUE

12:53 PM


Channel Date

On


Off Mode


39

4 / 1 MON

4:20 PM

5:10 PM

SP


Title Name


Press and hold [e, r] to alter On (Start time) and Off (Finish


time) in 30-minute increments.

You can also set Channel, Date, On (Start time), and Off (Finish time) with the numbered buttons.

You can also press [REC MODE] to change the recording mode.

DATE

Date:

Current date up to one month later minus


one day

Daily timer:

Sun-Sat Mon-Sat Mon-Fri

Weekly timer: Weekly Sun --- Weekly Sat

Title Name

Press [w, q] to select “Title Name” and press [ENTER] (page 31).

4 Press [ENTER].

SCHEDULE

Remaining Recording Time

1:58 SP


LIST


3/26 TUE

12:53 PM


No

Channel

Date

On

Off Mode Check


Check to make


01

64 ABC

3/ 26 TUE

1:00 PM

2:00 PM


SP

OK


02

64 ABC

3/ 26 TUE

2:30 PM

3:00 PM

SP

OK


sure “OK” is


New Scheduled Recording


displayed.


Repeat steps 2–4 to schedule other recordings.

5 Press [SCHEDULE].

The message “Turn recorder off for Scheduled Recording.” is shown on the television.

6 Press [^ DVD POWER].

The unit turns off and “z” lights on the unit’s display to indicate scheduled recording standby has been activated.

RAM

Even if the unit is in scheduled recording standby, you can play a disc. Without pressing [^ DVD POWER], just press [q] (PLAY) or [DIRECT NAVIGATOR]. Scheduled recording works even during play.

To release the unit from recording standby

Press [^ DVD POWER].

The unit turns on and “z” goes out.

Be sure to press [^ DVD POWER] to return the unit to standby

mode before the scheduled recording time. Scheduled recording will work only if “z” is displayed.

To cancel recording when recording has

already begun

Press [g], then [ENTER] within 5 seconds.

You can also press and hold [g] on the main unit for more than 3 seconds to stop recording.

Note

z” flashes when the unit cannot go to scheduled recording standby (e.g., a recordable disc is not in the disc tray).

When you program successive scheduled recordings to start immediately one after the other, the unit cannot record the part at the beginning of the later programs (a few seconds when recording with DVD-RAM and approximately 30 seconds when recording with DVD-R, DVD-RW (DVD-Video format) or +R).

If you set DST (Daylight Saving Time) to On when manually setting the clock (page 34), scheduled recording may not work when summer switches to winter and vice versa.


Check, change or delete a program


Recording


RAM


-R


-RW(V)


+R


Even when the unit is turned off, you can display the schedule list


by pressing [SCHEDULE].


Press [SCHEDULE].


Icons


This program is currently recording.


The times overlap those in another program. Recording of


W


the program with the later start time starts when the earlier


program finishes recording.


You stopped a weekly or daily scheduled recording. The icon


disappears the next time the scheduled program starts


recording.


F The disc was full so the program failed to record.


The material was copy-protected so it was not recorded.


XThe program did not complete recording because the disc is dirty or for some other reason.

SCHEDULE

Remaining Recording Time

1:58 SP

LIST


3/26 TUE

12:53 PM


No Channel

Date

On

Off Mode Check


New Scheduled Programing


Message displayed in the Check line

OK:

Press ENTER to store new schedule.

Displayed if the recording can fit in the remaining


space.

Cancel

No. 0 --9

(Date): For recordings made daily or weekly, the display will show until when recordings can be made (up to a maximum of one month from the present time) based on the time remaining on the disc.

!: It may not be possible to record because:

the disc is write-protected

there is no more space left

the number of possible titles has reached its maximum.

To change a program

Press [e, r] to select the program and press [ENTER]. (left, step 3)

To delete a program

Press [e, r] to select the program and press [ CANCEL] or [ADD/DLT].

To exit the schedule list

Press [SCHEDULE].

The message “Turn recorder off for Scheduled Recording.” is shown on the television.

To put the unit on scheduled recording standby

Press [^ DVD POWER].

The unit turns off and “z” lights on the unit’s display to indicate scheduled recording standby has been activated.

Programs that failed to record are displayed gray. They are automatically deleted from the schedule list at 4 a.m. two days later.

During scheduled recording, you can change the end time as long RQT8009

as the recording mode is not “FR”.

19


Page 19
Image 19
Panasonic DMR-ES10 warranty Manually programming scheduled recordings, Check, change or delete a program

DMR-ES10 specifications

The Panasonic DMR-ES10 is a versatile and compact DVD recorder that gained popularity for its user-friendly features and impressive performance in the early 2000s. This model is a testament to Panasonic's innovation in home entertainment technology, particularly in the realm of digital video recording.

One of the standout features of the DMR-ES10 is its ability to record in multiple modes, including standard play (SP), long play (LP), and EP modes. This flexibility allows users to choose between higher-quality recordings or extended playtime on a single disc, catering to varying needs whether recording a full-length movie or a series of television shows. With its ability to handle both DVD-R and DVD-RAM formats, the DMR-ES10 offers added convenience and versatility for users looking to archive their favorite programs or movies.

The DMR-ES10 is equipped with a built-in digital tuner, allowing users to record digital television broadcasts directly onto DVD. This feature was particularly important at the time as it facilitated the transition from analog to digital broadcasting. As such, users could enjoy high-quality recordings without the need for an additional external tuner.

Another key characteristic of the DMR-ES10 is its user-friendly interface. The device includes an intuitive on-screen menu and various editing features, enabling users to easily navigate their recordings. Functions like chapter creation and title editing make it simple for users to personalize their DVDs, enhancing the overall viewing experience.

In terms of connectivity, the DMR-ES10 offers several options, including composite and S-Video outputs, making it compatible with a variety of TVs and systems. It also features a convenient front panel USB port, allowing for direct access to compatible devices and easy file transfers.

Panasonic's commitment to delivering high-quality video is evident in the DMR-ES10's advanced video processing technology. It incorporates the company's proprietary video quality improvement technologies to ensure clear and vibrant playback, whether the source is a recorded DVD or an external input.

Overall, the Panasonic DMR-ES10 combines advanced recording capabilities, flexibility, and user-oriented features, making it an excellent choice for those looking to create and manage their digital media. While newer technologies have emerged, the DMR-ES10 remains a significant model in the evolution of DVD recorders, reflecting Panasonic's legacy of innovation and quality in consumer electronics.