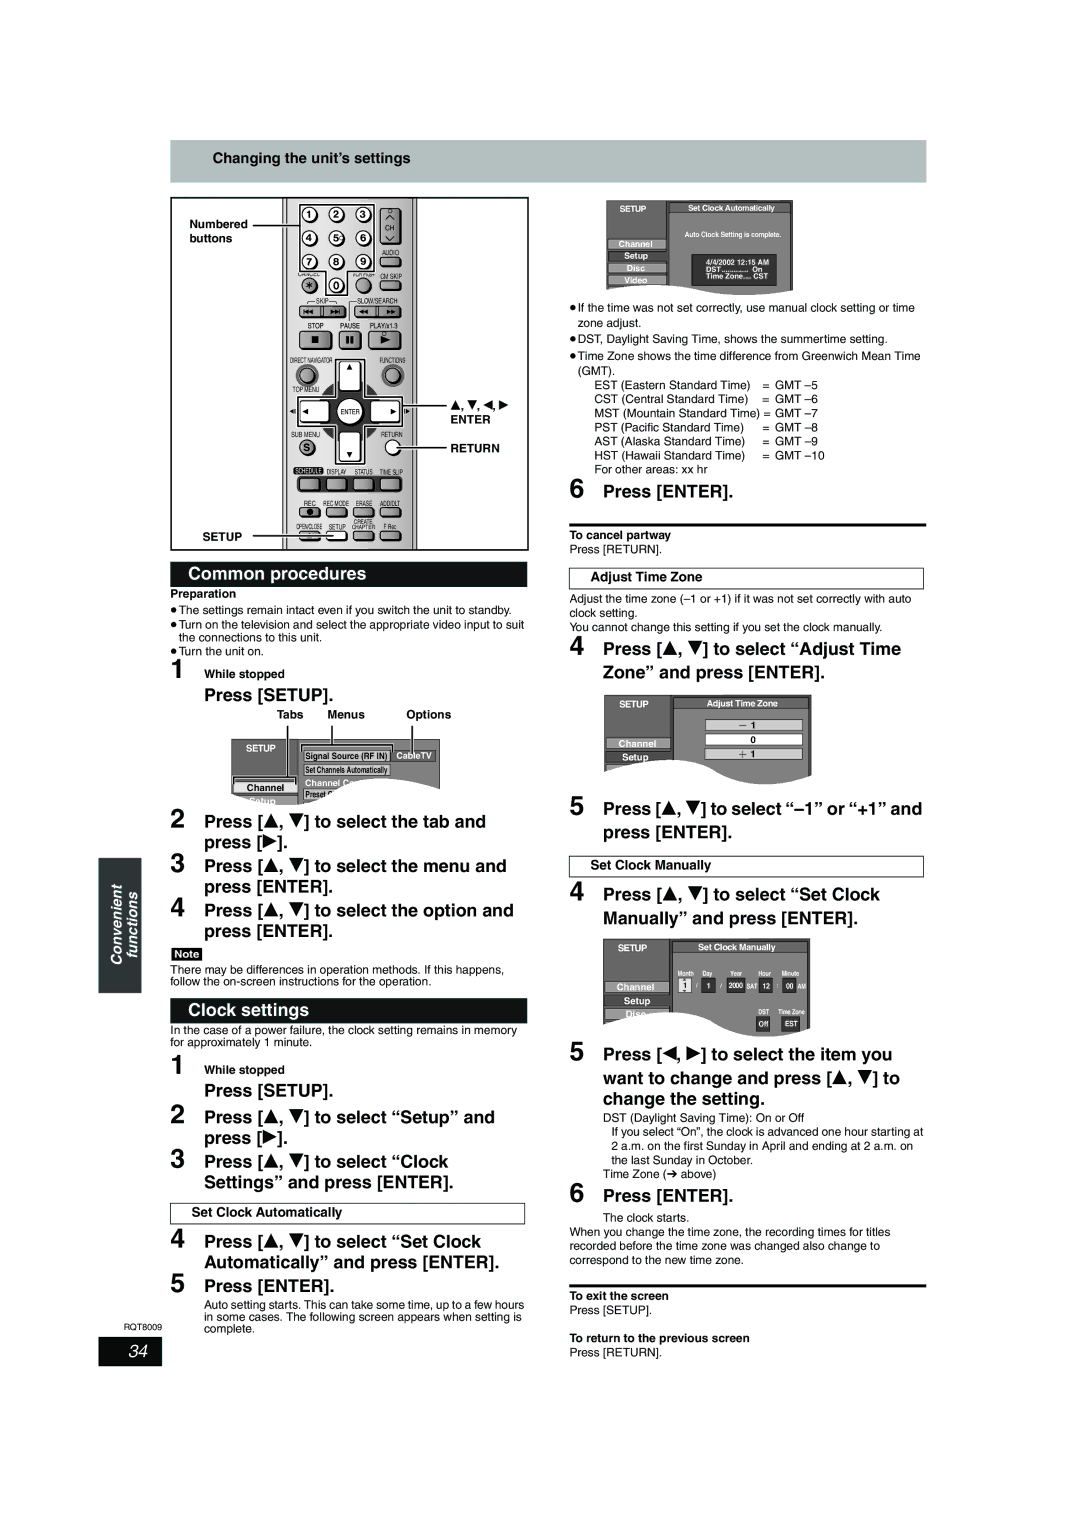
Changing the unit’s settings

Numbered buttons


AUDIO

CANCEL

VCR Plus+ CM SKIP

SKIP

SLOW/SEARCH

DIRECT NAVIGATOR

FUNCTIONS

TOP MENU


e, r, w, q

ENTER

SUB MENU


RETURN


RETURN

SCHEDULE

DISPLAY

STATUS

TIME SLIP

REC

REC MODE

ERASE

ADD/DLT

OPEN/CLOSE

SETUP

CREATE

F Rec

CHAPTER

SETUP

Common procedures

Preparation

The settings remain intact even if you switch the unit to standby.

Turn on the television and select the appropriate video input to suit the connections to this unit.

Turn the unit on.

1 While stopped

Press [SETUP].


Tabs Menus

Options


SETUP


Signal Source (RF IN)

CableTV


Set Channels Automatically


Channel Captions


Channel


Preset Channel Captions


Setup


2 Press [e, r] to select the tab and


press [q].


3 Press [e, r] to select the menu and


Convenient functions


press [ENTER].


4 Press [e, r] to select the option and


press [ENTER].


Note


There may be differences in operation methods. If this happens,


follow the on-screen instructions for the operation.


Clock settings

In the case of a power failure, the clock setting remains in memory for approximately 1 minute.

1 While stopped

Press [SETUP].

2 Press [e, r] to select “Setup” and press [q].

3 Press [e, r] to select “Clock Settings” and press [ENTER].

Set Clock Automatically

4 Press [e, r] to select “Set Clock Automatically” and press [ENTER].

5 Press [ENTER].

Auto setting starts. This can take some time, up to a few hours in some cases. The following screen appears when setting is

RQT8009complete.

34

SETUP

Set Clock Automatically


Auto Clock Setting is complete.

Channel


Setup


4/4/2002 12:15 AM


Disc


DST............. On


Video


Time Zone.... CST


Audio


If the time was not set correctly, use manual clock setting or time zone adjust.

DST, Daylight Saving Time, shows the summertime setting.

Time Zone shows the time difference from Greenwich Mean Time

(GMT).


EST (Eastern Standard Time)

= GMT –5

CST (Central Standard Time)

= GMT –6

MST (Mountain Standard Time) = GMT –7

PST (Pacific Standard Time)

= GMT –8

AST (Alaska Standard Time)

= GMT –9

HST (Hawaii Standard Time)

= GMT –10

For other areas: xx hr


6 Press [ENTER].

To cancel partway

Press [RETURN].

Adjust Time Zone

Adjust the time zone (–1 or +1) if it was not set correctly with auto clock setting.

You cannot change this setting if you set the clock manually.

4 Press [e, r] to select “Adjust Time Zone” and press [ENTER].


SETUP


Adjust Time Zone


1


0


Channel


Setup


1


Disc


Video


5 Press [e


, r] to select “–1” or “+1” and

press


[ENTER].


Set Clock Manually

4 Press [e, r] to select “Set Clock Manually” and press [ENTER].


SETUP


Set Clock Manually


Month


Day


Year Hour

Minute


1

/

1

/

2000

SAT

12

:

00

AM


Channel


Setup


Disc


DST

Time Zone


Off


EST


Video


5


Press [w, q] to select the item you

want to change and press [e, r] to change the setting.

DST (Daylight Saving Time): On or Off

If you select “On”, the clock is advanced one hour starting at 2 a.m. on the first Sunday in April and ending at 2 a.m. on the last Sunday in October.

Time Zone (above)

6 Press [ENTER].

The clock starts.

When you change the time zone, the recording times for titles recorded before the time zone was changed also change to correspond to the new time zone.

To exit the screen

Press [SETUP].

To return to the previous screen

Press [RETURN].

Page 34
Image 34
Panasonic DMR-ES10 warranty Clock settings, Press w, q to select the item you

DMR-ES10 specifications

The Panasonic DMR-ES10 is a versatile and compact DVD recorder that gained popularity for its user-friendly features and impressive performance in the early 2000s. This model is a testament to Panasonic's innovation in home entertainment technology, particularly in the realm of digital video recording.

One of the standout features of the DMR-ES10 is its ability to record in multiple modes, including standard play (SP), long play (LP), and EP modes. This flexibility allows users to choose between higher-quality recordings or extended playtime on a single disc, catering to varying needs whether recording a full-length movie or a series of television shows. With its ability to handle both DVD-R and DVD-RAM formats, the DMR-ES10 offers added convenience and versatility for users looking to archive their favorite programs or movies.

The DMR-ES10 is equipped with a built-in digital tuner, allowing users to record digital television broadcasts directly onto DVD. This feature was particularly important at the time as it facilitated the transition from analog to digital broadcasting. As such, users could enjoy high-quality recordings without the need for an additional external tuner.

Another key characteristic of the DMR-ES10 is its user-friendly interface. The device includes an intuitive on-screen menu and various editing features, enabling users to easily navigate their recordings. Functions like chapter creation and title editing make it simple for users to personalize their DVDs, enhancing the overall viewing experience.

In terms of connectivity, the DMR-ES10 offers several options, including composite and S-Video outputs, making it compatible with a variety of TVs and systems. It also features a convenient front panel USB port, allowing for direct access to compatible devices and easy file transfers.

Panasonic's commitment to delivering high-quality video is evident in the DMR-ES10's advanced video processing technology. It incorporates the company's proprietary video quality improvement technologies to ensure clear and vibrant playback, whether the source is a recorded DVD or an external input.

Overall, the Panasonic DMR-ES10 combines advanced recording capabilities, flexibility, and user-oriented features, making it an excellent choice for those looking to create and manage their digital media. While newer technologies have emerged, the DMR-ES10 remains a significant model in the evolution of DVD recorders, reflecting Panasonic's legacy of innovation and quality in consumer electronics.