Contents
Operating Instructions
Caller ID Service
Voice Mail Service
Introduction
Preparation
Product information
Notable differences between the models
Thank you for purchasing a Panasonic digital cordless phone
KX-TG4311 series
Accessory information
Supplied accessories
Replacement battery information
Quantity KX-TG4311 KX-TG4312
For your safety
Important safety instructions
Battery
For best performance
Base unit location/avoiding noise
Environment
Routine care
Controls
Base unit Handset
Charge contacts
Speaker
Base unit
Display
Connections
Battery installation and replacement
During a power failure
If you subscribe to a DSL/ADSL service
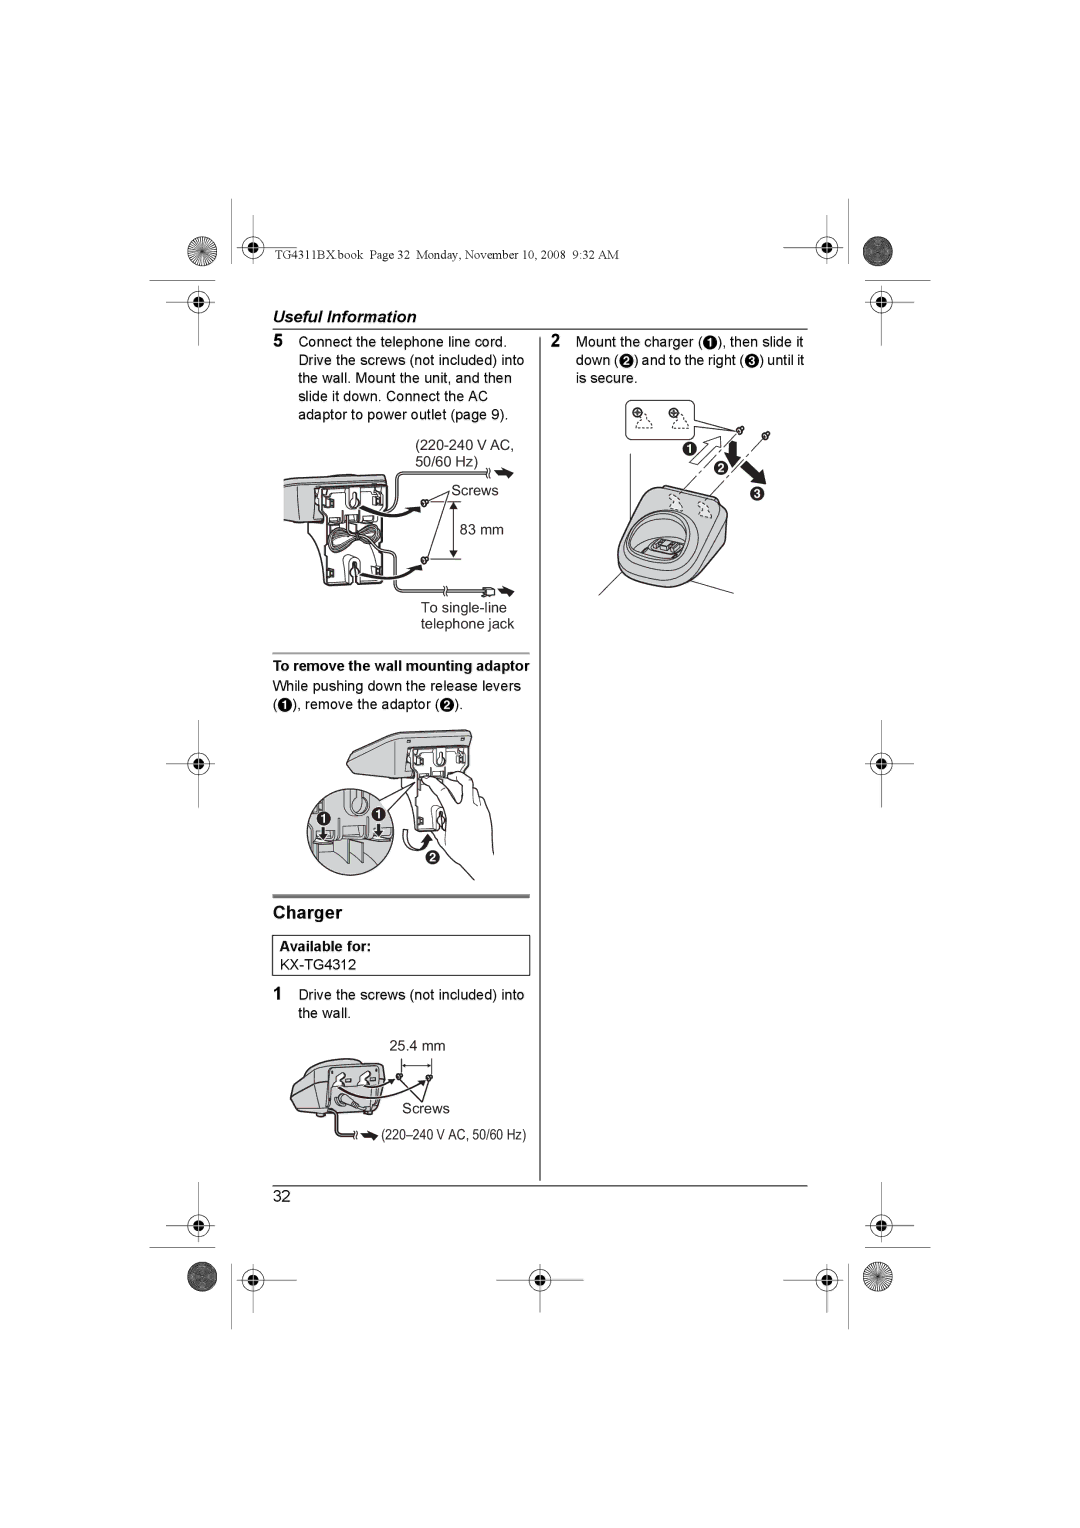
Charger
Battery charge
Battery level Battery icon
Symbols used in these operating instructions
Setting up the unit before use
Dialing mode
Date and time
Save iOFF
Making calls
Answering calls
Useful features during a call
Adjusting the handset ringer volume
Hold
Mute
Temporary tone dialing for rotary/pulse service users
Dial lock
Handset clarity booster
Call share
Finding and calling a phonebook entry
Phonebook
Adding entries
Editing entries
Erasing entries
Chain dial
Next
Programmable settings
Programming by scrolling through the display menus
Menu
Main menu Sub-menu
TG4311BX.book Page 20 Monday, November 10, 2008 932 AM
Programming using the direct commands
Feature Setting code System Code
Feature Setting code System Code Setting*1
Caller IDauto Adjustment*7
Special instructions for programmable settings
Night mode
Alarm
Setting the start and end time
TG4311BX.book Page 24 Monday, November 10, 2008 932 AM
Using Caller ID service
Caller ID features
Caller list
Ringer ID
Editing a caller’s phone
Number before calling back
Storing your area code
Erasing selected caller
TG4311BX.book Page 27 Monday, November 10, 2008 932 AM
Voice mail service
Intercom
Transferring calls, conference calls
Making an intercom call
Answering an intercom call
Handset Press OFF
Handset locator
Base unit Locator
Wall mounting
To remove the wall mounting adaptor
Error messages
Display message Cause/solution
Phonebook full
Troubleshooting
General use Problem Cause/solution
Programmable settings Problem Cause/solution
Battery recharge Problem Cause/solution
Problem Cause/solution
Making/answering calls, intercom
Caller ID Problem Cause/solution
Base unit Press and hold Locator
Registration Problem Cause/solution
Handset Menu i#130
Liquid damage Problem Cause/solution
Dial lock Important
Specifications
Index
TG4311BX.book Page 42 Monday, November 10, 2008 932 AM
TG4311BX.book Page 43 Monday, November 10, 2008 932 AM
Copyright
PNQX1829ZA CC1108PA0
For your future reference

![]() A
A![]() (220–240
(220–240![]()
