Setting the clock

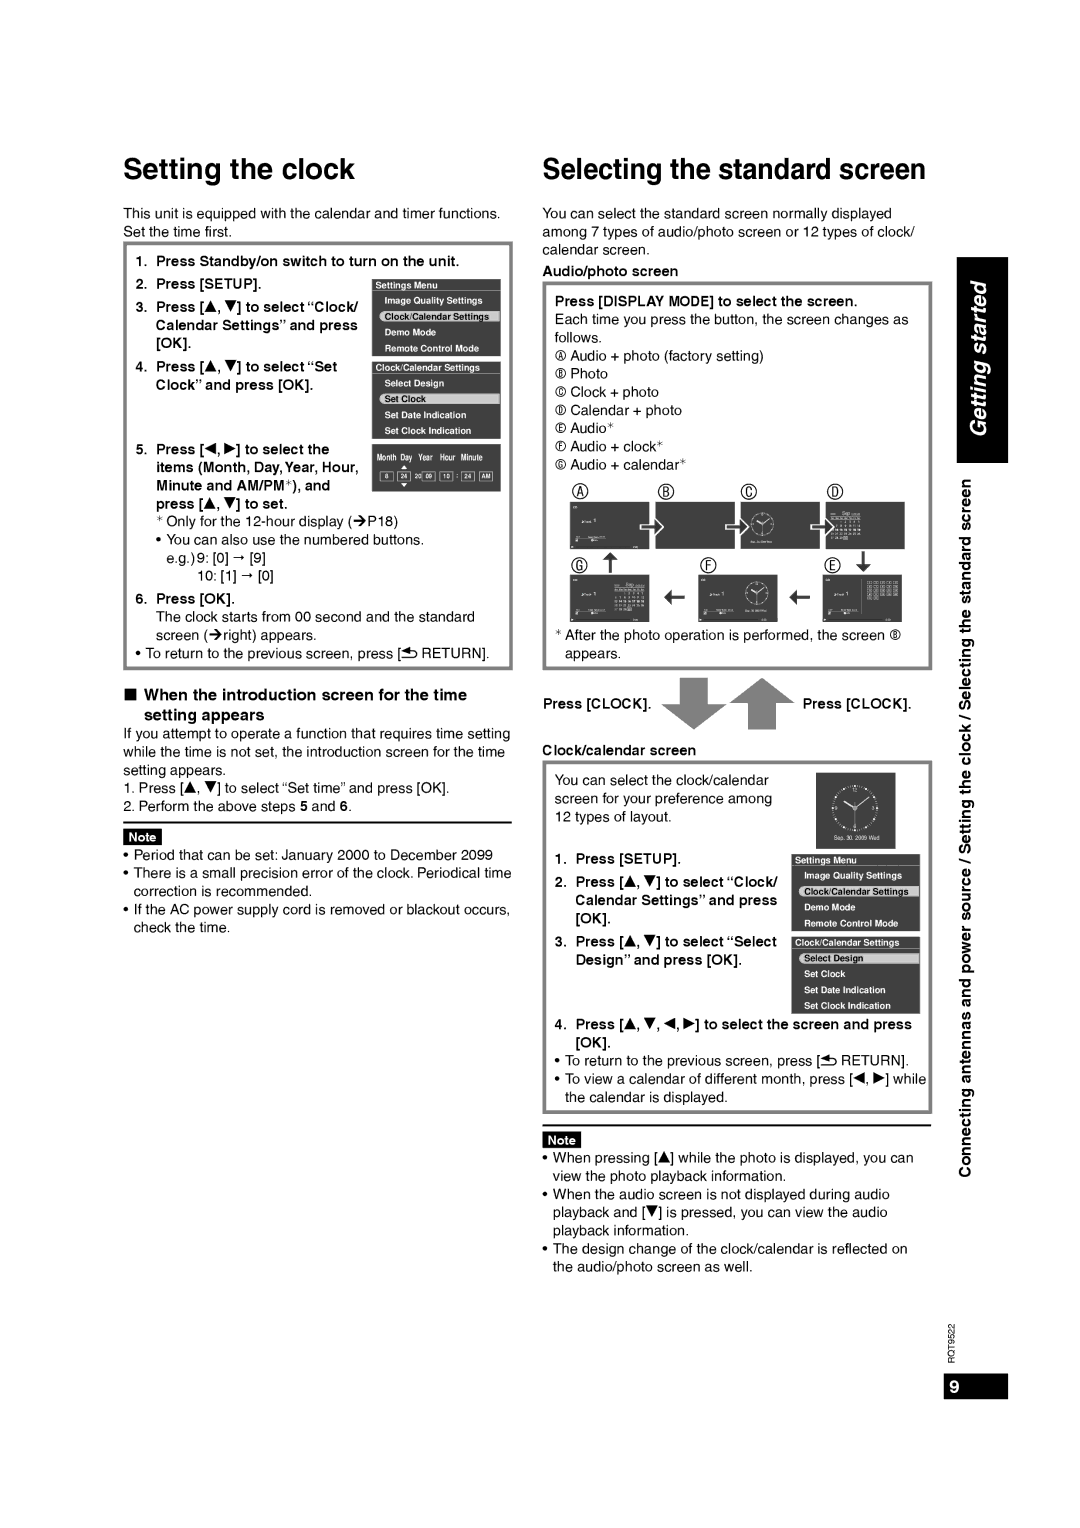
This unit is equipped with the calendar and timer functions. Set the time first.

1. Press Standby/on switch to turn on the unit.

Selecting the standard screen

You can select the standard screen normally displayed among 7 types of audio/photo screen or 12 types of clock/ calendar screen.

Audio/photo screen

2.Press [SETUP].

3.Press [e, r] to select “Clock/ Calendar Settings” and press [OK].

4.Press [e, r] to select “Set Clock” and press [OK].

Settings Menu

Image Quality Settings

Clock/Calendar Settings

Demo Mode

Remote Control Mode

Clock/Calendar Settings

Select Design

Set Clock

Set Date Indication Set Clock Indication

Press [DISPLAY MODE] to select the screen.

started

Each time you press the button, the screen changes as

follows.

A Audio + photo (factory setting)

Getting

B Photo

C Clock + photo

D Calendar + photo

E Audio¼

5. Press [w, q] to select the


Month Day Year

Hour Minute

items (Month, Day, Year, Hour,

8 24 20 09

10 : 24 AM

Minute and AM/PM¼), and


press [e, r] to set.


¼Only for the 12-hour display (¼P18)

You can also use the numbered buttons. e.g.) 9: [0] ˆ [9]

10:[1] ˆ [0]

6.Press [OK].

The clock starts from 00 second and the standard screen (¼right) appears.

To return to the previous screen, press [ RETURN].

„When the introduction screen for the time

setting appears

If you attempt to operate a function that requires time setting while the time is not set, the introduction screen for the time setting appears.

1.Press [e, r] to select “Set time” and press [OK].

2.Perform the above steps 5 and 6.

Note

Period that can be set: January 2000 to December 2099

There is a small precision error of the clock. Periodical time correction is recommended.

If the AC power supply cord is removed or blackout occurs, check the time.

F Audio + clock¼


G Audio + calendar¼


A


B

C


D


screen


CD


12


2009

Sep 10:08 AM


Track 1


Sun

Mon Tue Wed Thu Fri

Sat


9

3


6


standard


1/22 Total Time 60:12


Sep. 30. 2009 Wed


2:20


G


F


E


CD

Sep 10:08 AM


CD

12


CD


1

2

3

4

5


2009


6

7

8

9

10


Sun

Mon Tue Wed Thu Fri

Sat


11

12

13

14

15


Track 1


Track 1

9

3


Track 1


16

17

18

19

20


6


21

22


1/22 Total Time 60:12


1/22 Total Time 60:12


Sep. 30. 2009 Wed


1/22

Total Time 60:12


the


2:20


2:20


2:20


¼ After the photo operation is performed, the screen

B

Selecting

appears.


Press [CLOCK].


Press [CLOCK].


/

Clock/calendar screen


theclock


You can select the clock/calendar


12


screen for your preference among


9


3


/ Setting

12 types of layout.


6


Sep. 30. 2009 Wed


1.

Press [SETUP].


Settings Menu


2.

Press [e, r] to select “Clock/


Image Quality Settings


source


Clock/Calendar Settings


Calendar Settings” and press


Demo Mode


[OK].


Remote Control Mode


power

3.

Press [e, r] to select “Select


Clock/Calendar Settings


Design” and press [OK].


Select Design


Set Clock


and


Set Date Indication


Set Clock Indication


antennas

4.

Press [e, r, w, q] to select the screen and press


[OK].


• To return to the previous screen, press [

RETURN].

• To view a calendar of different month, press [w, q] while

Connecting

the calendar is displayed.


Note


• When pressing [e] while the photo is displayed, you can

view the photo playback information.


• When the audio screen is not displayed during audio


playback and [r] is pressed, you can view the audio


playback information.


• The design change of the clock/calendar is reflected on


the audio/photo screen as well.


RQT9522

9

Page 9
Image 9
Panasonic MW-10 operating instructions Setting the clock, Selecting the standard screen

MW-10 specifications

The Panasonic MW-10 is a versatile and compact microwave oven that combines efficiency with advanced technology, making it a valuable addition to any modern kitchen. With its sleek design and user-friendly features, the MW-10 caters to the needs of busy households, providing fast and convenient cooking options.

One of the standout features of the Panasonic MW-10 is its Inverter Technology. This innovative technology ensures consistent and even cooking by providing a steady stream of microwave energy. Unlike traditional microwaves that rely on a cycling method of power, which can lead to uneven heating, the MW-10 maintains a constant power level, allowing foods to cook uniformly and retain their natural texture and flavor.

The MW-10 offers a generous capacity, making it suitable for both single servings and larger meals. With a spacious interior, users can easily heat, defrost, or cook larger dishes, ensuring that family meals are effortless and efficient. Additionally, the microwave features multiple cooking presets, allowing users to quickly select the desired cooking mode for various types of food. This user-oriented design simplifies the cooking process, catering to those with busy lifestyles.

Another significant characteristic of the MW-10 is its ease of use. The intuitive control panel features a clear LCD display and simple navigation buttons, making it accessible for users of all ages. The one-touch sensor cook feature automatically adjusts cooking time and power levels based on the selected food type, making it easy to achieve perfect results every time.

Safety is also a priority with the Panasonic MW-10. It includes a child lock feature, ensuring that little hands cannot accidentally operate the microwave. The durable design and materials used provide additional peace of mind, making it a reliable choice for families.

In summary, the Panasonic MW-10 microwave oven is a remarkable appliance that combines cutting-edge technology with user-friendly features. Its Inverter Technology ensures even and consistent heating, while the ample capacity and straightforward controls make it a convenient choice for any kitchen. Whether you’re reheating leftovers, cooking a meal from scratch, or defrosting ingredients, the MW-10 stands out as a dependable and efficient solution.