Copying onto an S-VHS (or VHS) Cassette (Dubbing)
You can copy the picture and sound recorded on this Movie Camera onto an
|
| 21 pin Adaptor |
[AV OUT] |
| |
PHONES | [VIDEO IN] | |
| ||
| AV Cable |
[AUDIO IN] | ||
| ||
|
|
Using with Digital Video Equipment (Dubbing) (NV-DS150 only)
|
|
| VIDEO CAMERA | |
| DATE/ | PHOTO | START/ | |
OSD | STOP | |||
TIME | SHOT |
| ||
DISPLAY | RESET |
| ZOOM | |
|
|
| ||
|
|
| T | |
| ¥REC | A.DUB | r | |
|
|
| sVOL | |
V/REW | PLAY | FF/W | W | |
6 | 1 | 5 | ||
| ||||
STILL ADV | PAUSE | STILL ADV |
|
E ; D
INDEX STOP INDEX
:∫ 9
SELECT
VAR. | P.B. |
SEARCH | ZOOM |
STORE
MENU
OFF/ON | SET |
ITEM | DV Cable |
P.B.DIGITAL |
|
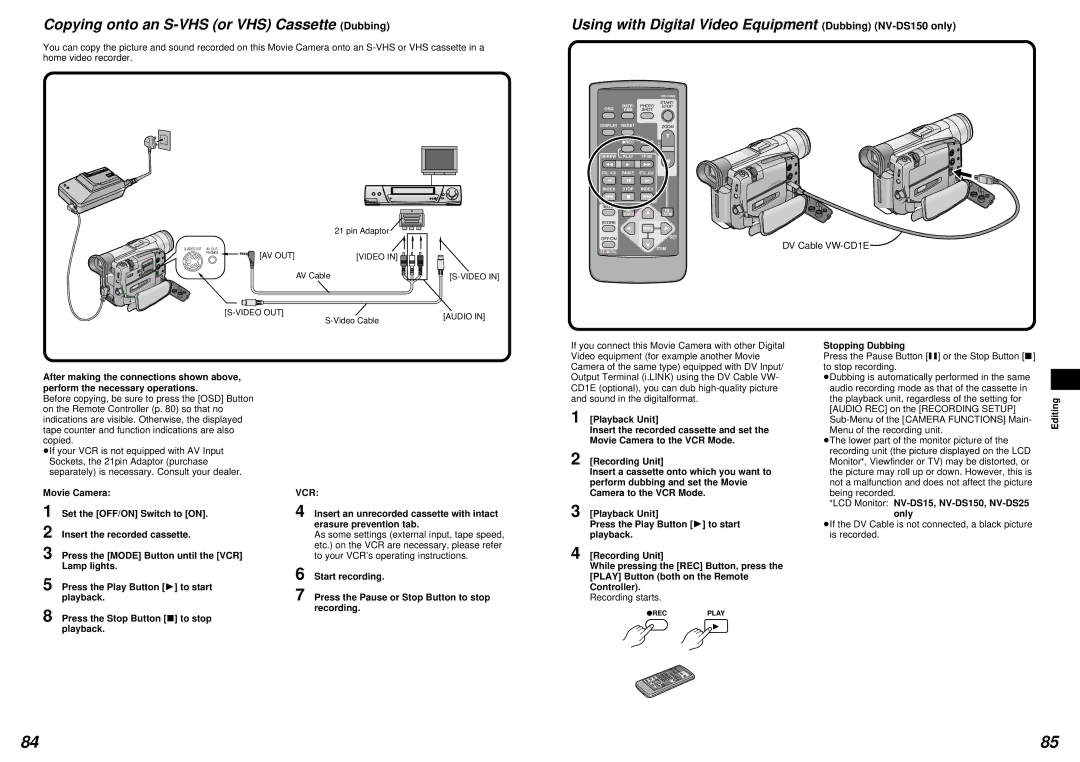
After making the connections shown above, perform the necessary operations.
Before copying, be sure to press the [OSD] Button on the Remote Controller (p. 80) so that no indications are visible. Otherwise, the displayed tape counter and function indications are also copied.
³If your VCR is not equipped with AV Input Sockets, the 21pin Adaptor (purchase separately) is necessary. Consult your dealer.
Movie Camera:
1
2
3 Press the [MODE] Button until the [VCR] Lamp lights.
5 Press the Play Button [1] to start playback.
VCR:
4 Insert an unrecorded cassette with intact erasure prevention tab.
As some settings (external input, tape speed, etc.) on the VCR are necessary, please refer to your VCR’s operating instructions.
6 Start recording.
7 Press the Pause or Stop Button to stop recording.
If you connect this Movie Camera with other Digital Video equipment (for example another Movie Camera of the same type) equipped with DV Input/ Output Terminal (i.LINK) using the DV Cable VW- CD1E (optional), you can dub
1 [Playback Unit]
Insert the recorded cassette and set the Movie Camera to the VCR Mode.
2 [Recording Unit]
Insert a cassette onto which you want to perform dubbing and set the Movie Camera to the VCR Mode.
3 [Playback Unit]
Press the Play Button [1] to start playback.
4 [Recording Unit]
While pressing the [REC] Button, press the
[PLAY] Button (both on the Remote
Controller).
Recording starts.
Stopping Dubbing
Press the Pause Button [;] or the Stop Button [º] to stop recording.
³Dubbing is automatically performed in the same audio recording mode as that of the cassette in the playback unit, regardless of the setting for [AUDIO REC] on the [RECORDING SETUP]
³The lower part of the monitor picture of the recording unit (the picture displayed on the LCD Monitor¡, Viewfinder or TV) may be distorted, or the picture may roll up or down. However, this is not a malfunction and does not affect the picture being recorded.
¡LCD Monitor: NV-DS15, NV-DS150, NV-DS25 only
³If the DV Cable is not connected, a black picture is recorded.
Editing
8 Press the Stop Button [º] to stop playback.
¥RECPLAY
1
84 | 85 |