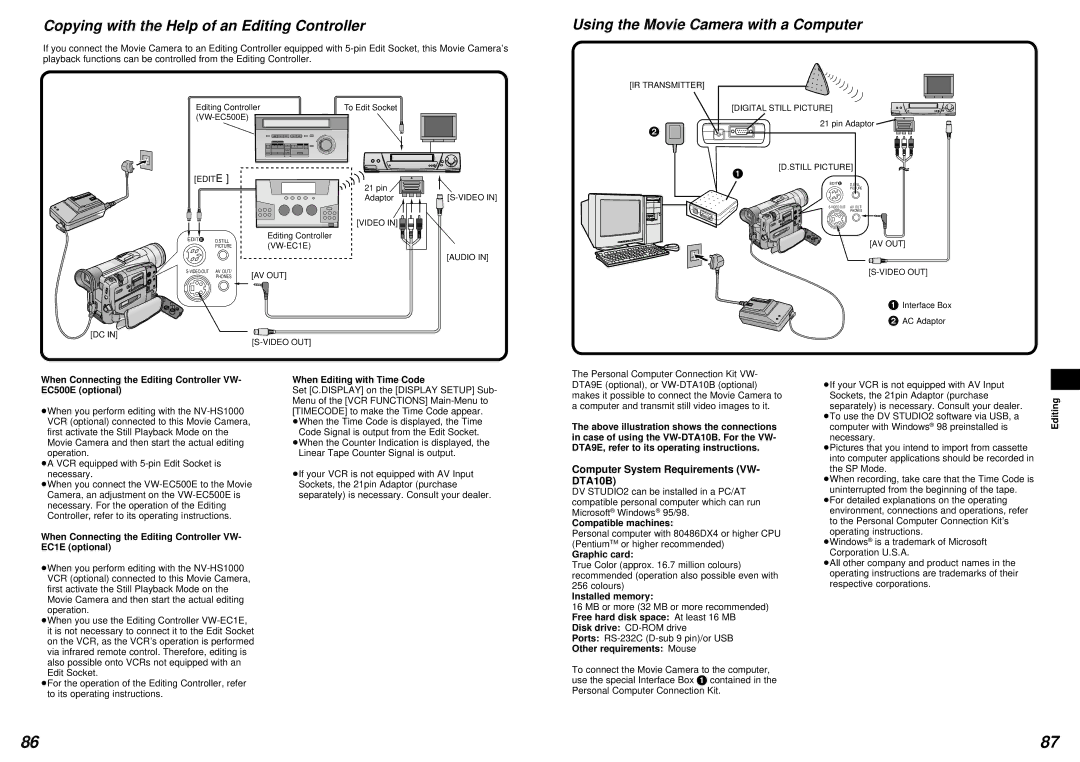
Copying with the Help of an Editing Controller
If you connect the Movie Camera to an Editing Controller equipped with
Editing Controller | To Edit Socket |
Using the Movie Camera with a Computer
[IR TRANSMITTER]
[DIGITAL STILL PICTURE]
2 ![]()
21 pin Adaptor ![]()
[EDITE] |
| ||
EDIT E | D.STILL | Editing Controller | |
| PICTURE | ||
AV OUT/ | [AV OUT] | ||
| PHONES | ||
[DC IN]
21 pin |
|
Adaptor | |
[VIDEO IN] |
|
| [AUDIO IN] |
1
[D.STILL PICTURE]
EDIT E | D.STILL |
| PICTURE |
AV OUT/ | |
| PHONES |
[AV OUT]
1 Interface Box
2 AC Adaptor
When Connecting the Editing Controller VW- EC500E (optional)
³When you perform editing with the
³A VCR equipped with
³When you connect the
When Connecting the Editing Controller VW- EC1E (optional)
³When you perform editing with the
³When you use the Editing Controller
³For the operation of the Editing Controller, refer to its operating instructions.
When Editing with Time Code
Set [C.DISPLAY] on the [DISPLAY SETUP] Sub- Menu of the [VCR FUNCTIONS]
Code Signal is output from the Edit Socket. ³When the Counter Indication is displayed, the
Linear Tape Counter Signal is output.
³If your VCR is not equipped with AV Input Sockets, the 21pin Adaptor (purchase separately) is necessary. Consult your dealer.
The Personal Computer Connection Kit VW- DTA9E (optional), or
The above illustration shows the connections in case of using the
Computer System Requirements (VW- DTA10B)
DV STUDIO2 can be installed in a PC/AT compatible personal computer which can run Microsoft® Windows® 95/98.
Compatible machines:
Personal computer with 80486DX4 or higher CPU (PentiumTM or higher recommended)
Graphic card:
True Color (approx. 16.7 million colours) recommended (operation also possible even with
256colours)
Installed memory:
16MB or more (32 MB or more recommended) Free hard disk space: At least 16 MB
Disk drive:
Ports:
Other requirements: Mouse
To connect the Movie Camera to the computer, use the special Interface Box 1 contained in the Personal Computer Connection Kit.
³If your VCR is not equipped with AV Input Sockets, the 21pin Adaptor (purchase separately) is necessary. Consult your dealer.
³To use the DV STUDIO2 software via USB, a computer with Windows® 98 preinstalled is necessary.
³Pictures that you intend to import from cassette into computer applications should be recorded in the SP Mode.
³When recording, take care that the Time Code is uninterrupted from the beginning of the tape.
³For detailed explanations on the operating environment, connections and operations, refer to the Personal Computer Connection Kit’s operating instructions.
³Windows® is a trademark of Microsoft Corporation U.S.A.
³All other company and product names in the operating instructions are trademarks of their respective corporations.
Editing
86 | 87 |