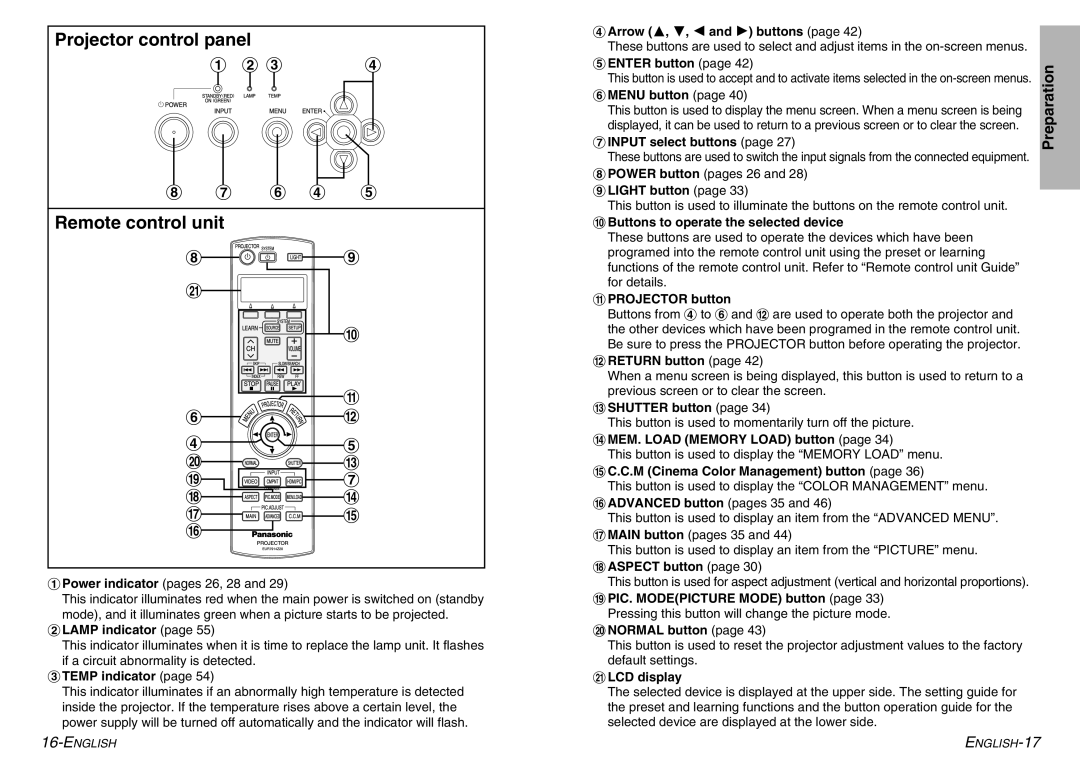
Projector control panel
# $ % | & |
*) ( & '
Remote control unit
*![]()
![]()
![]()
![]()
![]()
![]()
![]()
![]() +
+
7
,
-
(![]()
![]()
![]()
![]()
![]()
![]() .
.
&'
6 | / |
5 | ) |
4 | 0 |
3 | 1 |
2 |
|
#Power indicator (pages 26, 28 and 29)
This indicator illuminates red when the main power is switched on (standby mode), and it illuminates green when a picture starts to be projected.
$LAMP indicator (page 55)
This indicator illuminates when it is time to replace the lamp unit. It flashes if a circuit abnormality is detected.
%TEMP indicator (page 54)
This indicator illuminates if an abnormally high temperature is detected inside the projector. If the temperature rises above a certain level, the power supply will be turned off automatically and the indicator will flash.
&Arrow (F, G, I and H) buttons (page 42)
These buttons are used to select and adjust items in the
'ENTER button (page 42)
This button is used to accept and to activate items selected in the
(MENU button (page 40)
This button is used to display the menu screen. When a menu screen is being displayed, it can be used to return to a previous screen or to clear the screen.
)INPUT select buttons (page 27)
These buttons are used to switch the input signals from the connected equipment.
*POWER button (pages 26 and 28)
+LIGHT button (page 33)
This button is used to illuminate the buttons on the remote control unit.
,Buttons to operate the selected device
These buttons are used to operate the devices which have been programed into the remote control unit using the preset or learning functions of the remote control unit. Refer to “Remote control unit Guide” for details.
-PROJECTOR button
Buttons from & to ( and . are used to operate both the projector and the other devices which have been programed in the remote control unit. Be sure to press the PROJECTOR button before operating the projector.
.RETURN button (page 42)
When a menu screen is being displayed, this button is used to return to a previous screen or to clear the screen.
/SHUTTER button (page 34)
This button is used to momentarily turn off the picture.
0MEM. LOAD (MEMORY LOAD) button (page 34)
This button is used to display the “MEMORY LOAD” menu.
1C.C.M (Cinema Color Management) button (page 36)
This button is used to display the “COLOR MANAGEMENT” menu.
2ADVANCED button (pages 35 and 46)
This button is used to display an item from the “ADVANCED MENU”.
3MAIN button (pages 35 and 44)
This button is used to display an item from the “PICTURE” menu.
4ASPECT button (page 30)
This button is used for aspect adjustment (vertical and horizontal proportions).
5PIC. MODE(PICTURE MODE) button (page 33) Pressing this button will change the picture mode.
6NORMAL button (page 43)
This button is used to reset the projector adjustment values to the factory default settings.
7LCD display
The selected device is displayed at the upper side. The setting guide for the preset and learning functions and the button operation guide for the selected device are displayed at the lower side.