Turning on the power
Before turning on the power
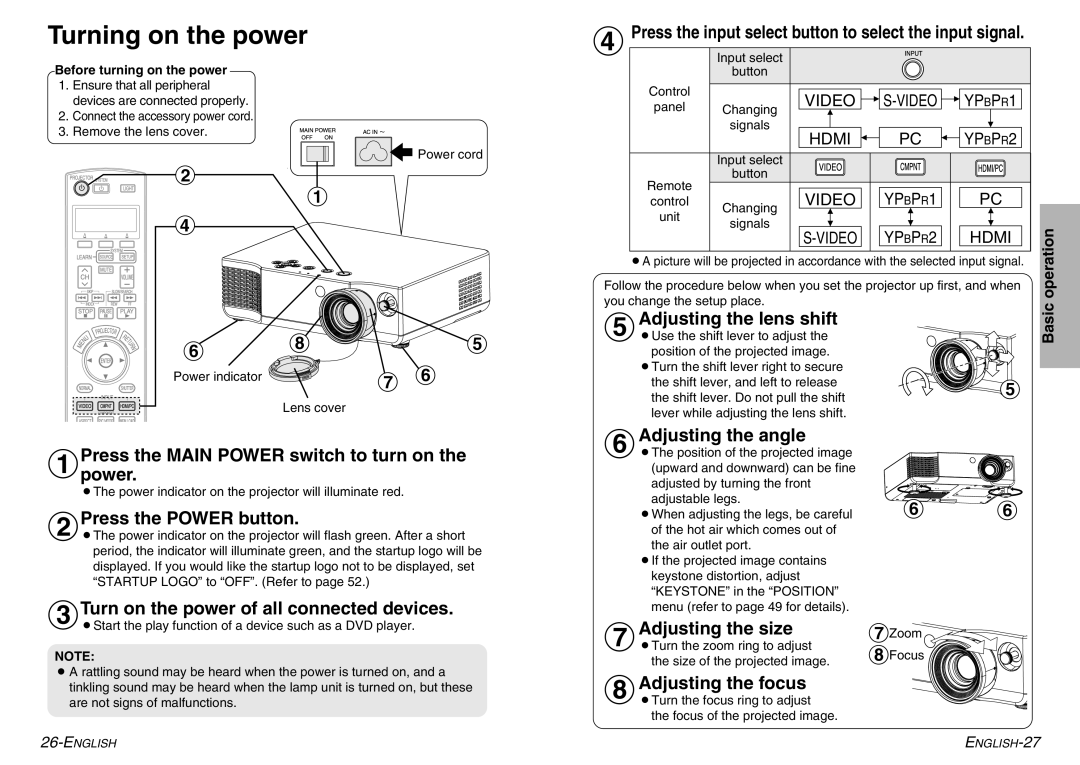
& Press the input select button to select the input signal. |
Input select |
button |
1.Ensure that all peripheral devices are connected properly.
2.Connect the accessory power cord.
3.Remove the lens cover.
$˛
&˛
(˛
Power indicator
![]() Power cord
Power cord
#˛
*˛ 
 '˛ ˛) ˛(
Lens cover
Control |
| VIDEO | YPBPR1 | ||
panel | Changing | ||||
|
|
| |||
| signals | HDMI | PC | YPBPR2 | |
|
| ||||
| Input select |
|
|
| |
Remote | button |
|
|
| |
| VIDEO | YPBPR1 | PC | ||
control | Changing | ||||
unit |
|
|
| ||
signals |
|
|
| ||
| YPBPR2 | HDMI | |||
|
|
BA picture will be projected in accordance with the selected input signal.
Follow the procedure below when you set the projector up first, and when you change the setup place.
Adjusting the lens shift |
| |
'BUse the shift lever to adjust the |
| |
position of the projected image. |
| |
BTurn the shift lever right to secure |
| |
the shift lever, and left to release | ˛' | |
the shift lever. Do not pull the shift | ||
| ||
lever while adjusting the lens shift. |
| |
(Adjusting the angle |
|
Basic operation
#Presspower.the MAIN POWER switch to turn on the
BThe power indicator on the projector will illuminate red.
$Press the POWER button.
BThe power indicator on the projector will flash green. After a short period, the indicator will illuminate green, and the startup logo will be displayed. If you would like the startup logo not to be displayed, set “STARTUP LOGO” to “OFF”. (Refer to page 52.)
%Turn on the power of all connected devices.
BStart the play function of a device such as a DVD player.
NOTE:
BA rattling sound may be heard when the power is turned on, and a tinkling sound may be heard when the lamp unit is turned on, but these are not signs of malfunctions.
BThe position of the projected image |
|
|
(upward and downward) can be fine |
|
|
adjusted by turning the front |
|
|
adjustable legs. | ˛( | (˛ |
BWhen adjusting the legs, be careful | ||
of the hot air which comes out of |
|
|
the air outlet port. |
|
|
BIf the projected image contains |
|
|
keystone distortion, adjust |
|
|
“KEYSTONE” in the “POSITION” |
|
|
menu (refer to page 49 for details). |
|
|
Adjusting the size | )˛Zoom |
|
)BTurn the zoom ring to adjust | *˛Focus |
|
the size of the projected image. |
| |
Adjusting the focus |
|
|
*BTurn the focus ring to adjust |
|
|
the focus of the projected image. |
|
|