Turning on the power
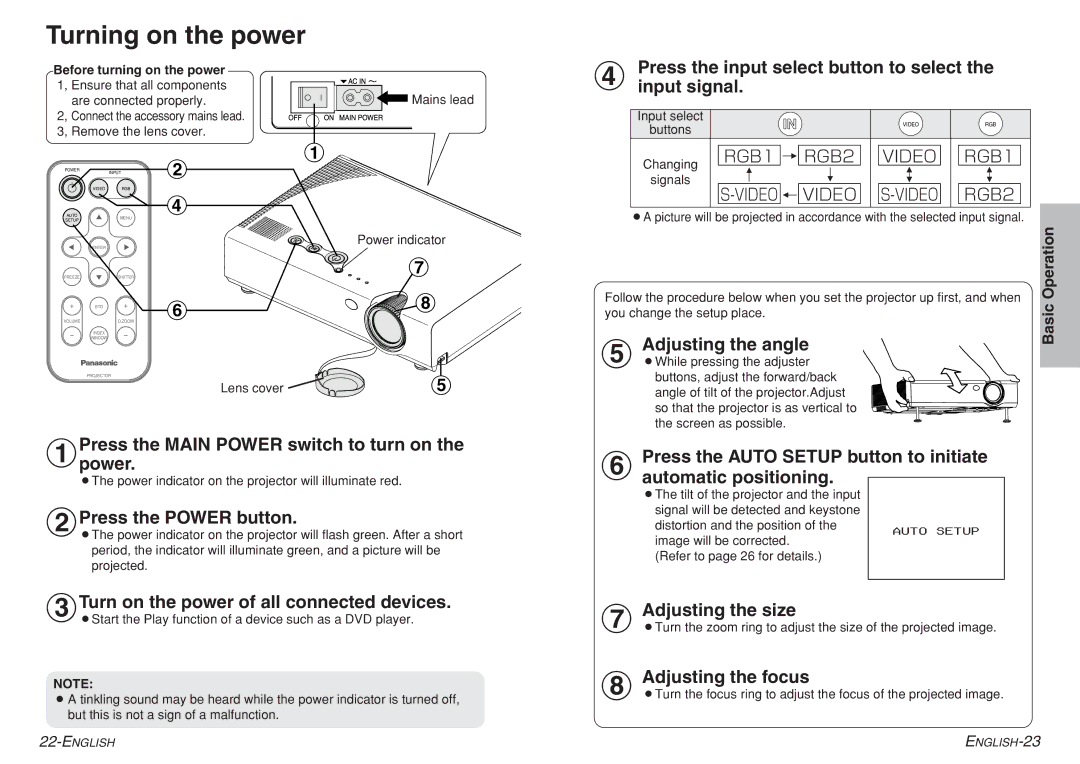
Before turning on the power 1, Ensure that all components are connected properly.
2, Connect the accessory mains lead. 3, Remove the lens cover.
POWER | INPUT | $ |
|
|
VIDEO RGB
&
![]() Mains lead
Mains lead
#
&Press the input select button to select the input signal.
Input select | VIDEO | RGB | |
buttons | |||
|
|
Changing | RGB1 |
|
|
|
|
| RGB2 |
| VIDEO |
| RGB1 | ||||
|
|
|
|
| |||||||||||
|
|
|
|
|
|
|
|
|
|
|
|
|
|
| |
signals |
|
|
|
|
|
|
|
|
|
|
|
|
|
|
|
|
|
|
|
|
|
|
|
|
|
|
|
|
|
| |
|
|
|
|
|
| VIDEO |
|
| RGB2 | ||||||
|
|
|
|
|
| ||||||||||
AUTO | MENU | |
SETUP | ||
|
Power indicator
| ENTER |
|
|
FREEZE |
| SHUTTER | ) |
|
| ||
| STD | ( | * |
VOLUME |
| D.ZOOM |
|
| INDEX |
|
|
| WINDOW |
|
|
| PROJECTOR |
| ' |
|
| Lens cover |
#Presspower.the MAIN POWER switch to turn on the
BThe power indicator on the projector will illuminate red.
$Press the POWER button.
BThe power indicator on the projector will flash green. After a short period, the indicator will illuminate green, and a picture will be projected.
%Turn on the power of all connected devices.
BStart the Play function of a device such as a DVD player.
NOTE:
BA tinkling sound may be heard while the power indicator is turned off, but this is not a sign of a malfunction.
BA picture will be projected in accordance with the selected input signal.
Follow the procedure below when you set the projector up first, and when | Operation | |
Basic | ||
you change the setup place. | ||
|
' Adjusting the angle
BWhile pressing the adjuster buttons, adjust the forward/back angle of tilt of the projector.Adjust so that the projector is as vertical to the screen as possible.
(Press the AUTO SETUP button to initiate automatic positioning.
BThe tilt of the projector and the input |
| |
signal will be detected and keystone |
| |
distortion and the position of the | AUTO SETUP | |
image will be corrected. | ||
| ||
(Refer to page 26 for details.) |
|
) Adjusting the size
BTurn the zoom ring to adjust the size of the projected image.
* Adjusting the focus
BTurn the focus ring to adjust the focus of the projected image.