Replacing the lamp unit
LAMP indicator |
Warning
The lamp unit should only be replaced by a qualified technician.
When replacing the lamp, allow it to cool for at least one hour before handling it.
BThe lamp cover gets very hot, and contact with it can cause burns.
Notes on replacing the lamp unit
BThe light generating lamp is |
made of glass, so dropping it or |
allowing it to hit hard objects may |
cause it to burst. Be careful when |
handling the lamp. |
Lamp unit replacement period
The lamp is a consumable product. Even when the full life of the bulb has not been exhausted, the brightness of the light will gradually decline. Therefore periodic replacement of the lamp is necessary.
The intended lamp replacement interval is 2 000 hours, but it is possible that the lamp may need to be replaced earlier due to variables such as a particular lamp’s characteristics, usage conditions and the installation environment. Early preparation for lamp replacement is encouraged.
| Displayed for 30 |
| |
More than 1 800 hours | seconds. Pressing any |
| |
button will clear the | Illuminates red during | ||
| display. | image projection and | |
|
| standby mode. | |
More than 2 000 hours | Remains displayed until | ||
| |||
any button is pressed. |
| ||
|
|
|
Lamp unit replacement procedure
NOTE:
BIf the lamp usage time has passed 2 000 hours (when “LAMP POWER” has been set to “HIGH”), the projector will switch to standby mode after approximately 10 minutes of operation. The steps ) to - on the next page should thus be completed within 10 minutes.
BDispose of the removed old lamp |
with the same care that would be |
taken with a fluorescent light. |
BA Phillips screwdriver is |
necessary for removing the lamp |
unit. |
NOTE:
BThe projector is not supplied with a replacement lamp unit. Please ask your dealer for details. Lamp unit product no.:
CAUTION:
BDo not use any lamp unit other than the one with the product number indicated above.
The lamp will automatically shut off after approximately 10 minutes when 2 000 hours of use have been reached because of a much greater chance of it exploding after this time.
NOTE:
BThe usage hours explained above are for use when the “HIGH” setting has been selected for “LAMP POWER” in the “OPTION2” menu. If the “LOW” setting is selected, the brightness of the lamp will be less and life of the lamp can be extended.
BWhile 2 000 hours is the intended replacement interval, it is not a period of time covered by warranty.
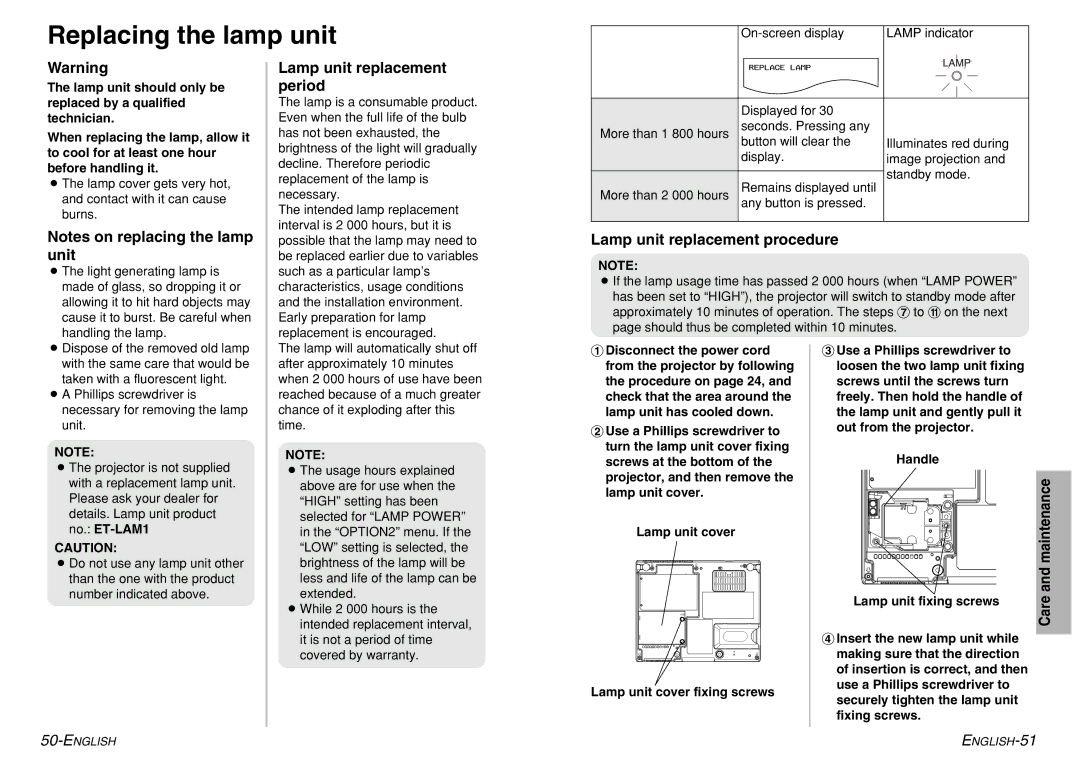
#Disconnect the power cord from the projector by following the procedure on page 24, and check that the area around the lamp unit has cooled down.
$Use a Phillips screwdriver to turn the lamp unit cover fixing screws at the bottom of the projector, and then remove the lamp unit cover.
Lamp unit cover
Lamp unit cover fixing screws
%Use a Phillips screwdriver to loosen the two lamp unit fixing screws until the screws turn freely. Then hold the handle of the lamp unit and gently pull it out from the projector.
Handle
Lamp unit fixing screws
&Insert the new lamp unit while making sure that the direction of insertion is correct, and then use a Phillips screwdriver to securely tighten the lamp unit fixing screws.
Care and maintenance