For assistance, please call Immediately View PTV843-9788
Three Important Reasons to Register Your Product
For assistance, please call
Follow all instructions carefully
Keep these instructions for future reference
Trademarks
Getting Started
Models Number
For assistance, please call 1-888-VIEW PTV843-9788
FCC Caution
Declaration of Conformity
Table of Contents
Before Using
Observe the following precautions
Remote Control Battery Installation
Emergency Alert System EAS Forced Tuning
Reset All Memory Functions
Glossary and Acronyms
Number
Illuminated Remote Control
Location of Controls
VOL -+
Front View Model PT-56DLX75 unit shown
Controls and Terminals on the Projection Display
Vent
Output audio signal
Digital Audio Out Output audio signal
Rear View Model PT-56DLX75 unit shown
Connecting the Antenna / Cable to the RF in Terminal
Installation
Antenna Connection
Cable Connection
From cable CableCARDTM
CableCARDTM Connection
Input 3 is located on the front of the unit. P
How to connect the 1, 2, 3 Input Terminals
Connecting a DVD Player to Component Video
How to connect the Component Video Input Terminals
Component Signals Y, PB, PR that can be Input
How to connect the AV OUT Terminals
Audio Adjustments
How to connect the Amplifier
Analog Audio Out
Amplifier with built in Dolby Digital decoders
Procedure
Firmly connect the cable to the connector
Digital Audio Out
NC Not connected
How to connect the PC in Terminals
Connecting a PC to PC
PC in Terminal D-SUB 15P Pin Layouts
Svga
RGB signals that can be input
XGA
When audio signal input is analog
How to connect the Hdmi input terminal
Connection diagram
When audio signal input is digital
Audio signal PCM
Procedure
Compatible formats
Power OFF
Power on / OFF
Turning the Power on and OFF
Power on
Language
First Time Setup
Auto program
Basic Menu Navigation
Example of a procedure
Button operation during Menu display Menu navigation
Other Adjust sub-menu
Press Menu to display the Main Menu screen
Tuning channels
Switching languages for display
Press to select Setup icon Press to display the Setup menu
Press to select ANT
Automatic program setting
Press to move cursor to Apply Press to enter Caption
Manual program setting
Edit Caption When a preset Caption has been entered
When selecting a desired Caption manually
Press to move cursor to Apply
Edit Add
Preview CH
Edit Favorite
Projection Display operation
Selecting Input Mode
Rapid Tuning
Card input mode Photo Viewer is selected
Channel and Program Tuning
Using the CH/VOL Button
Unit Status display
Audio Mute
Favorite Feature
Use Favorite Feature
Set Favorite Feature
Analog mode
Select Audio Mode for TV Viewing
Sleep Timer Feature
Digital mode
Aspect mode is changed each time When Aspect is pressed
Changing the aspect mode
Aspect Controls
Returning to one screen Left screen
Split screen
Splitting the screen
Changing the channel
Mode
Select desired input mode of the Right screen
Swapping left and right screens
Press to select the desired input
Picture Menu is inaccessible when no signal is present
Picture Adjustments
Press to adjust each item
PC Adjust
Picture Mode
You can adjust the picture when viewing a signal from a PC
Advanced Adjust
Other Adjust
Normal / Bass / Treble / Balance
Audio Adjustments
Audio Mode
CH Press to select Audio Mode
CH Press to select BBE
Press to select BBE setting
Sleep time may be set using the Sleep button. P
Sleep Timer Feature
Set Sleep Timer
Press to select Timer icon Press to display Timer menu
Create Secret Code First Time Setting
Lock Feature
Enter Secret Code
Channel Lock Block channel selection
Rating level setting
Lock Set
Block program
Press to select Program
Monitor out setting
Press to select Monitor out Press to select On or Off
Blocking Messages
Change password
Remove the Card
Photo Viewer
Insert/Remove the Card
Insert the Card
SD button may also be pressed for Photo Viewer mode. P
Jpeg thumbnail
Press SD to exit Photo Viewer
Card Warning Messages
Exit Photo Viewer
Index Area Operation
Single Play Mode
Press to select each item Press to set each item
Slide Show Mode
Exit Slide Show mode
Press during Single Play Mode
CH scan
Setup Features
Signal meter
Press to display signal meter
CC Closed Caption
CC Mode
CC Mode for Analog
Input labels
Settings
CC Mode for Digital
Digital settings
CC Reset
Reset
Other adjust Setup
About
Programming Without a Code
When code is known
When code is not known
Programming the Remote
Component Codes
VCR Infrared Codes Index
After the code is found, press
OK to store the code
Cable Converter BOX DVD, CD Players Infrared Codes Index
Remote Control Quick Reference Guide
Codes For CD Player
AMPLIFIERS, and DBS Infrared Codes Index
Operating a VCR
Operating Components with Remote Control
Operating a Cable BOX
Operating a DBS
Operating a Cassette Deck
Program the Remote Control to use with DVD
Program the Remote Control to operate audio receiver
Operating a DVD
Operating a PVR Personal Video Recorder
Program the Remote Control to use with a PVR
Temp
Lamp unit replacement period
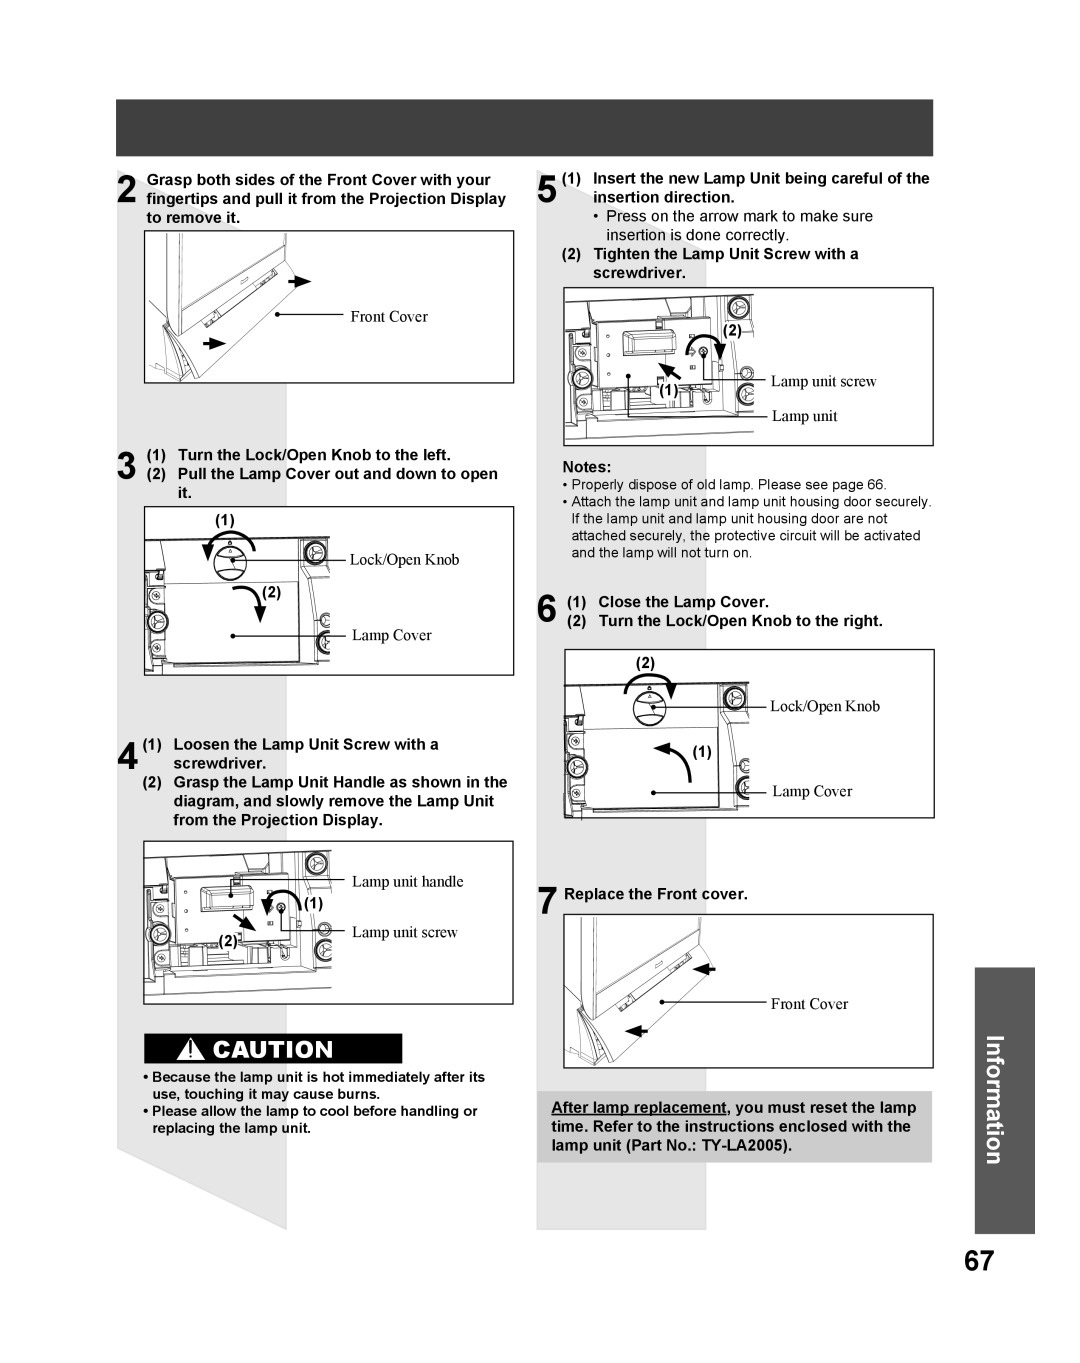
Lamp replacement procedure
Replacing the lamp unit
Replace the Front cover
Tighten the Lamp Unit Screw with a screwdriver
Close the Lamp Cover
Turn the Lock/Open Knob to the right
OFF
Troubleshooting
PT-56DLX75 PT-61DLX75
Specifications
Customer Services Directory
Cleaning
Limited Warranty Limits And Exclusions
Limited Warranty
Limited Warranty Coverage
Carry-in or In-Home Service
Preamble
Other Information
Above provided that you also do one of the following
END of Terms and Conditions
How to Apply These Terms to Your New Programs
Version 2.1, February
Other Information
Information
USA
How to Apply These Terms to Your New Libraries
Hdmi
Index
PCM
Customer’ Record