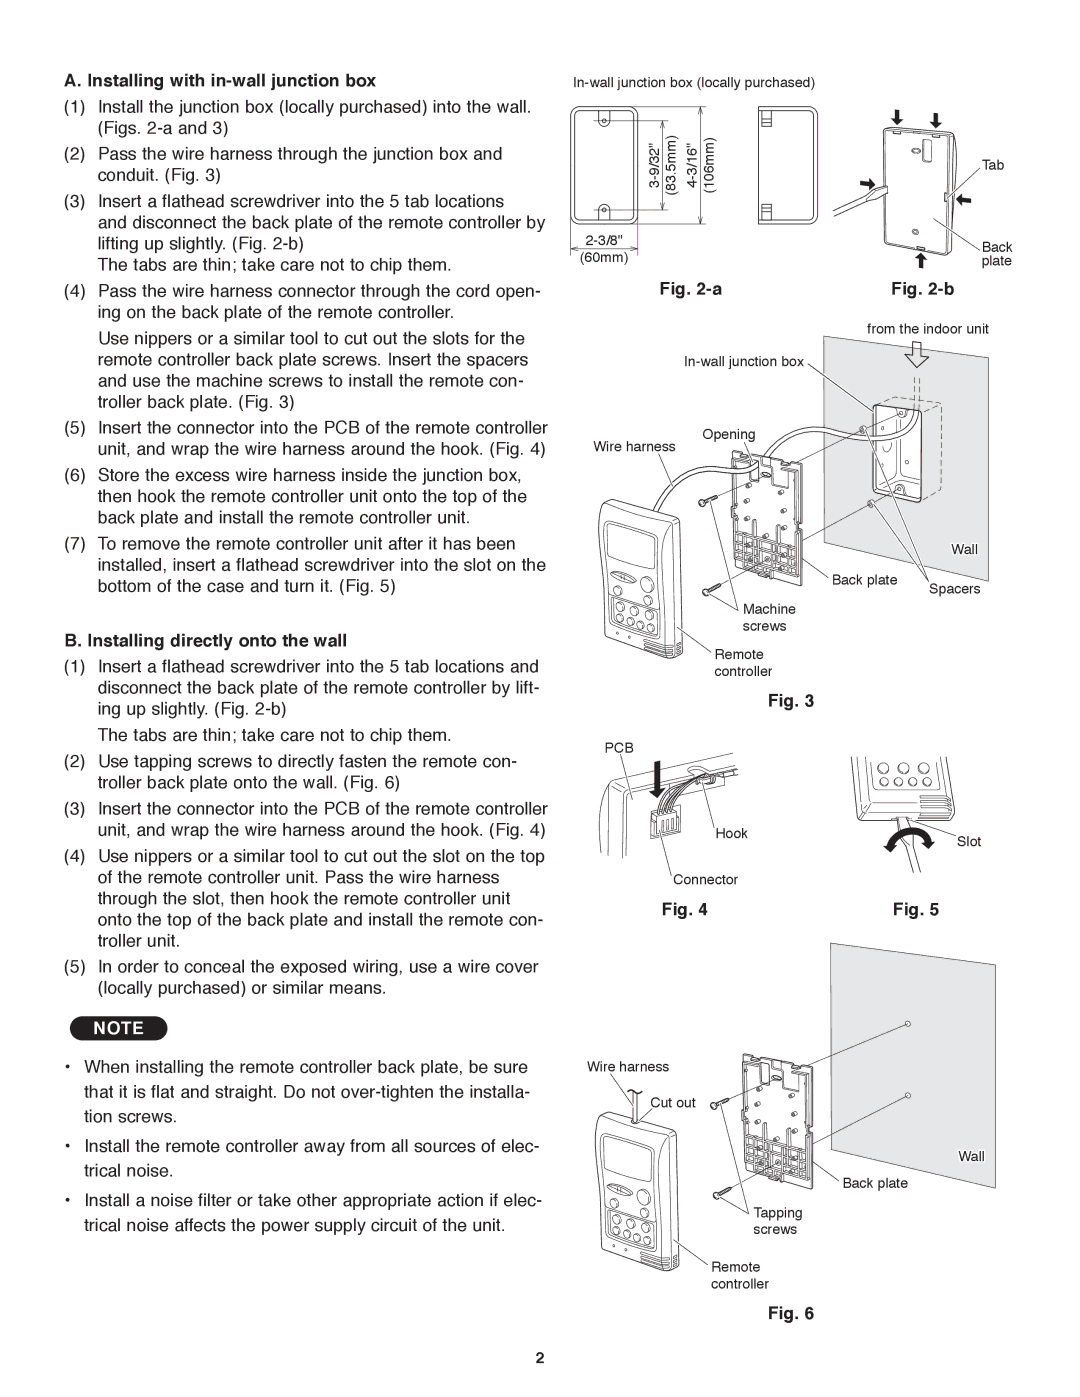
A. Installing with in-wall junction box

(1)

Install the junction box (locally purchased) into the wall.


(Figs. 2-a and 3)

(2)

Pass the wire harness through the junction box and


conduit. (Fig. 3)

(3)

Insert a flathead screwdriver into the 5 tab locations


and disconnect the back plate of the remote controller by


lifting up slightly. (Fig. 2-b)


The tabs are thin; take care not to chip them.

(4)

Pass the wire harness connector through the cord open-


ing on the back plate of the remote controller.


Use nippers or a similar tool to cut out the slots for the

In-wall junction box (locally purchased)

9/32"-3 (83.5mm)

3/16"-4 (106mm)

Tab


2-3/8"

Back

(60mm)

plate

Fig. 2-a

Fig. 2-b

from the indoor unit


remote controller back plate screws. Insert the spacers


and use the machine screws to install the remote con-


troller back plate. (Fig. 3)

(5)

Insert the connector into the PCB of the remote controller


unit, and wrap the wire harness around the hook. (Fig. 4)

(6)

Store the excess wire harness inside the junction box,


then hook the remote controller unit onto the top of the


back plate and install the remote controller unit.

(7)

To remove the remote controller unit after it has been


installed, insert a flathead screwdriver into the slot on the


bottom of the case and turn it. (Fig. 5)

B. Installing directly onto the wall

(1)

Insert a flathead screwdriver into the 5 tab locations and


disconnect the back plate of the remote controller by lift-


ing up slightly. (Fig. 2-b)


The tabs are thin; take care not to chip them.

(2)

Use tapping screws to directly fasten the remote con-


troller back plate onto the wall. (Fig. 6)

(3)

Insert the connector into the PCB of the remote controller

In-wall junction box

Opening

Wire harness

Back plate

Machine screws

Remote controller

Fig. 3

PCB

Wall

Spacers


unit, and wrap the wire harness around the hook. (Fig. 4)

(4)

Use nippers or a similar tool to cut out the slot on the top


of the remote controller unit. Pass the wire harness


through the slot, then hook the remote controller unit


onto the top of the back plate and install the remote con-


troller unit.

(5)

In order to conceal the exposed wiring, use a wire cover


(locally purchased) or similar means.

Hook

Slot


Connector


Fig. 4

Fig. 5

NOTE

‡When installing the remote controller back plate, be sure that it is flat and straight. Do not over-tighten the installa- tion screws.

‡Install the remote controller away from all sources of elec- trical noise.

‡Install a noise filter or take other appropriate action if elec- trical noise affects the power supply circuit of the unit.

Wire harness

Cut out

Wall

Back plate

Tapping screws

Remote controller

Fig. 6

2

Page 108
Image 108
Panasonic R410A service manual Installing with in-wall junction box, Installing directly onto the wall

R410A specifications

Panasonic R410A is a refrigerant that has gained significant popularity in the air conditioning and refrigeration industry due to its favorable environmental properties and performance characteristics. Specifically designed to replace the harmful R22 refrigerant, which is being phased out due to its ozone-depleting potential, R410A offers a more eco-friendly alternative without compromising on efficiency or power.

One of the main features of R410A is its high energy efficiency. It operates at a higher pressure than R22, resulting in better heat transfer capabilities. This increased efficiency translates to lower energy consumption, making units using R410A more cost-effective in the long run. Additionally, R410A is known for its ability to provide excellent cooling performance even in high-temperature environments, making it suitable for a variety of applications, from residential air conditioning systems to commercial refrigeration units.

In terms of composition, R410A is a blend of two hydrofluorocarbons (HFCs), namely R32 and R125. This combination not only minimizes ozone depletion potential (ODP) but also reduces global warming potential (GWP) compared to older refrigerants. Panasonic has emphasized the importance of innovative technologies in its products, and R410A aligns perfectly with the company's commitment to developing sustainable solutions.

Panasonic also integrates advanced technologies to optimize the performance of R410A systems. For example, variable speed compressors, known as inverter technology, enhance system efficiency by adjusting the compressor's speed according to the cooling demand. This ensures that energy is only consumed when needed, further reducing operational costs.

Furthermore, R410A has a wide range of applications, including air conditioning systems, heat pumps, and chillers. Its versatility makes it a popular choice among manufacturers and consumers alike. The refrigerant is also compatible with existing R22 equipment, although specific retrofit procedures must be followed to ensure peak performance and reliability.

In conclusion, Panasonic R410A stands out as an innovative refrigerant choice in the HVAC industry, offering a combination of energy efficiency, environmentally friendly properties, and advanced technologies. As regulatory frameworks continue to tighten on greenhouse gas emissions, R410A and similar refrigerants are expected to play a crucial role in shaping a more sustainable future for air conditioning and refrigeration. Its high performance and lower environmental impact solidify its position as a leading refrigerant in contemporary cooling solutions.