| 26 | 28 |
|
| 14 |
|
| 78 |
| 51 | 51 |
|
| |
3/8 X | 38 | 35 3/8 X 1” |
FIGURE 24 |
|
|
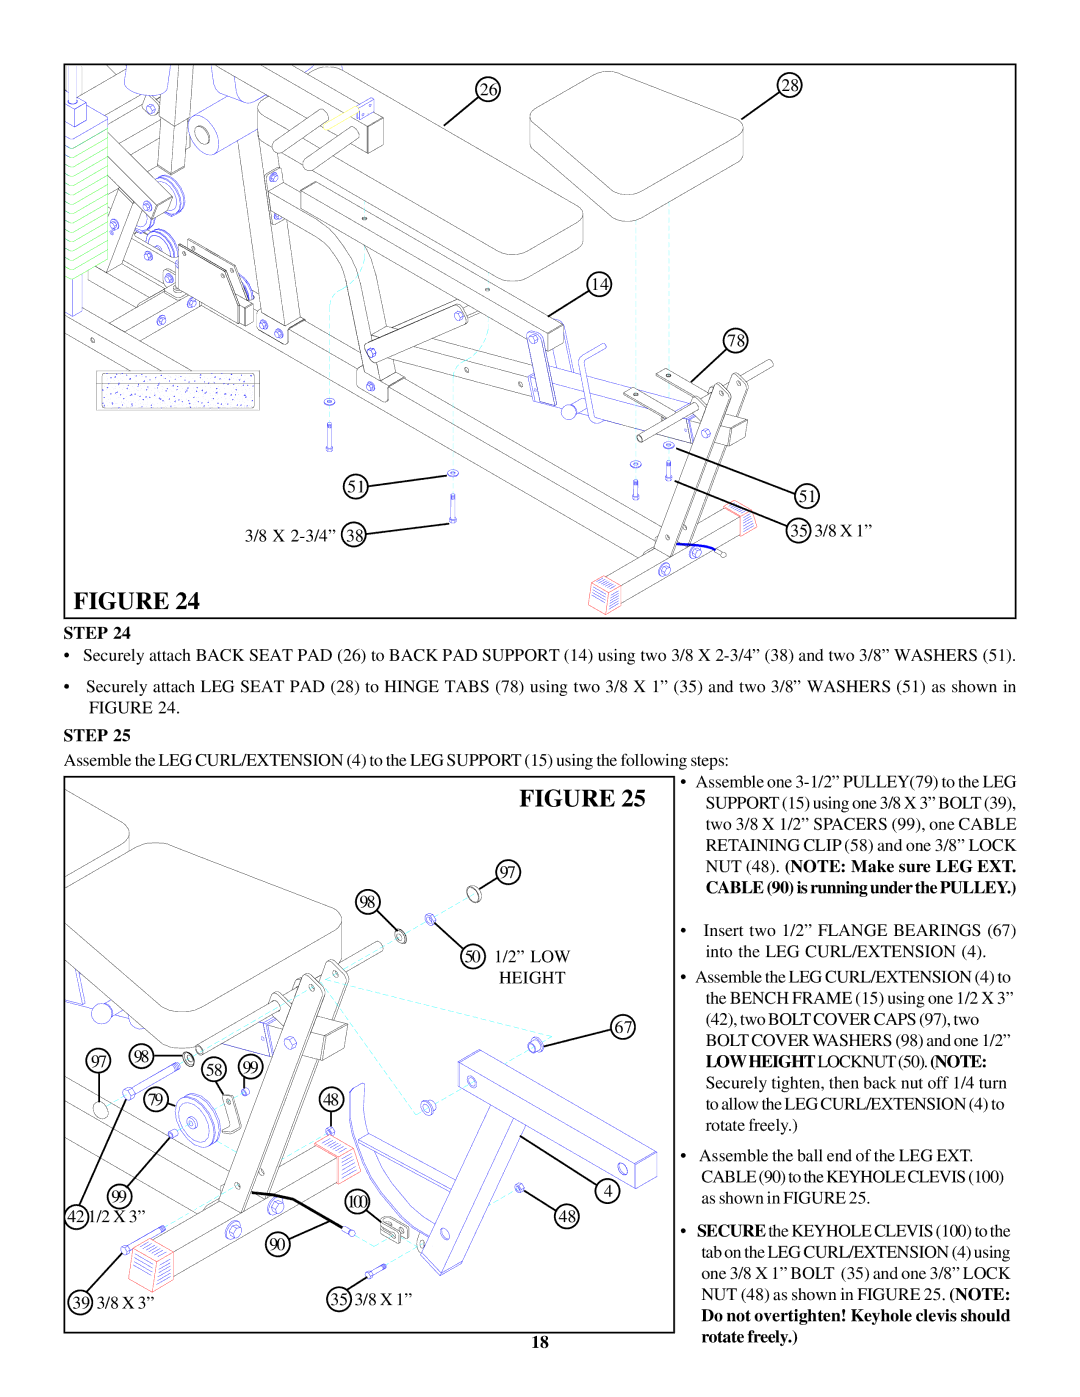
STEP 24
•Securely attach BACK SEAT PAD (26) to BACK PAD SUPPORT (14) using two 3/8 X
•Securely attach LEG SEAT PAD (28) to HINGE TABS (78) using two 3/8 X 1” (35) and two 3/8” WASHERS (51) as shown in FIGURE 24.
STEP 25
Assemble the LEG CURL/EXTENSION (4) to the LEG SUPPORT (15) using the following steps:
|
|
|
| FIGURE 25 | • Assemble one |
|
|
|
| SUPPORT (15) using one 3/8 X 3” BOLT (39), | |
|
|
|
|
| two 3/8 X 1/2” SPACERS (99), one CABLE |
|
|
|
|
| RETAINING CLIP (58) and one 3/8” LOCK |
|
|
|
| 97 | NUT (48). (NOTE: Make sure LEG EXT. |
|
|
| 98 |
| CABLE (90) is running under the PULLEY.) |
|
|
|
|
| |
|
|
|
|
| • Insert two 1/2” FLANGE BEARINGS (67) |
|
|
| 50 | 1/2” LOW | into the LEG CURL/EXTENSION (4). |
|
|
|
| HEIGHT | • Assemble the LEG CURL/EXTENSION (4) to |
|
|
|
|
| the BENCH FRAME (15) using one 1/2 X 3” |
|
|
|
| 67 | (42), two BOLT COVER CAPS (97), two |
|
|
|
| BOLT COVER WASHERS (98) and one 1/2” | |
| 98 |
|
|
| |
97 | 58 | 99 |
| LOWHEIGHTLOCKNUT(50).(NOTE: | |
|
|
| Securely tighten, then back nut off 1/4 turn | ||
| 79 |
| 48 |
| |
|
|
| to allow the LEG CURL/EXTENSION (4) to | ||
|
|
|
|
| rotate freely.) |
|
|
|
|
| • Assemble the ball end of the LEG EXT. |
| 99 |
|
| 4 | CABLE (90) to the KEYHOLE CLEVIS (100) |
|
| 100 | as shown in FIGURE 25. | ||
42 1/2 X 3” |
|
| 48 | • SECURE the KEYHOLE CLEVIS (100) to the | |
|
|
| 90 |
| |
|
|
|
| tab on the LEG CURL/EXTENSION (4) using | |
|
|
|
|
| |
|
|
|
|
| one 3/8 X 1” BOLT (35) and one 3/8” LOCK |
39 3/8 X 3” |
| 35 3/8 X 1” |
| NUT (48) as shown in FIGURE 25. (NOTE: | |
|
|
|
|
| Do not overtighten! Keyhole clevis should |
|
|
|
| 18 | rotate freely.) |
