18
CREATING AN ACCESS CODE FOR AUTOLOCK™
Over the next few panels you’ll learn how to block channels and get a better
understanding of the rating terms for cer- tain programming.
First, let’s start by learning how to set a personal access code:
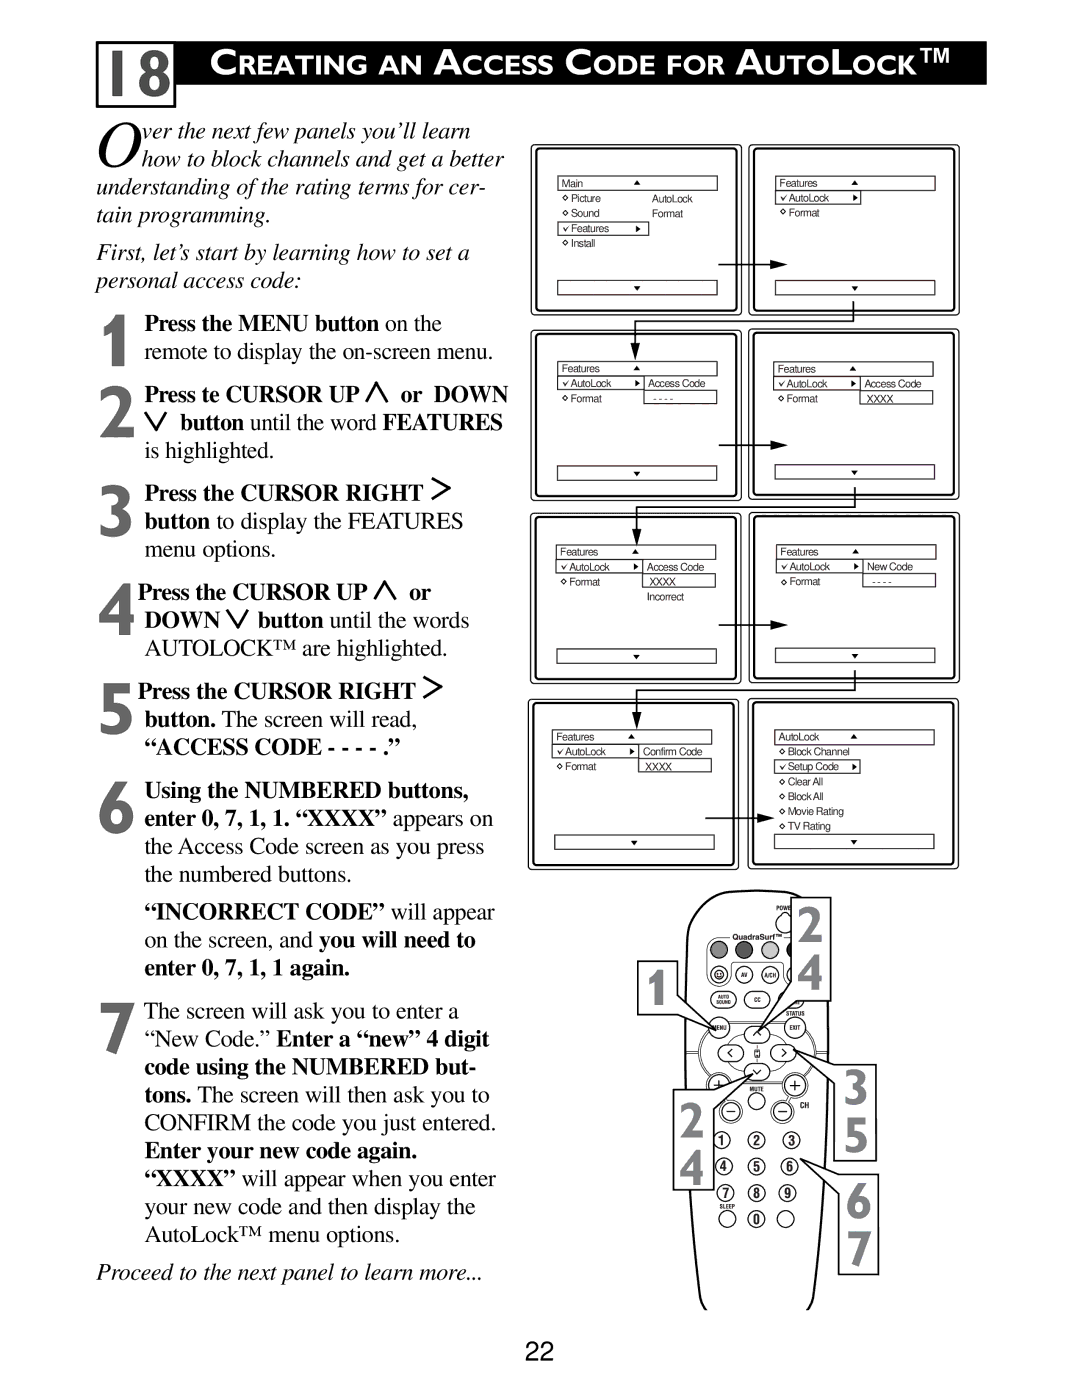
1Press the MENU button on the remote to display the
2Press te CURSOR UP ![]() or DOWN button until the word FEATURES
or DOWN button until the word FEATURES
is highlighted.
3Press the CURSOR RIGHT ![]() button to display the FEATURES menu options.
button to display the FEATURES menu options.
4Press the CURSOR UP ![]() or DOWN
or DOWN ![]() button until the words AUTOLOCK™ are highlighted.
button until the words AUTOLOCK™ are highlighted.
5Press the CURSOR RIGHT ![]() button. The screen will read,
button. The screen will read,
“ACCESS CODE - - -
6Using the NUMBERED buttons, enter 0, 7, 1, 1. “XXXX” appears on the Access Code screen as you press the numbered buttons.
Main |
|
| Features |
| ||
Picture | AutoLock |
| AutoLock | Timer | ||
Sound | Format |
| Format | Start Time | ||
Features |
|
|
|
| Stop Time | |
Install |
|
|
|
| Channel | |
|
|
|
|
|
| Activate |
|
|
|
|
|
| Display |
|
|
|
|
|
|
|
|
|
|
|
|
|
|
|
|
|
|
|
|
|
|
|
|
|
|
|
|
Features |
|
| Features |
|
| |
AutoLock | Access Code |
| AutoLock |
| Access Code | |
Format | - - - - |
| Format |
| XXXX | |
|
|
|
|
|
|
|
|
|
|
|
|
|
|
|
|
|
|
|
|
|
|
|
|
|
|
|
|
|
|
|
|
|
|
|
|
|
|
|
|
|
|
Features |
|
|
|
| Features |
|
|
AutoLock |
| Access Code |
|
| AutoLock |
| New Code |
Format |
| XXXX |
|
| Format |
| - - - - |
|
| Incorrect |
|
|
|
|
|
|
|
|
|
|
|
|
|
|
|
|
|
|
|
|
|
|
|
|
|
|
|
|
|
|
|
|
|
|
|
|
|
|
|
|
|
|
|
|
|
|
|
|
|
|
|
|
|
Features |
| AutoLock |
|
AutoLock | Confirm Code | Block Channel |
|
Format | XXXX | Setup Code | OffStop Time |
|
| Clear All | Channel |
|
| Block All | Activate |
|
| Movie Rating | Display |
|
| TV Rating |
|
“INCORRECT CODE” will appear on the screen, and you will need to enter 0, 7, 1, 1 again.
7The screen will ask you to enter a “New Code.” Enter a “new” 4 digit code using the NUMBERED but- tons. The screen will then ask you to CONFIRM the code you just entered.
Enter your new code again. “XXXX” will appear when you enter your new code and then display the AutoLock™ menu options.
Proceed to the next panel to learn more...
![]()
![]()
![]()
![]()
![]()
![]()
![]() 2
2
1 ![]()
![]()
![]()
![]()
![]()
![]()
![]()
![]()
![]()
![]() 4
4
3
2![]()
![]()
![]()
![]()
![]()
![]() 5
5
4 ![]()
6
7
22
