Connection
From the list below, please choose the connection method that fits your TV viewing environment best.
≥If you connect to a television using an included Audio/Video cable > A ≥If you connect to an HDMI (> 32) compatible television > B
≥If you connect to an HDMI compatible television and an HDMI compatible amplifier/receiver to enjoy surround sound > C(> 7) ≥For other connection methods, please see pages 7 and 8.
≥Do not place the unit on amplifiers or equipment that may become hot. The heat can damage the unit.
≥Do not connect through the video cassette recorder. Due to copy guard protection, the picture may not display properly. ≥Turn off all equipment before connection and read the appropriate operating instructions.
Conserving power
This unit consumes a small amount of power even when it is turned off (less than 1 W). To save power when the unit is not to be used for a long time, unplug it from the household mains socket.
≥Please use High Speed HDMI Cables that have the HDMI logo (as shown on the cover). It is recommended that you use Panasonic’s HDMI cable.
Recommended part number:
\For\the\United\Kingdom\and\Republic\of\Ireland\only\
BE SURE TO READ THE CAUTION FOR THE AC MAINS LEAD ON PAGE 2 BEFORE CONNECTION.
![]()
![]() Basic connections
Basic connections
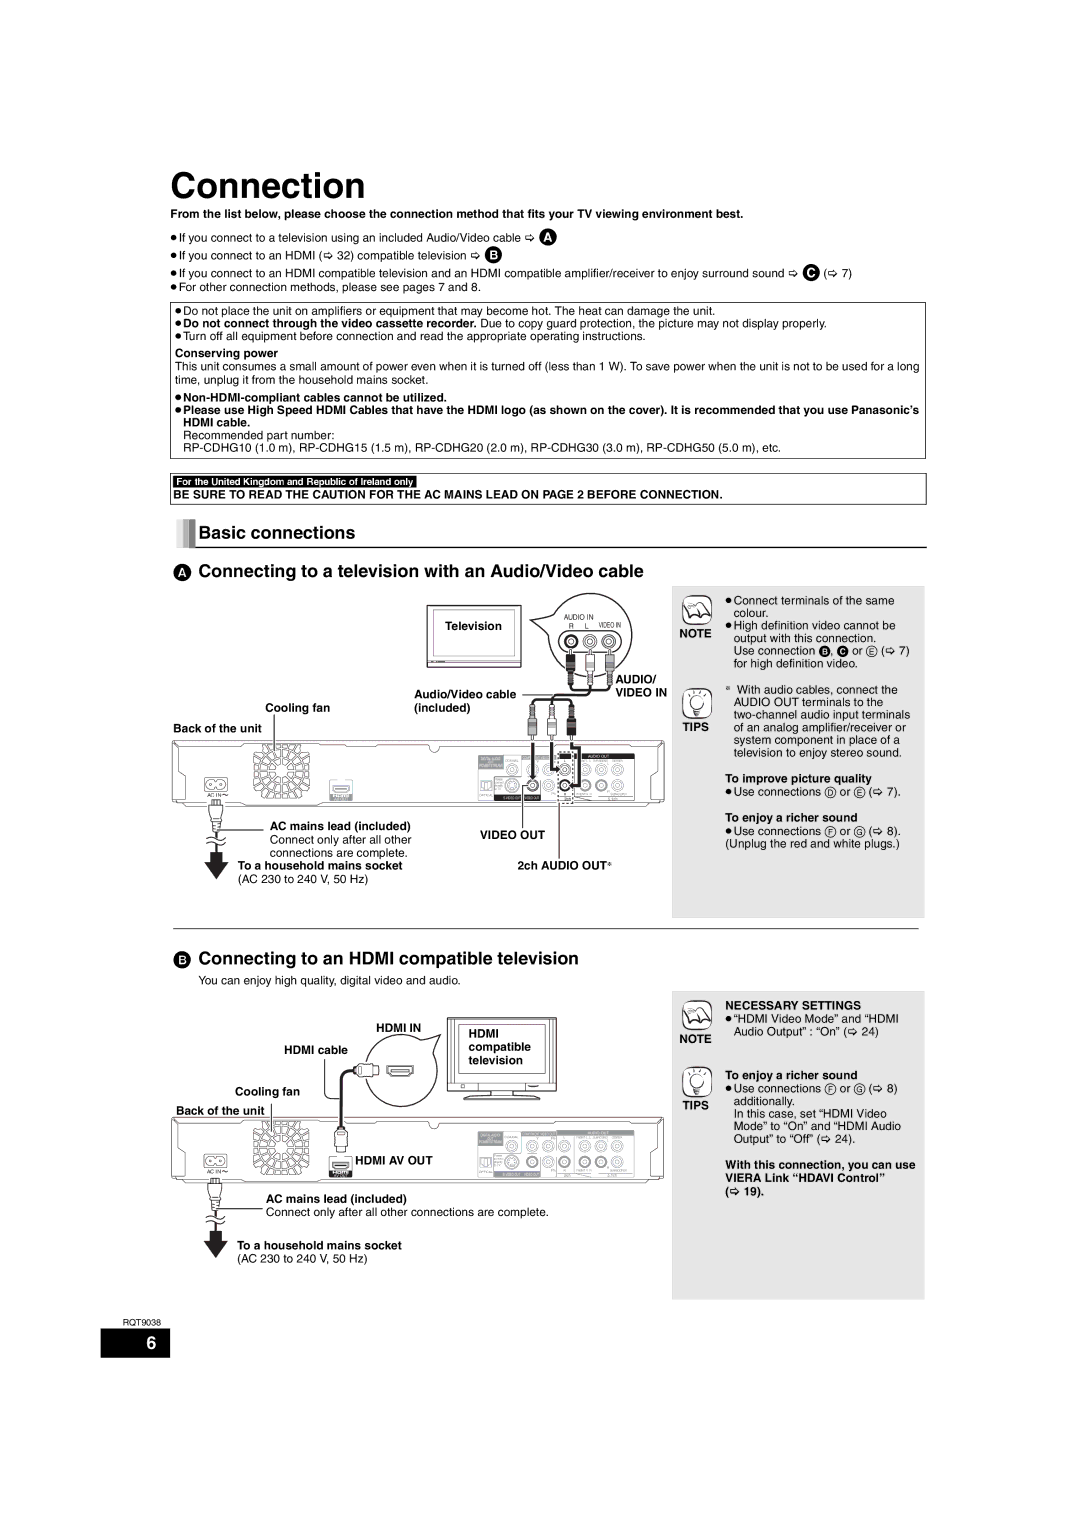
AConnecting to a television with an Audio/Video cable
| Television | AUDIO IN |
| R L VIDEO IN | |
|
| NOTE |
|
| AUDIO/ |
| Audio/Video cable | VIDEO IN |
Cooling fan | (included) |
|
Back of the unit |
| TIPS |
| DIGITAL AUDIO |
| NT VIDEO |
|
| AUDIO OUT |
|
| OUT | COAXIAL | Y | B | L | NT L /L SURROUND | CENTER |
|
|
| L |
| |||
| (PCM/BITSTREAM) |
|
|
|
|
|
|
| Please |
|
|
|
|
|
|
| connect |
|
|
|
|
| |
| directly |
|
|
|
|
|
|
| to TV. |
|
|
|
| R |
|
AC IN | OPTICAL |
|
| PR | R | FRONT R /R | SUBWOOFER |
AV OUT |
| S VIDEO OUT | VIDEO OUT |
| 2ch | 5.1ch | |
AC mains lead (included)
Connect only after all otherVIDEO OUT connections are complete.
To a household mains socket | 2ch AUDIO OUT§ |
(AC 230 to 240 V, 50 Hz) |
|
≥Connect terminals of the same colour.
≥High definition video cannot be output with this connection.
Use connection B, C or E (> 7) for high definition video.
§With audio cables, connect the AUDIO OUT terminals to the
To improve picture quality
≥Use connections D or E (> 7).
To enjoy a richer sound
≥Use connections F or G (> 8). (Unplug the red and white plugs.)
BConnecting to an HDMI compatible television
You can enjoy high quality, digital video and audio.
NECESSARY SETTINGS
HDMI IN
HDMI cable
Cooling fan
Back of the unit ![]()
 HDMI AV OUT
AC IN![]()
AV OUT
HDMI compatible television
DIGITAL AUDIO |
| COMPONENT VIDEO OUT |
| AUDIO OUT |
| |
OUT | COAXIAL | Y | PB | L | FRONT L /L SURROUND | CENTER |
|
| L |
| |||
(PCM/BITSTREAM) |
|
|
|
|
|
|
Please |
|
|
|
|
|
|
connect |
|
|
|
|
| |
directly |
|
|
|
|
|
|
to TV. |
|
|
|
| R |
|
|
|
| PR | R | SUBWOOFER | |
OPTICAL | S VIDEO OUT | VIDEO OUT | FRONT R /R | |||
|
| 2ch | 5.1ch | |||
NOTE
TIPS
≥“HDMI Video Mode” and “HDMI Audio Output” : “On” (> 24)
To enjoy a richer sound
≥Use connections F or G (> 8) additionally.
In this case, set “HDMI Video Mode” to “On” and “HDMI Audio Output” to “Off” (> 24).
With this connection, you can use VIERA Link “HDAVI Control”
AC mains lead (included)
![]() Connect only after all other connections are complete.
Connect only after all other connections are complete.
To a household mains socket (AC 230 to 240 V, 50 Hz)
RQT9038
(> 19).
6