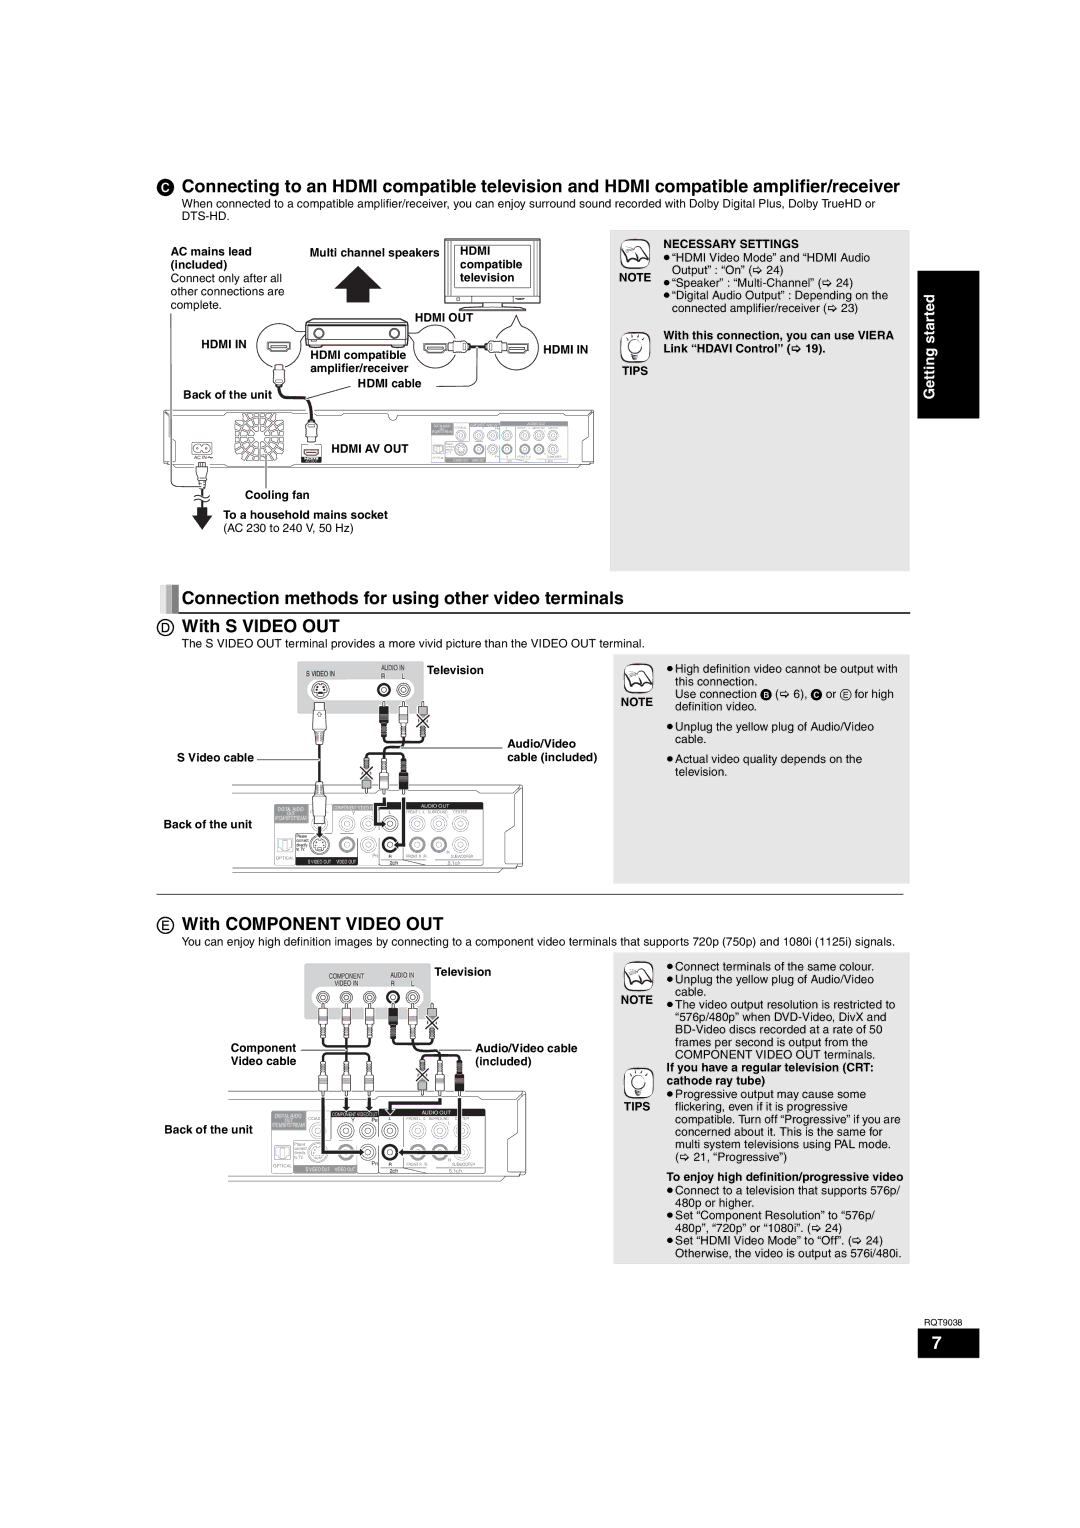
CConnecting to an HDMI compatible television and HDMI compatible amplifier/receiver
When connected to a compatible amplifier/receiver, you can enjoy surround sound recorded with Dolby Digital Plus, Dolby TrueHD or
AC mains lead | Multi channel speakers HDMI |
(included) | compatible |
Connect only after all | television |
other connections are |
|
complete. | HDMI OUT |
|
HDMI IN
HDMI compatible amplifier/receiver
HDMI cable
Back of the unit
NECESSARY SETTINGS
≥“HDMI Video Mode” and “HDMI Audio
Output” : “On” (> 24)
NOTE ≥“Speaker” :
≥“Digital Audio Output” : Depending on the connected amplifier/receiver (> 23)
| With this connection, you can use VIERA |
HDMI IN | Link “HDAVI Control” (> 19). |
| TIPS |
Getting started
| DIGITAL AUDIO |
| COMPONENT VIDEO OUT |
| AUDIO OUT |
| |
| OUT | COAXIAL | Y | PB | L | FRONT L /L SURROUND | CENTER |
|
|
| L |
| |||
| (PCM/BITSTREAM) |
|
|
|
|
|
|
HDMI AV OUT | Please |
|
|
|
| R |
|
to TV. |
|
|
|
|
| ||
| connect |
|
|
|
|
| |
| directly |
|
|
|
|
|
|
AC IN | OPTICAL | S VIDEO OUT | VIDEO OUT | PR | R | FRONT R /R | SUBWOOFER |
AV OUT |
|
| 2ch | 5.1ch | |||
Cooling fan
To a household mains socket (AC 230 to 240 V, 50 Hz)
![]()
![]() Connection methods for using other video terminals
Connection methods for using other video terminals
DWith S VIDEO OUT
The S VIDEO OUT terminal provides a more vivid picture than the VIDEO OUT terminal.
S VIDEO IN | AUDIO IN | Television |
| ≥High definition video cannot be output with | |
| R | L |
|
| this connection. |
|
|
|
|
| |
|
|
|
| NOTE | Use connection B (> 6), C or E for high |
|
|
|
| definition video. | |
|
|
|
|
| |
|
|
|
|
| ≥Unplug the yellow plug of Audio/Video |
|
|
| Audio/Video |
| cable. |
|
|
|
|
| |
S Video cable |
|
| cable (included) |
| ≥Actual video quality depends on the |
|
|
|
|
| television. |
DIGITAL AUDIO | COAXIAL | COMPONENT VIDEO |
OUT | Y | |
(PCM/BITSTREAM) |
|
|
Back of the unit |
|
|
Please |
|
|
connect |
| |
directly |
|
|
to TV. |
|
|
OPTICAL |
| PR |
| S VIDEO OUT | VIDEO OUT |
AUDIO OUT
L | FRONT L /L SURROUND | CENTER |
| L |
|
| R |
|
R | FRONT R /R | SUBWOOFER |
2ch5.1ch
EWith COMPONENT VIDEO OUT
You can enjoy high definition images by connecting to a component video terminals that supports 720p (750p) and 1080i (1125i) signals.
|
| COMPONENT | |
|
|
| VIDEO IN |
Component |
|
| |
Video cable |
|
| |
| DIGITAL AUDIO | COAXIAL | COMPONENT VIDEO OUT |
| OUT | Y PB | |
Back of the unit | (PCM/BITSTREAM) |
|
|
|
|
| |
| Please |
|
|
| connect |
| |
| directly |
|
|
| to TV. |
|
|
| OPTICAL |
| PR |
| S VIDEO OUT | VIDEO OUT | |
|
| ||
AUDIO IN | Television |
R L |
|
NOTE
![]() Audio/Video cable (included)
Audio/Video cable (included)
TIPS
AUDIO OUT
L | FRONT L /L SURROUND | TER |
| L |
|
| R |
|
R | FRONT R /R | SUBWOOFER |
2ch5.1ch
≥Connect terminals of the same colour. ≥Unplug the yellow plug of Audio/Video
cable.
≥The video output resolution is restricted to “576p/480p” when
If you have a regular television (CRT: cathode ray tube)
≥Progressive output may cause some flickering, even if it is progressive compatible. Turn off “Progressive” if you are concerned about it. This is the same for
multi system televisions using PAL mode. (> 21, “Progressive”)
To enjoy high definition/progressive video
≥Connect to a television that supports 576p/
480p or higher.
≥Set “Component Resolution” to “576p/ 480p”, “720p” or “1080i”. (> 24)
≥Set “HDMI Video Mode” to “Off”. (> 24) Otherwise, the video is output as 576i/480i.
RQT9038
7