Card within I 0 days. See
Verification
For Customer Use
High Quality
Special Information for Canadian Users
Radio/TV Interference
Declaration of Conformity
Tableof Contents
Disc Menus
Introduction5
Welcome
Color Systems
PlayableDiscs
Region Codes
Unacceptable Discs
Recording Prevention
PlayableVideoCassetteTapes7
Playable Video Cassette Tapes
To allow recording, cover the hole with cellophane tape
Basic antenna/cable to DVD/VCR toTV is shown below
HookupsWithouta CableBox/DirectBroadcastSystem
Disconnect the antenna or cable from yourTV
300ohm
HookupsWithouta CableBox/DirectBroadcastSystemcontd9
Plug in theTV and the DVD/VCR
Recording/Viewing Any Channel
I0 HookupsWitha CableBox/DirectBroadcastSystem
Connections
Recording One ChannellWatching Another
HookupsWitha CableBox/DirectBroadcastSystemcontdII
Connections
Press the VCR/TV button once to put the DVD/VCR in TV
DVD/VCR,no Disc will appear on the displaypanel
Connecting the DVD/VCR to a Stereo TV
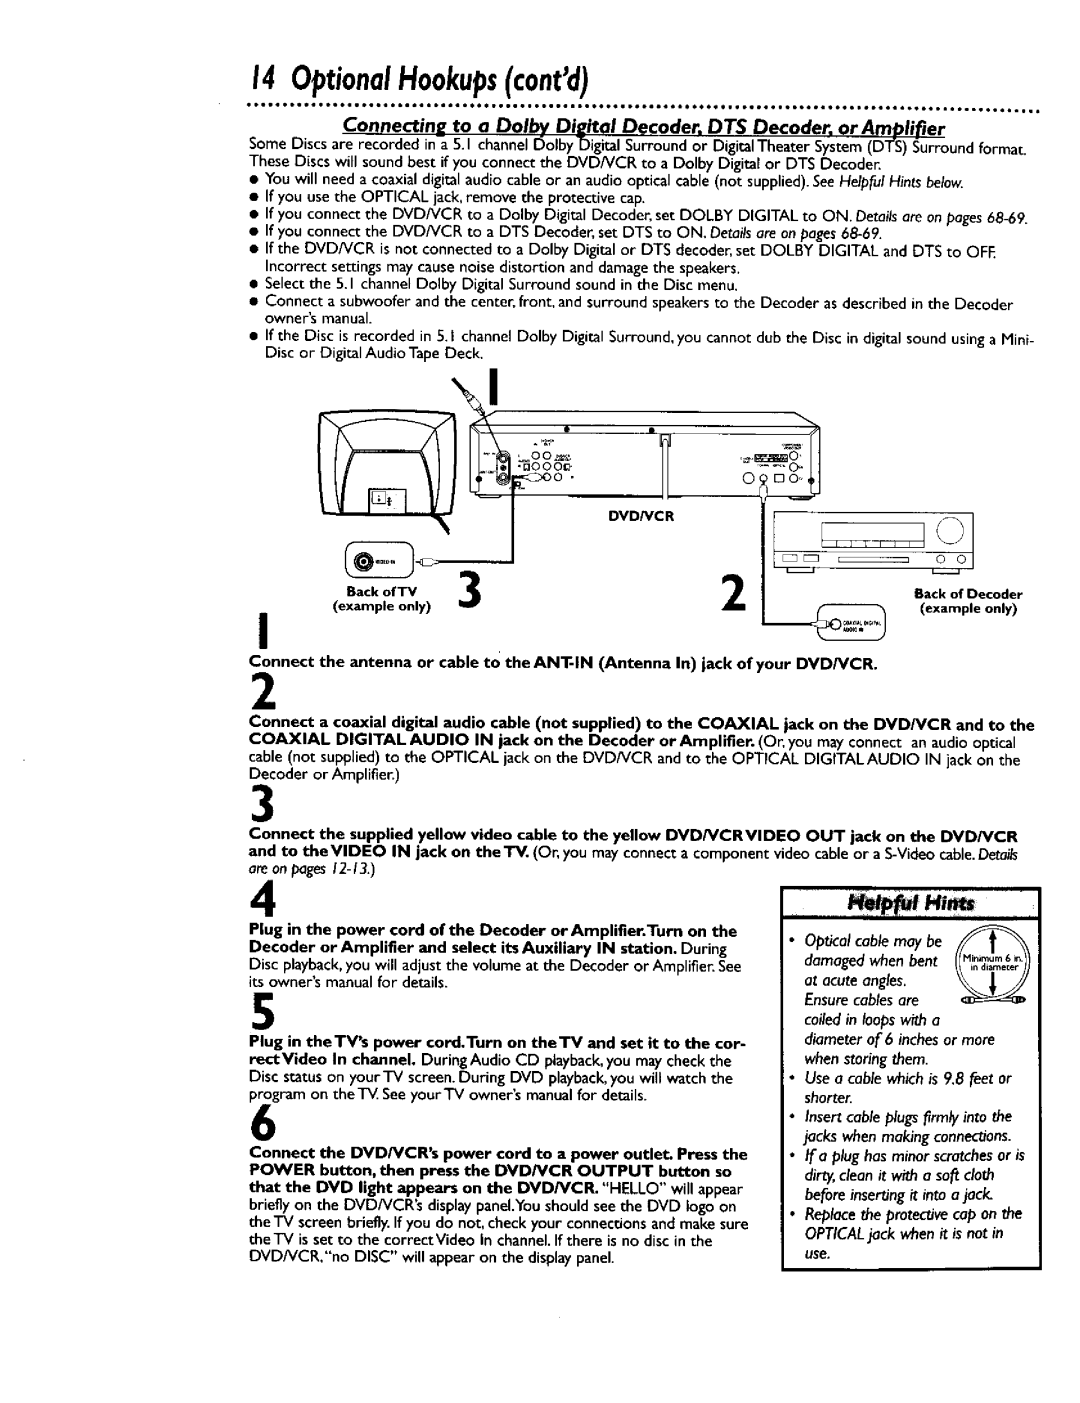
OptionalHookups
Example only
OptionalHookupscontd13
Back of Stereo
BackofTV
OptionalHookupscontd
RemoteControlSetup15
Recycling Guidelines/Battery Safety
Helpful Hints
Press the VCR button, then press the Power button
TurningonYourDVD/VCR
Wait for a few minutes while the DVD/VCR sets up
Press theVCR button, then press the Menu button
Press the Play button or the Stop button to select Auto
Helpful Hn
Press the DISPLAYISTATUS/EXIT button
Adding/Deleting Channels
Press the Play button or the Stop button to select
Press the VCR button, then press the Menu button
Press the DISPLAY/STATUS/EXIT button once or twice
AutomaticChannelSetupcontd19
Reviewing Memorized Channels
To exit
SettingtheClock
Press two Number buttons for the month, two Number
Press the DISPLAY/STATUSIEXIT button
Daylight.SavingsTime21
That OFF or on appears beside Daylight SVG Time
LanguageSelectionVCR
Helpful Hint
On-ScreenStatusDisplaysVCR23
Press the Menu button
Is on
24 DVD/VCRDisplay- DVDFeatures
Disc loading tray Power Light
VCR Light Green
DVD/VCRDisplayVCRFeatures25
CST. in Cassette- Inside Light This light appearswhen a
Is inVCR mode.You can only watch
STOP/EJECT Button
FrontPanel
Play Button
Video OUT Jack
RearPanel27
Coaxial Jack
ANT-OUT Antenna Out Jack
Title Button
REWind Button DVD mode
RemoteControlButtons
RemoteControlButtonscantd29
Subtitle Button
Slow Button
Pause Button DVD mode
RemoteControlButtonscantd
RemoteControlButtonscontd31
Audio Button
PlayingVideoCassetteTape
Insert a tape in the cassette compartment
To stop recording, press the Stop button
RecordingonaVideoCassetteTape33
Insert a tape with its record tab intact into the cassette
RecordingOneChannel/WatchingAnother
Press the Stop button to stop the recording
One-TouchRecording35
TimerRecording
Daily Recording
Use the Number buttons I-8 to select a slot in which to
Follow the instructions in to enter the recordings
Press
TimerRecordingcontd
Number 2 button to record in SLP speed. See the chart
Button to record in SP speed or
TimerRecordingcontd39
Ee pae 78 for more hints
Press the Speed button to select SP or SLP at DVD/VCR
RerecordingTapeDuplication
Make the connections shown above
RepeatPlayVideoCassetteTapes41
Press the F.FWD button so that on appears beside
While the real-timecounter is on the screen, press
Real-TimeCounterMemory
While the status display is on the screen, press
TimeSearch43
Within 10 seconds, press the F.FWD button or
Viewing a Slow Motion Picture
SpecialEffectsPlayback
Forward and Reverse Searching SP/LP/SLP
Automatic Rewind, Eject
Automatic Tracking Adjustment
Automatic Playback
Manual Tracking
When
MTSMulti.ChannelTelevisionSoundSystem
Understanding On-ScreenDisplays
Monaural Sound
Press the VCR button, then press the Menu button
Pres the Play button or the Stop button to select
Hi-FiStereoSoundSystem
Please see additional notes
Press the Displayistatusiexit button
Cb O
Press the Play button or the Stop button to selectVCR
Playing a DVD or an Audio CD Before you begin
Press the Power button to turn on the DVD/VCR.HELLO
Playing Disc
Press the Stop button to stop playback. If disc playback is
DiscMenus51
Using the DVD Menus
Using theTitle Menu
Press the DVD button, then press the Menu button.
PausingPlayback
Press the Play button to resume playback
Helful Hints
StepbyStepPlayback53
SlowMotion
FastForward/ReverseSearch
Occ U
Starting Playback at a Specific Track
Will beginplayingautomatically
Title/ChapterPlayback
Starting Playback at a Specific Title/Chapter
Starting Playback at a Specific Disc Time
Press the DVD button, then press the Search Mode
SpecificTimePlayback57
RepeatPlaybackDiscs
Select
Play the Disc to the point at which you want repeated
BRepeatPlayback59
Press the A-B Repeat button to set the starting point a
Playback Begin
While playback is stopped, press the DVD button, then
ProgrammedPlayback
@ U
RandomPlayback61
While the Random screen appears, press the Play but
AudioLanguage/SoundMode
Language
DVD
Menu
CameraAngles
Accessing the Status Display
Displays
ParentalLockLevels
Press the Number buttons to enter the 4-digit password
Press the Number 2 button to select Change Pass
Press the Number 3 button to select Audio
AudioSettings
To change the Digital OUT settings, go to step
Press the Setup button to remove the menu
Audio signals are converted to
Go to to change the settings within AUDIO, SUB
LanguageSettings
Press the Setup button, The setup screen appears
Press the Number I button to select Language
Press a Number button to select a setting
Tamil
LanguageSettingscontd
Tajik
Press the Number 2 button to selectVIDEO
VideoSettings73
Press the corresponding Number button to select a set- ting
LE,,0,.kE
Press the Number 5 button to select Others
OtherMenuSettings
When disc playback is stopped, press the DVD button
Press the corresponding Number button to select an item
Cleaning a Disc
CareandMaintenance75
Cleaning the DVD/VCR
Checling the Laser
DVD/VCR has no power
Remote control will not operate the DVD/VCR
No picture in DVD mode
HelpfulHints
Audio or subtitle language cannot be changed
DVD/VCR switches to VCR mode automatically
Distorted picture
Camera angle cannot be changed
HelpfulHintscontd
Tape cannot be inserted
Line Input mode
Cleaning the Video Heads
Tape cannot be removed
Glossary
From a distance
Specifications81
LimitedWarranty
WHO is COVERED?
Index83
Are provided to help you use or set up your DVD/VCR
RO. Box