USING THE AUDIO OUTPUT JACKS
| ould you like to hear TV pro- |
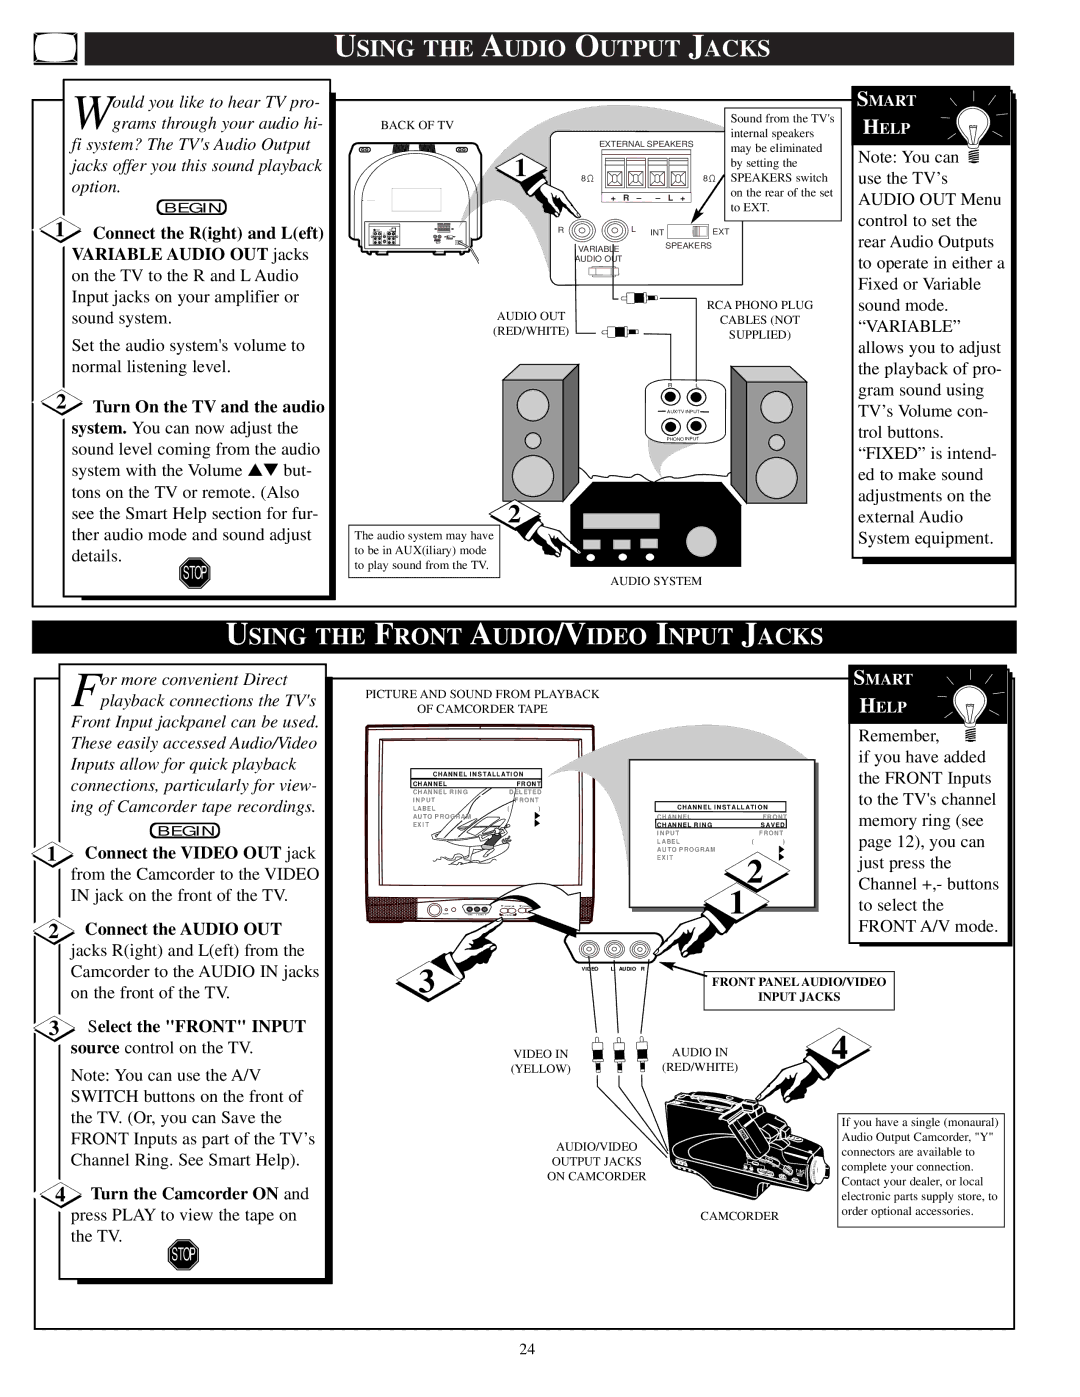
| Wgrams through your audio hi- |
| fi system? The TV's Audio Output |
| jacks offer you this sound playback |
| option. |
| BEGIN |
1 | Connect the R(ight) and L(eft) |
| VARIABLE AUDIO OUT jacks |
| on the TV to the R and L Audio |
| Input jacks on your amplifier or |
| sound system. |
| Set the audio system's volume to |
| normal listening level. |
2 | Turn On the TV and the audio |
| system. You can now adjust the |
| sound level coming from the audio |
| system with the Volume ▲▼ but- |
| tons on the TV or remote. (Also |
| see the Smart Help section for fur- |
| ther audio mode and sound adjust |
| details. |
| STOP |
BACK OF TV |
|
|
|
|
| Sound from the TV's |
|
|
|
|
| internal speakers | |
| EXTERNAL SPEAKERS | |||||
| may be eliminated | |||||
1 |
|
|
|
|
| |
|
|
|
|
| by setting the | |
8 |
|
|
| 8 | SPEAKERS switch | |
| + | R – | – | L | + | on the rear of the set |
| to EXT. | |||||
|
|
|
|
|
| |
R | L INT | EXT |
VARIABLESPEAKERS
AUDIO OUT
AUDIO OUT | RCA PHONO PLUG | |
CABLES (NOT | ||
(RED/WHITE) | ||
SUPPLIED) | ||
| ||
| R L | |
| AUX/TV INPUT | |
| PHONO INPUT |
2
The audio system may have
to be in AUX(iliary) mode to play sound from the TV.
AUDIO SYSTEM
SMART
HELP
Note: You can ![]() use the TV’s AUDIO OUT Menu control to set the rear Audio Outputs to operate in either a Fixed or Variable sound mode. “VARIABLE” allows you to adjust the playback of pro- gram sound using TV’s Volume con- trol buttons. “FIXED” is intend- ed to make sound adjustments on the external Audio System equipment.
use the TV’s AUDIO OUT Menu control to set the rear Audio Outputs to operate in either a Fixed or Variable sound mode. “VARIABLE” allows you to adjust the playback of pro- gram sound using TV’s Volume con- trol buttons. “FIXED” is intend- ed to make sound adjustments on the external Audio System equipment.
USING THE FRONT AUDIO/VIDEO INPUT JACKS
| or more convenient Direct |
| Fplayback connections the TV's |
| Front Input jackpanel can be used. |
| These easily accessed Audio/Video |
| Inputs allow for quick playback |
| connections, particularly for view- |
| ing of Camcorder tape recordings. |
| BEGIN |
1 | Connect the VIDEO OUT jack |
| from the Camcorder to the VIDEO |
| IN jack on the front of the TV. |
2 | Connect the AUDIO OUT |
| jacks R(ight) and L(eft) from the |
| Camcorder to the AUDIO IN jacks |
| on the front of the TV. |
3 | Select the "FRONT" INPUT |
| source control on the TV. |
| Note: You can use the A/V |
| SWITCH buttons on the front of |
| the TV. (Or, you can Save the |
| FRONT Inputs as part of the TV’s |
| Channel Ring. See Smart Help). |
4 | Turn the Camcorder ON and |
| press PLAY to view the tape on |
| the TV. |
| STOP |
PICTURE AND SOUND FROM PLAYBACK |
|
|
| SMART | ||
|
|
| HELP | |||
OF CAMCORDER TAPE |
|
|
| |||
|
|
|
|
|
| Remember, |
|
|
|
|
|
| if you have added |
CHANNEL INSTALLATION |
|
|
| the FRONT Inputs | ||
CHANNEL |
| FRONT |
|
|
| |
CHANNEL RING | DELETED |
|
|
| to the TV's channel | |
INPUT | ( | FRONT | CHANNEL INSTALLATION | |||
LABEL | ) | memory ring (see | ||||
AUTO PROGRAM |
|
| C H A N N E L |
| FRONT | |
EXIT |
|
| CHANNEL RING |
| SAVED | |
|
|
| INPUT |
| FRONT | page 12), you can |
|
|
| LABEL | ( | ) | |
|
|
| AUTO PROGRAM |
|
| just press the |
|
|
| EXIT | 2 | ||
|
|
|
| |||
|
|
| 1 | Channel +,- buttons | ||
POWERVIDEO L AUDIO R | A V SWITCH | CHANNEL |
|
| to select the | |
| VOLUME |
|
|
|
| |
|
|
|
|
|
| FRONT A/V mode. |
3 |
| VIDEO L AUDIO | R |
|
|
|
|
| FRONT PANEL AUDIO/VIDEO | ||||
|
|
|
| INPUT JACKS | ||
|
| VIDEO IN | AUDIO IN |
|
| 4 |
| (YELLOW) | (RED/WHITE) |
|
|
| |
|
|
|
|
|
| If you have a single (monaural) |
|
| AUDIO/VIDEO |
|
|
| Audio Output Camcorder, "Y" |
|
|
|
|
| connectors are available to | |
|
| OUTPUT JACKS |
|
| ||
|
|
|
| complete your connection. | ||
|
| ON CAMCORDER |
|
| ||
|
|
|
| Contact your dealer, or local | ||
|
|
|
|
|
| |
|
|
|
|
|
| electronic parts supply store, to |
|
|
| CAMCORDER | order optional accessories. | ||
|
|
|
| |||
24