HTZ-360DV
Thank you for buying this Pioneer product
Location rear of the unit
Grounding or Polarization
We Want You Listening For a Lifetime
To establish a safe level
Contents
Page
Controls and displays Chapter
Remote control
Controls and displays
Front panel
Controls and displays
Controls and displays Display
2PL
Getting started
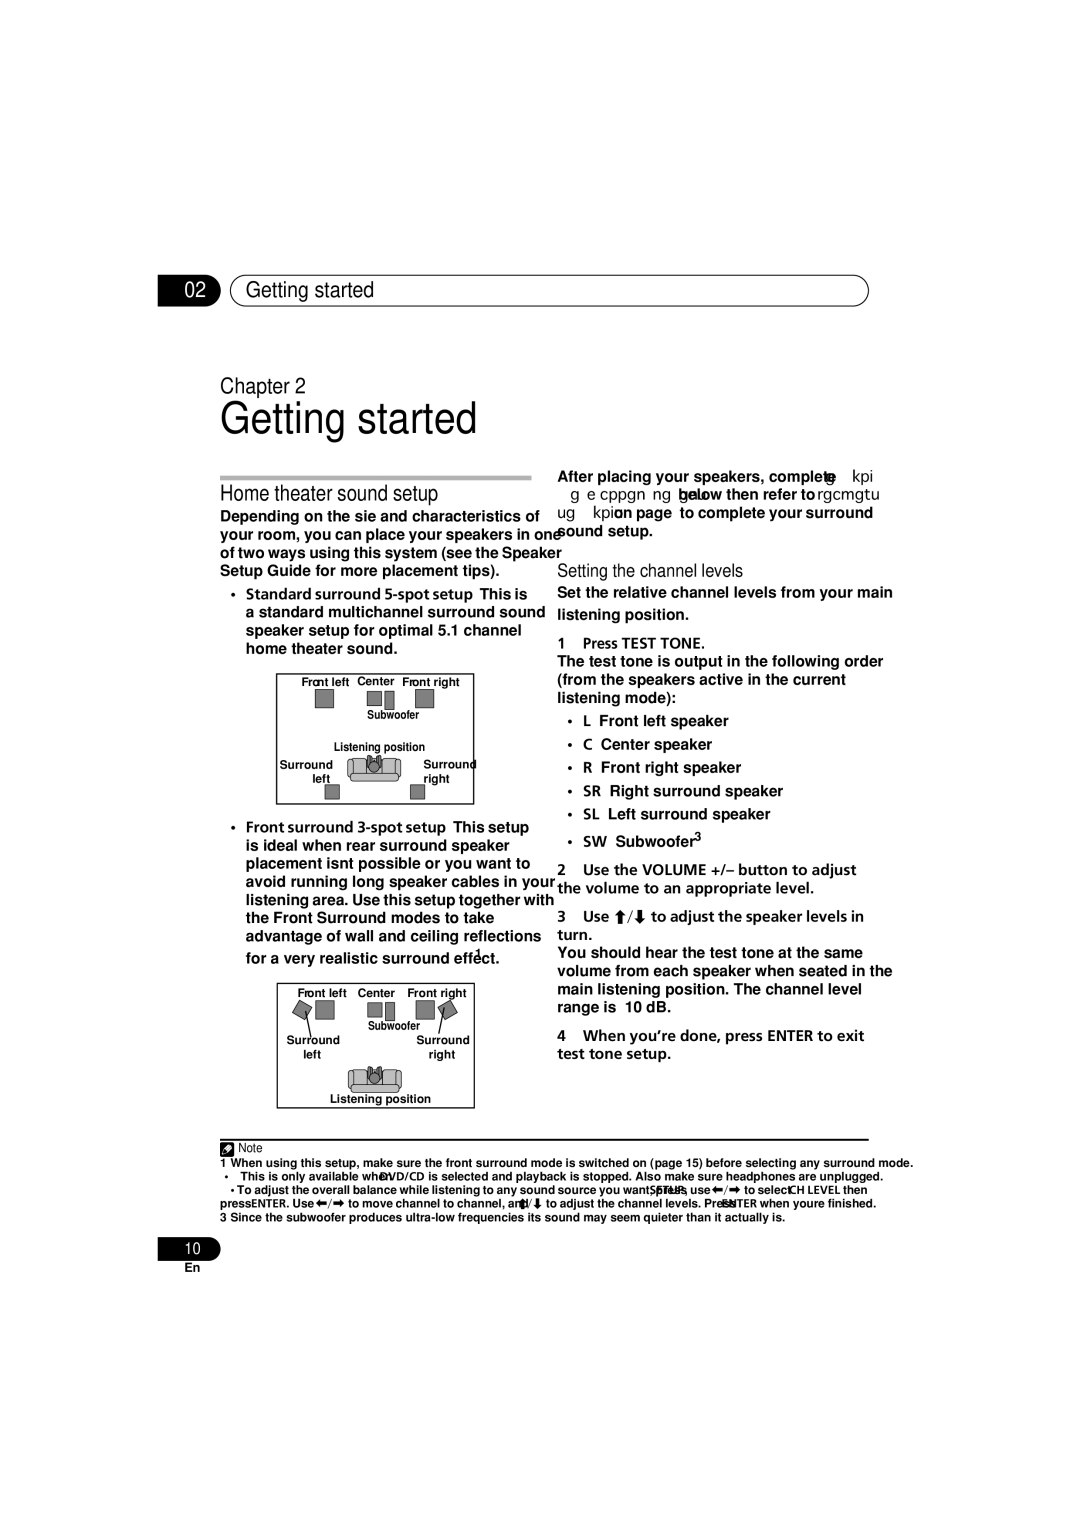
Home theater sound setup
Setting the channel levels
Getting started Chapter
Basic playback controls
Getting started Using the on-screen displays
Playing discs
English Deutsch Français Italiano
DVD-Video disc menus
Getting started
Resume and Last Memory
Video CD/Super VCD PBC menus
Listening to other sources
Listening to station presets
Getting started Listening to the radio
Improving poor FM reception
Getting started Setting the sleep timer
Press Sleep repeatedly to select an option then press Enter
Listening to your system
Auto listening mode
Using Front Surround
Listening to your system Chapter
Listening with headphones
Using the SFC modes
Adjusting the bass and treble
Listening to your system Listening in stereo
Frame advance/frame reverse
Disc playback features
Disc playback features Chapter
Scanning discs Playing a Jpeg slideshow
Select a view option
Disc playback features
Select the thumbnail image for what you want to play
Using repeat play
Looping a section of a disc
Creating a program list
Using random play
During playback, press Home Menu and select ‘Play Mode’
Other functions available from the program menu
Searching a disc Switching subtitles
Switching language / audio channels
English Deutsch Français
During playback or when paused, press Angle to switch angle
Disc playback features Zooming the screen
Switching camera angles
Displaying disc information
USB playback Chapter
Using the USB interface
USB playback
Basic playback controls
Browsing files with the Navigator
USB playback Scanning files
Press Menu
Audio Settings menu
Audio Settings and Video Adjust menus
Audio Settings and Video Adjust menus Chapter
Video Adjust menu
Using the Initial Settings menu
Initial Settings menu
Initial Settings menu Chapter
Video Output settings
Display settings
Initial Settings menu
Language settings
Component Out Interlace
Speakers settings
Initial Settings menu Options settings
Parental Lock
Playing DivX VOD content
About DivX VOD content
Setting/changing the Country/Area code
Displaying your DivX VOD registration code
For the highlighted speaker
Speaker Distance
Use To change the distance
Other connections
Connecting external antennas
Connecting auxiliary audio components
Other connections Chapter
About progressive scan video
Other connections Connecting the S-video output
Connecting using the component video output
Video outputs for a better quality picture.1
Switching the Hdmi audio setting
Other connections Connecting using Hdmi
Resetting the Hdmi connection
Other connections About Hdmi
Additional information Chapter
Disc / content format playback compatibility
Additional information
Disc compatibility table
About DVD+R/DVD+RW compatibility
Additional information
About DivX
DivX video compatibility
About MPEG-4 AAC
Using and taking care of discs
About WMA
Installation and maintenance
Additional information Screen sizes and disc formats
Frequency step setting
Switching off the demo
Dimming the display
See Connecting auxiliary audio components on
Additional information Troubleshooting
Problem Remedy
General
See Video Output settings on
DVD/CD/Video CD player
USB connection
Step setting on page 39 to switch the tuning interval
Tuner
Hdmi connection
Error Messages
Message Description
Setting the Key Lock
Additional information Resetting the system
Using the language code list
Language Language code letter, Language code
Additional information Language code list
Country/Area code list
Country/Area, Country/Area code, Country/Area code letter
Additional information Specifications
DV353 Speaker system
Additional information
Emplacement Panneau arrière
Nous vous remercions d’avoir acheté ce produit Pioneer
Sommaire
Page
Face avant
Commandes et écrans
Chapitre
English Français
Réglage des options de son
Touches de déplacement du curseur
Volume +
Touches DVD Audio
14 13 12
Ecran
Français
Pour commencer
Installation du son Home Cinema
Réglage des niveaux de voie
Lecture d’un disque
Commandes de base pour la lecture
Réglez le volume
Touches Leur rôle
Touches
Reprise de la lecture et mémoire de la dernière image
Menus des DVD-Vidéo
Valider votre choix
Amélioration d’une réception FM de mauvaise qualité
Ecoute de la radio
Ecoute d’autres sources
Mémorisation des stations
Réglage du minuteur de mise en veille
Ecoute de votre système
Mode d’écoute Auto
Utilisation du mode Front Surround
Ecoute de sonorités d’ambiance
Réglage de la tonalité
Ecoute en stéréo
Utilisation des modes SFC
Augmentation du niveau des graves
Examen du contenu d’un disque
Fonctions de lecture de disque
Avance ou recul image par image
Lecture au ralenti
Sélectionnez une option d’affichage
Pendant la lecture du diaporama
Sélectionnez la miniature qui vous intéresse
Utilisation de la lecture répétée
Lecture répétée d’un passage du disque
Pour revenir à la lecture normale, sélectionnez ‘Off’
CD et Super VCD dans un ordre aléatoire.2
Utilisation de la lecture au hasard
Création d’un programme de lecture
Sélectionnez ‘Random’, puis une option
Choix des sous-titres
Recherche sur un disque
Choix de la langue ou de la voie audio
Choix de l’angle de prise de vues
Utilisation du zoom
Affichage des informations du disque
Utilisation de l’interface USB
Commandes de base pour la lecture
Lecture USB
’appareil étant en marche, appuyez sur la touche USB
Lecture d’un diaporama d’images Jpeg
Exploration rapide des fichiers
Examen du contenu des fichiers avec Navigator
Pour reprendre la lecture, appuyez sur lecture.1
Menu Audio Settings
Menus Audio Settings et Video Adjust
Menu Video Adjust
Réglage du paramètre Video Output sortie vidéo
Menu Initial Settings
Utilisation du menu Initial Settings
Réglage Option Ce qu’elle signifie
Réglage
Réglage du paramètre Language langue
Réglage du paramètre Display affichage
Option Ce qu’elle signifie
Enregistrement d’un nouveau mot de passe
Réglage du paramètre Options options
Réglage du paramètre Speakers enceintes
Modification du mot de passe
Lecture du contenu DivX VOD
Propos du contenu DivX VOD
Définition et modification du code de pays/région
Affichage du code d’enregistrement DivX VOD
Utilisez les touches / pour sélectionner une enceinte
Connexion d’antennes extérieures
Autres connexions
Connexion d’appareils audio auxiliaires
Reliez les prises Audio in aux sorties
Propos de la vidéo à balayage progressif
Connexion de la sortie S-vidéo
Connexion à l’aide de la sortie vidéo composante
Guard.2
Utilisation de l’option Hdmi audio
Connexion au moyen de l’interface Hdmi
Réactivation de la connexion Hdmi
Propos de Hdmi
Propos de la lecture de disques DualDisc
Informations complémentaires
Tableau de compatibilité des disques
Cet appareil peut lire les disques DVD+R/ +RW
Compatibilité des vidéos DivX
Propos de la compatibilité des disques DVD+R/DVD+RW
Propos de DivX
Affichage des fichiers de sous-titrage DivX
Propos du format MPEG-4 AAC
Utilisation et précaution d’utilisation des disques
Propos de WMA
Déplacement de l’appareil
Installation et entretien
Problèmes de condensation Conseils d’installation
Régions DVD Vidéo
Annuler la démonstration
Tailles de l’écran et formats de disque
Réglage de l’échelon de fréquence
Réduction de la luminosité de l’écran
Anomalie Action corrective
Guide de dépannage
Généralités
La section Ecoute de sonorités d’ambiance ,
Lecteur DVD/CD/Vidéo CD
Paramètre Video Output sortie vidéo ,
Connexion Hdmi
Syntoniseur
Connexion USB
Changer dintervalle de syntonisation
De dépannage ,
Messages d’erreur
Video Output sortie vidéo ,
Guide de dépannage ,
Utilisation de la liste des codes de langue
Réinitialisation du système
Utilisation de la fonction Key Lock
KEYLOCK, puis appuyez sur Enter
Liste des codes de langue
Liste des codes de pays/région
Caractéristiques techniques
Système d’enceintes S-DV353
English Français
Pioneer Corporation