025 minute guide
Chapter 2:
5 minute guide
Introduction to home theater
Home theater refers to the use of multiple audio tracks to create a surround sound effect, making you feel like you’re in the middle of the action or concert. The surround sound you get from a home theater system depends not only on your speaker setup, but also on the source and the sound settings of the receiver.
This receiver will automatically decode multichannel Dolby Digital, DTS, or Dolby Surround sources according to your speaker setup. In most cases, you won’t have to make changes for realistic surround sound, but other possibilities (like listening to a CD with multichannel surround sound) are explained in Listening to your system on page 27.
Listening to Surround Sound
This receiver was designed with the easiest possible setup in mind, so with the following quick setup guide, you should have your system hooked up for surround sound in no time at all. In most cases, you can simply leave the receiver in the default settings.
•Be sure to complete all connections before connecting this unit to an AC power source.
1 Connect your TV and DVD player.
See Connecting your TV and DVD player on page 13 to do this. For surround sound, you’ll want to hook up using a digital connection from the DVD player to the receiver.
2Connect your speakers and place them for optimal surround sound.
Connect your speakers as shown in Installing your speaker system on page 18.
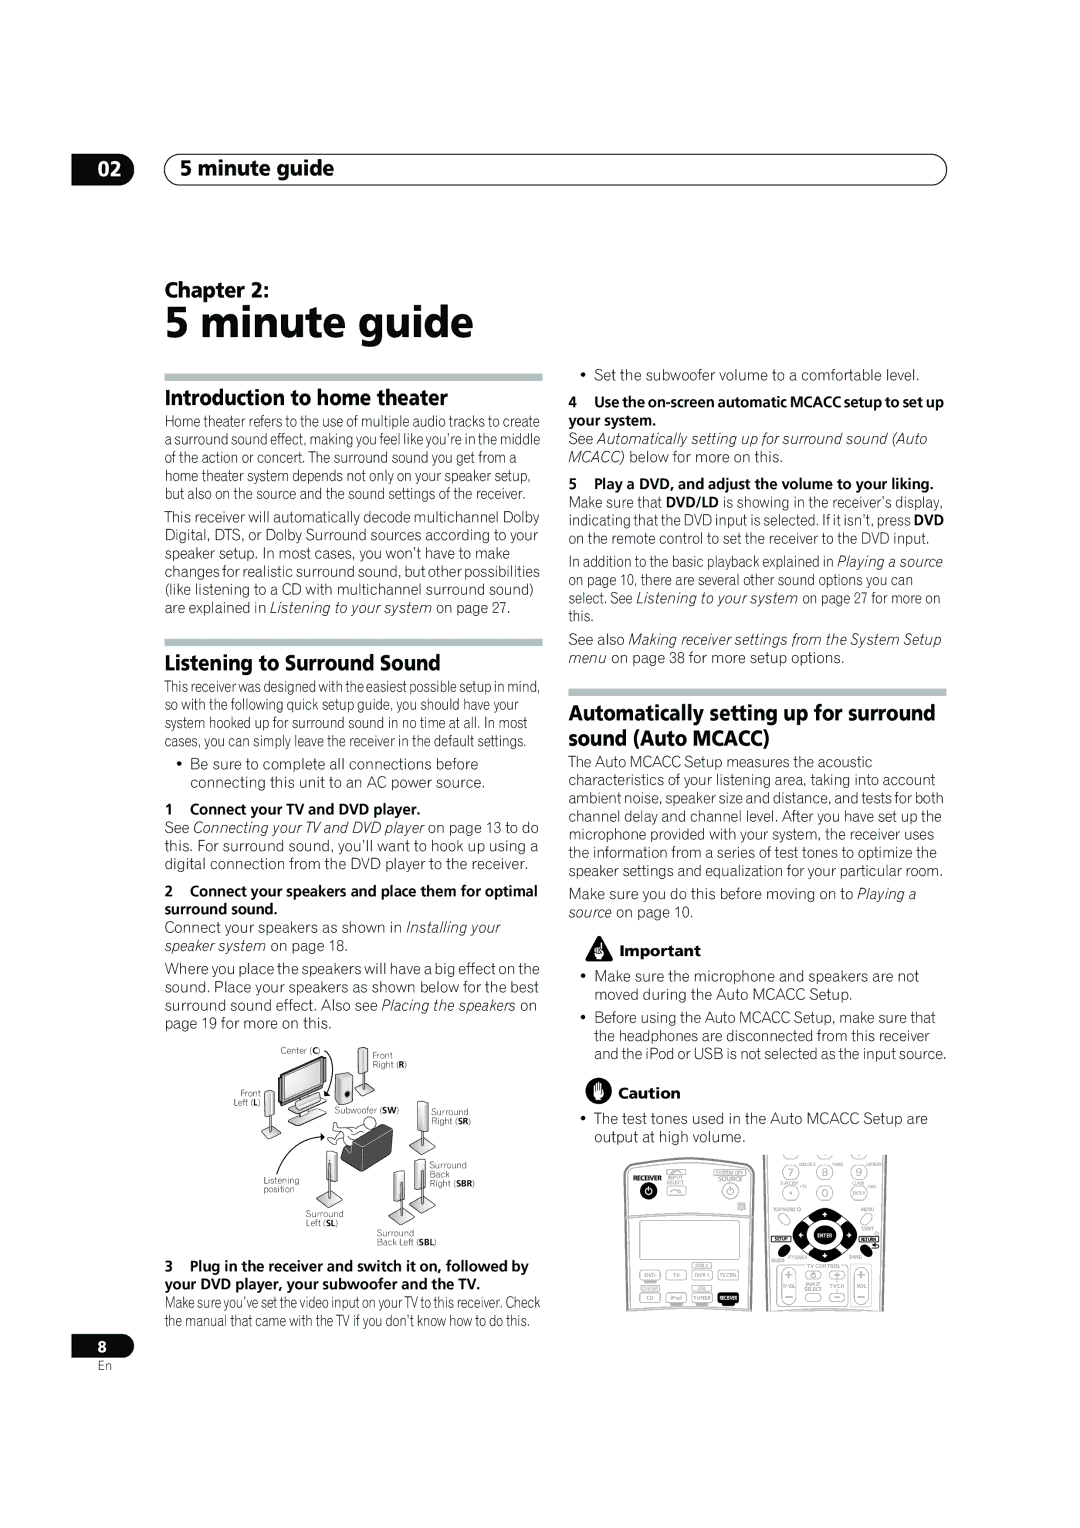
Where you place the speakers will have a big effect on the sound. Place your speakers as shown below for the best surround sound effect. Also see Placing the speakers on page 19 for more on this.
Center (C) | Front |
|
| Right (R) |
|
Front |
|
|
Left (L) | Subwoofer (SW) | Surround |
|
| Right (SR) | |
| Surround | |
Listening | Back | |
Right (SBR) | ||
position | ||
| ||
| Surround | |
| Left (SL) | |
| Surround | |
| Back Left (SBL) |
3Plug in the receiver and switch it on, followed by your DVD player, your subwoofer and the TV.
Make sure you’ve set the video input on your TV to this receiver. Check the manual that came with the TV if you don’t know how to do this.
8
• Set the subwoofer volume to a comfortable level.
4Use the
See Automatically setting up for surround sound (Auto MCACC) below for more on this.
5Play a DVD, and adjust the volume to your liking. Make sure that DVD/LD is showing in the receiver’s display, indicating that the DVD input is selected. If it isn’t, press DVD on the remote control to set the receiver to the DVD input.
In addition to the basic playback explained in Playing a source on page 10, there are several other sound options you can select. See Listening to your system on page 27 for more on this.
See also Making receiver settings from the System Setup menu on page 38 for more setup options.
Automatically setting up for surround sound (Auto MCACC)
The Auto MCACC Setup measures the acoustic characteristics of your listening area, taking into account ambient noise, speaker size and distance, and tests for both channel delay and channel level. After you have set up the microphone provided with your system, the receiver uses the information from a series of test tones to optimize the speaker settings and equalization for your particular room.
Make sure you do this before moving on to Playing a source on page 10.
![]() Important
Important
•Make sure the microphone and speakers are not moved during the Auto MCACC Setup.
•Before using the Auto MCACC Setup, make sure that the headphones are disconnected from this receiver and the iPod or USB is not selected as the input source.
![]() Caution
Caution
•The test tones used in the Auto MCACC Setup are output at high volume.
|
|
|
| DIALOG E | PHASE |
| S.RETRIEVER |
RECEIVER | INPUT |
| SYSTEM OFF |
|
|
|
|
| SOURCE |
|
|
| CLASS | ||
| SELECT |
| D.ACCESS | +10 |
|
| |
|
|
|
|
|
| DISC | |
|
|
|
|
|
|
| ENTER |
|
|
| TOPMENU |
|
|
| MENU |
|
|
|
| TUNE |
|
|
|
|
|
|
| ST |
| ST | T.EDIT |
|
|
| SETUP | ENTER |
| RETURN | |
|
|
|
|
|
| ||
|
| DVR 2 | GUIDE PTYSEARCH TUNE |
| BAND | ||
|
|
| TV CONTROL |
|
| ||
DVD | TV | DVR 1 | TVCTRL |
|
|
|
|
| USB | TVVOL | INPUT | TVCH |
| VOL | |
|
| SELECT |
|
|
| ||
CD | iPod | TUNER | RECEIVER |
|
|
|
|
En