Connecting Your Equipment
Before making or changing the connections, switch off the power and disconnect the power cord from the AC wall outlet.
Connecting Speakers
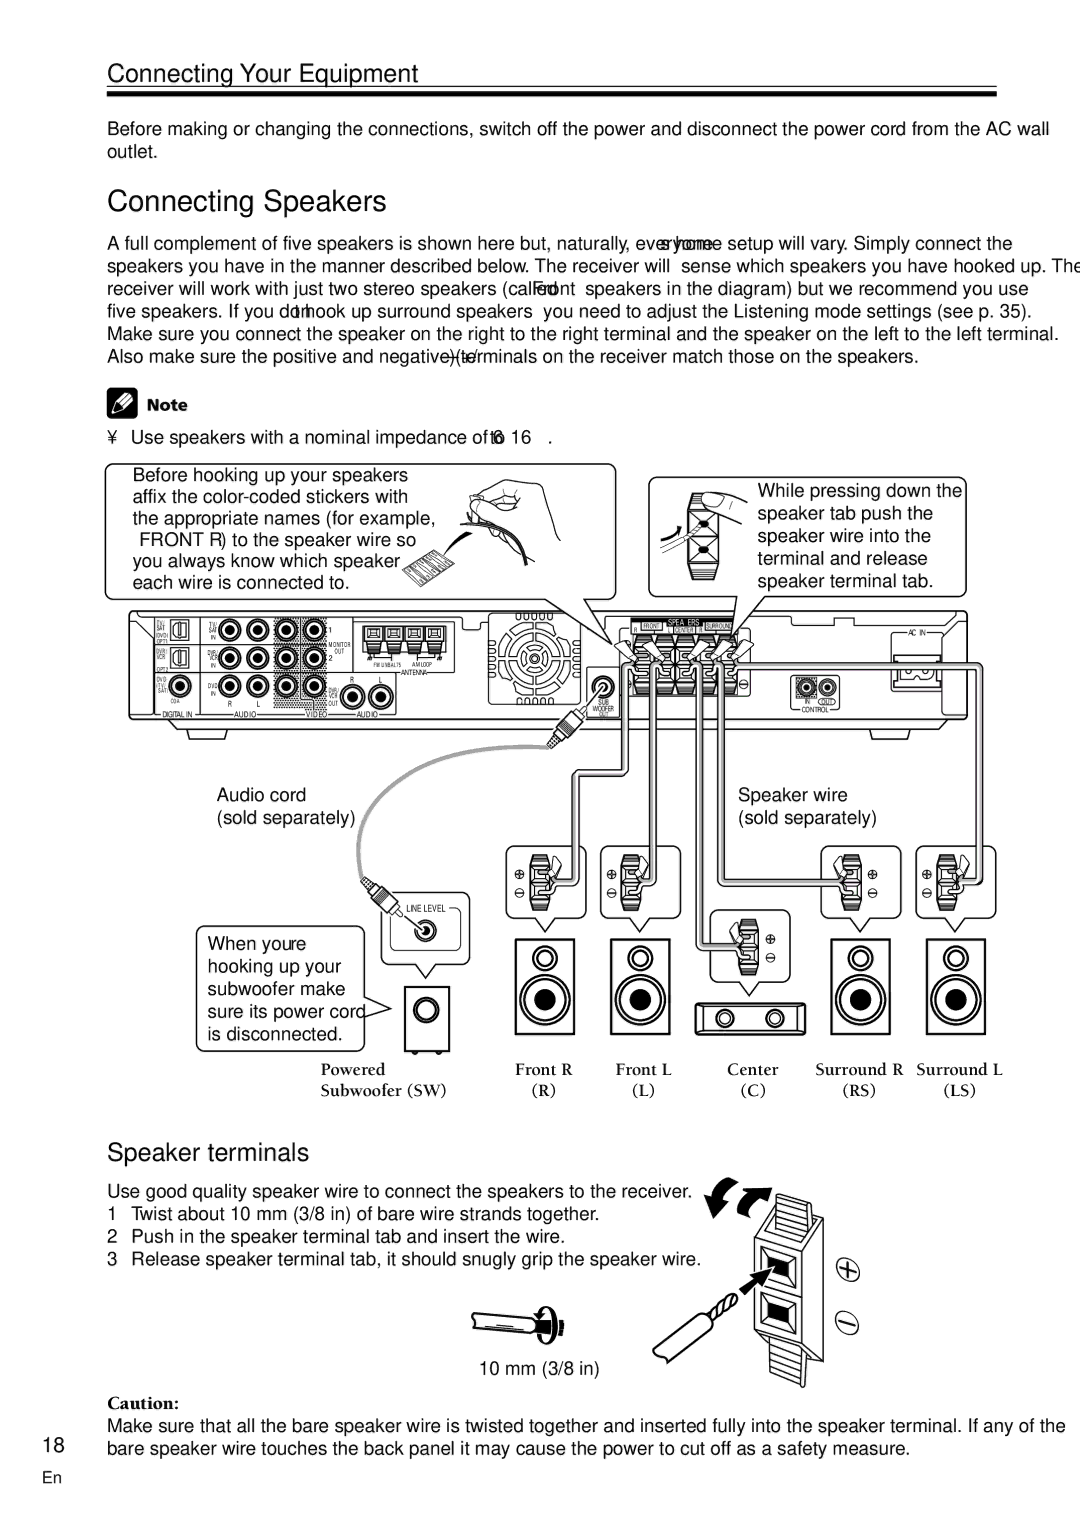
A full complement of five speakers is shown here but, naturally, everyone’s home setup will vary. Simply connect the speakers you have in the manner described below. The receiver will sense which speakers you have hooked up. The receiver will work with just two stereo speakers (called “Front” speakers in the diagram) but we recommend you use five speakers. If you don’t hook up surround speakers you need to adjust the Listening mode settings (see p. 35).
Make sure you connect the speaker on the right to the right terminal and the speaker on the left to the left terminal. Also make sure the positive and negative
• Use speakers with a nominal impedance of 6 Ω to 16 Ω .
Before hooking up your speakers affix the
T V/ |
| T V/ |
| 1 |
|
|
SAT |
| SAT |
|
|
| |
(DVD) |
| IN |
|
|
|
|
OPT1 |
|
| MONITOR |
|
| |
|
|
|
|
| ||
DVR / |
| DVR/ |
| OUT |
|
|
VCR |
| VCR |
| 2 | F M UNBAL75 Ω | AM LOOP |
OPT2 |
| IN |
|
| ||
|
|
|
| ANTENNA | ||
|
|
|
|
| ||
DVD |
| DVD |
| R | L |
|
( T V / |
|
| DVR / |
|
| |
SAT) |
| IN |
|
|
| |
|
|
| VCR |
|
| |
| COA X | R | L | OUT |
|
|
|
|
|
| |||
DIGITAL IN | AUDIO | VIDEO | AUDIO |
Audio cord (sold separately)
SUB
WOOFER
OUT
While pressing down the speaker tab push the speaker wire into the terminal and release speaker terminal tab.
| FRONT | SPEAKERS | SURROUND |
| AC IN |
R |
| L CENTER R |
| L |
IN OUT
CONTROL
Speaker wire (sold separately)
LINE LEVEL
When you’re hooking up your subwoofer make sure its power cord is disconnected.
Powered | Front R | Front L | Center | Surround R | Surround L |
Subwoofer (SW) | (R) | (L) | (C) | (RS) | (LS) |
Speaker terminals
Use good quality speaker wire to connect the speakers to the receiver.
1Twist about 10 mm (3/8 in) of bare wire strands together.
2Push in the speaker terminal tab and insert the wire.
3Release speaker terminal tab, it should snugly grip the speaker wire.
10 mm (3/8 in)
Caution:
ª ·
Make sure that all the bare speaker wire is twisted together and inserted fully into the speaker terminal. If any of the
18bare speaker wire touches the back panel it may cause the power to cut off as a safety measure.
En
